To enable integration between the RUCKUS
One platform and the RUCKUS IoT Controller, the controller must first be added and
authenticated within the RUCKUS One GUI. This process ensures that the controller can
securely communicate with the RUCKUS APs and manage IoT devices effectively.
Prerequisites: Before adding an IoT Controller to your RUCKUS One account,
ensure your RUCKUS One account has enough device networking licenses available; each
IoT Controller added to RUCKUS One consumes 1 license. You can check your overall
subscription utilization on the Administration > Subscriptions > My Subscriptions page. To see a detailed, per-device list of license usage, navigate
to the Administration > Subscriptions > Compliance page, then click the My Account tab in the
Device Networking Licenses tile.
Complete the following steps to add a RUCKUS IoT Controller to your RUCKUS One
account:
From the navigation bar, select
Gateway > IoT
Controller.
The IoT
Controllers page is displayed.
In the upper-right corner of the
IoT Controllers page, click Add IoT
Controller.
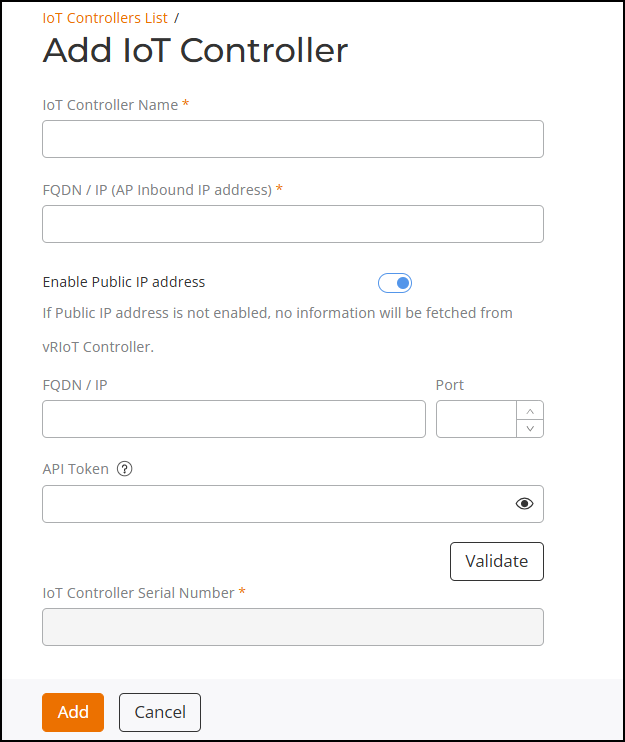
The Add IoT
Controller page is displayed.Adding IoT
Controller
Configure the following:
For IoT Controller Name, enter a user-defined
name for identifying the IoT Controller within RUCKUS One.
For FQDN / IP (AP Inbound
IP address), enter a fully qualified domain name (FQDN)
or the IP address through which APs can reach the IoT Controller.
For Enable Public IP
Address, toggle the switch to configure whether RUCKUS
One can communicate with your RUCKUS IoT Controller through a public IP
address. This option is disabled by default.
For FQDN /
IP, if the Enable Public IP
Address option is enabled, enter the external FQDN or IP
address of the IoT Controller for RUCKUS One to communicate
directly.
For Port,
provide the port number used by the IoT Controller API for
communication.
For API Token, enter the API Token generated
from the IoT Controller to authenticate the RUCKUS One connection.
Note: Refer to the RUCKUS IoT Controller Configuration Guide,
2.4.0.0 for more details.
Click Validate to verify the connection between
RUCKUS One and the IoT Controller using the entered credentials and IP
details.
For IoT Controller Serial
Number:
If Enable Public
IP Address is enabled and the Port and API
Token are valid, the IoT
Controller Serial Number field is grayed out. In
this case, the operation is triggered and completed by clicking
the Validate button.
If Enable Public
IP Address is disabled, the IoT
Controller Serial Number field becomes editable,
allowing you to manually enter the IoT Controller's serial
number.
Note: For more
information on IoT Controller Serial Number, refer to the RUCKUS IoT
Controller Configuration Guide, 2.4.0.0.
Click
Add.
The newly added RUCKUS IoT Controller is displayed in the IoT
Controllers page.