If you have a user that requires temporary access to the network (for example, a company visitor or a temporary worker), you can create a guest pass for that person.
Note: If you need to create guest passes for multiple users, you can create them in bulk. For more information, see
.
Complete the following steps to create a single guest pass.
From the navigation pane, click
Users.
The
Users page is displayed.
Select the
Guest Pass Credentials tab.
If you see the message “Guest cannot be added since there are no guest networks,” click the
Add a Captive Portal network with Guest Pass option.
In the upper-right corner of the
Guest Pass Credentials tab, click
Add Guest.
The
Add Guest Pass form appears
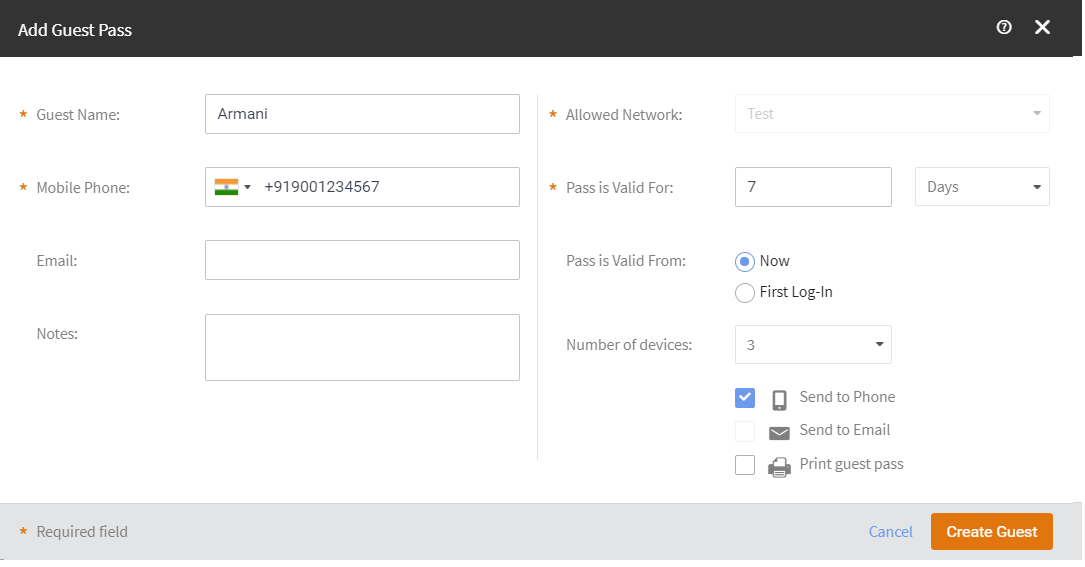
Adding a Guest Pass
Complete the following fields to identify the user of this guest pass:
Guest Name: Type the name of guest.
Mobile Phone: Type the mobile phone number of the guest. The mobile phone number must follow the format:
+ {country code}-{area code}-{phone number}. For example, you can type
+1-408-888-8888.
Note: Based on the browser locale, the default country is displayed for the
Mobile Phone filed.
Email: Type the email address of the guest.
Notes: Type any notes or additional information about the guest.
Allowed Networks: Select a network to which you want this guest to have access. Only managed guest networks appear on this list. If you have not created a managed guest network, this list will be empty.
Pass is Valid For: Select the number of hours or days for which the guest pass will be valid.
Pass is Valid From: Check either
Now or
First Log-in.
Number of Devices: Select the number of devices on which the guest pass can be used simultaneously. In addition to the option of adding a definite number of clients ranging from 1 to 5, you have the option of adding unlimited number clients under the guest.
Specify how you want the guest user to receive the instructions for activating the guest pass. Options include:
Send to Phone: Click to send the guest pass information to the guest's phone via SMS.
Send by Email: Click to send the guest pass information to the guest's email address.
Print guest pass: Click to print a hard copy of the guest pass, which you can give to the guest user.
Note: If you are printing the guest pass, remember to temporarily disable your web browser's pop-up blocker (if enabled).
You can select multiple guest pass delivery methods.
Click
Create Guest.
Ruckus Cloud sends the guest pass information to the guest using the delivery methods you selected. The
Guest Pass Credential page refreshes, and then an entry for the guest pass that you have created appears.