Adding a CLI Configuration Profile
You can add a CLI configuration profile for selected switch models and apply the profile at the venue level. All switches matching the selected models that are added to the selected venue(s) receive the CLI Configuration Profile.
- If you apply a CLI Configuration Profile to a venue, you cannot configure a Regular Profile for the same venue.
- Beginning with the FastIron 09.0.10e release, certain CLI commands have been deprecated. For a list of deprecated CLI commands, refer to the FastIron 09.0.10e for RUCKUS ICX Switches Release Notes.
-
Click Add CLI
Profile.
The Add CLI Configuration Profile page is displayed.Note: These profiles allow you to pre-define CLI configuration for switches. Once defined, these profiles can be applied to one or more venues. Any switch(es) that are in factory default condition joining such venue will inherit the configuration. There is also an additional option to overwrite pre-existing configuration on the switches with the profile configuration.
Add CLI Configuration Profile - Important Notice 
-
On the Models page, enter a profile name in the
Profile Name field. In Filter by switch
model family, filter by switch model family and select the
required models. You can also use the Select All or
Deselect All options as needed.
Note:
- Support is available for ICX 8100 and ICX 8100‑X models. You can select these models, including AV‑capable variants, when creating a CLI Configuration Profile.
- Support is available for the ICX 8200 family. You can select ICX 8200 models, including AV‑capable variants, when creating a CLI Configuration Profile.
The CLI Configuration Profile applies based on the capabilities of the selected switch model. Any CLI settings that the model does not support are not applied.
Add CLI Configuration Profile - Models Page 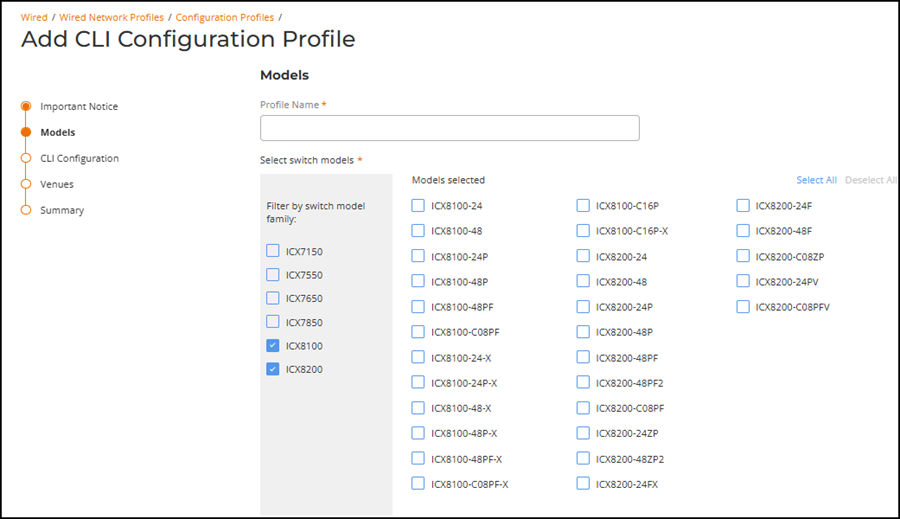
-
On the CLI
Configuration page, add the CLI commands to the CLI
Commands field.
You can type the commands manually, copy and paste the configuration from another file, click the
 icon next to the examples listed on the right, or import the commands
from a file. Ensure that all required command attributes are defined.If you use the Import from file option, note the following:Note:
icon next to the examples listed on the right, or import the commands
from a file. Ensure that all required command attributes are defined.If you use the Import from file option, note the following:Note:- The file format must CSV or TXT.
- The file size cannot exceed 2 MB.
You can enable Override existing switch configuration to remove previous configuration settings from the switch.
Add CLI Configuration Profile - CLI Configuration Page 
-
Define variables to be used in
the CLI commands. You can also customize the configuration at the switch level.
-
Click Add
Variable. The Add
Variable page is displayed.
Adding Variables for CLI Configuration 
-
Configure the
following:
- Variable Name: Enter a name to identify the variable. The name must begin with a letter and may include letters and numbers; special characters are not allowed.
- Variable
Type: Select one from the drop-down menu: String,
IP
Address, or Range.
- If you select IP Address, enter the Start IP Address, End IP Address, and Network Mask Address.
- If you select Range, enter the Start Value and End Value between 0 and 65535.
- If you select String, enter the string in the text field. A string may include letters, numbers, spaces, and special characters $, -, and . (no other special characters are allowed).
- (Optional) Click
Customize to assign the variable values for
each switch. Switches that are onboarded to RUCKUS One and
configured with the CLI profile appear under Online
Devices; they are considered provisioned devices and
cannot be removed.
Switches not yet configured with the CLI profile appear under Devices to be provisioned, where you can customize their values.
Add Variables 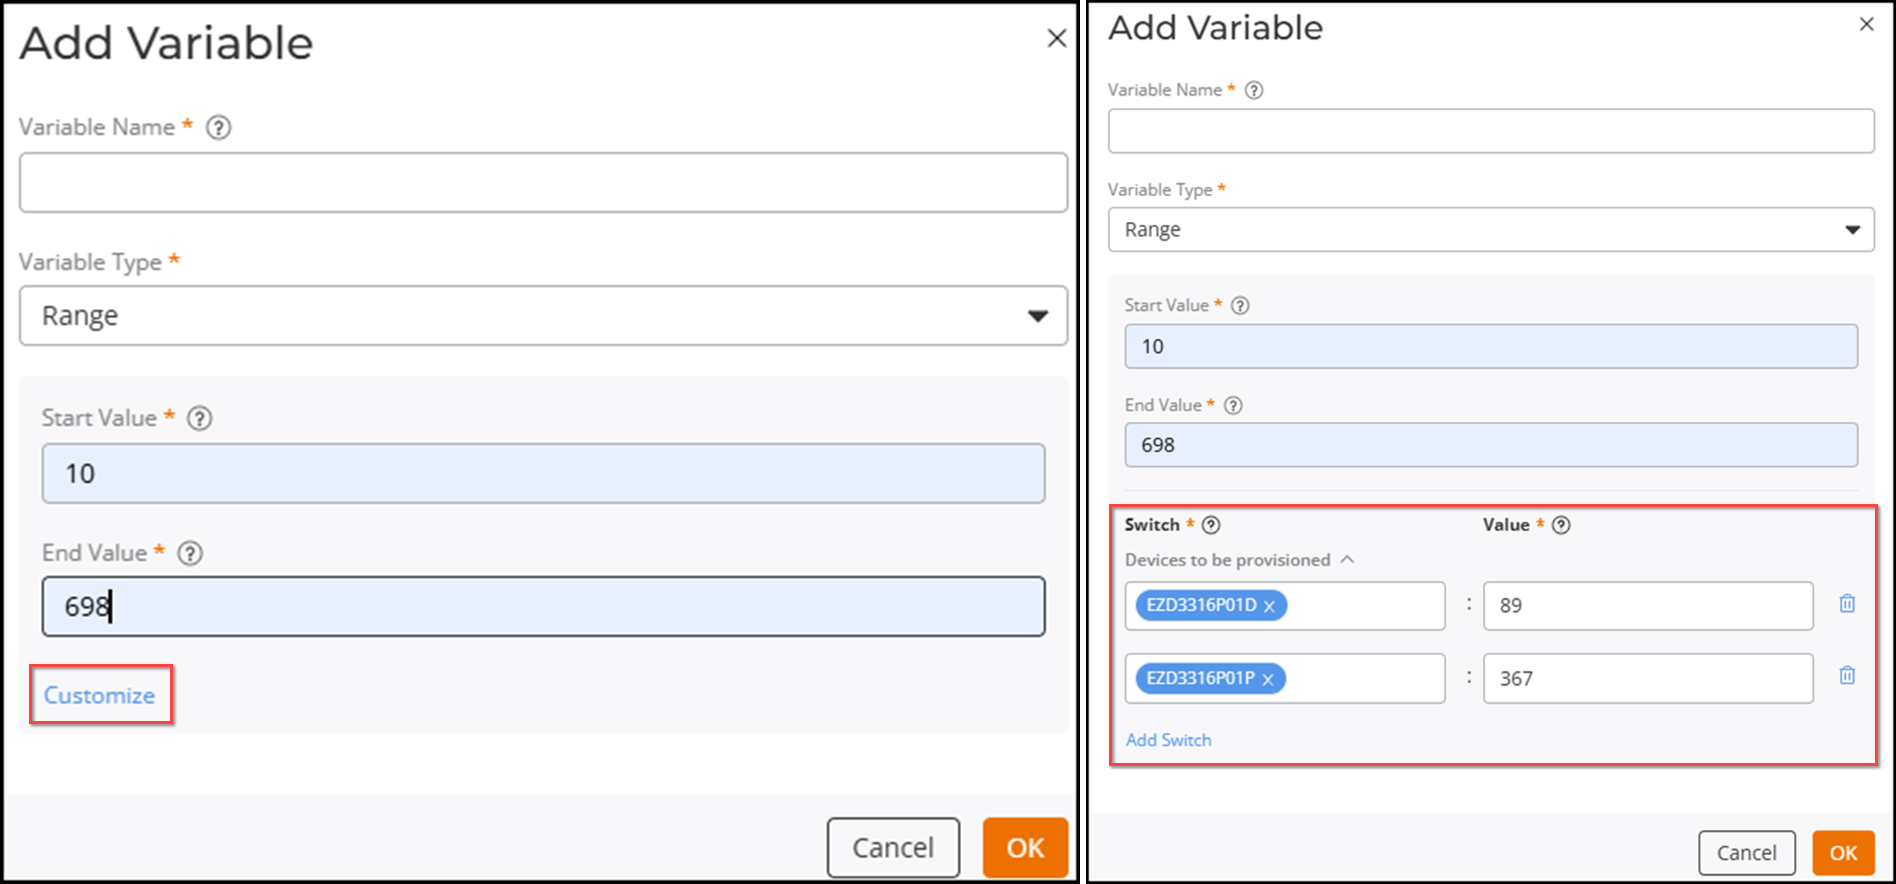
-
Click Add
Variable. The Add
Variable page is displayed.
-
(Optional) In the
Variables tab, you can view all defined variables for
the configuration by clicking All types or view specific variables by selecting Address, Range, and String from the drop-down
menu. Additionally, after you have assigned customized variable values to
switches and applied the profile, a clickable hyperlink appears, allowing you to
view customized variable values for switches and applicable venues.
Edit CLI Configuration Profile: Switch Settings 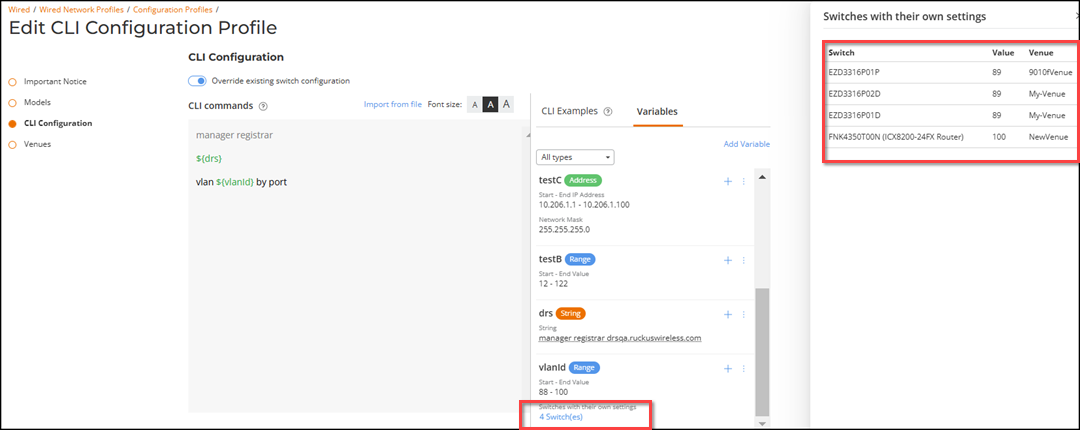
-
On the Venues page, select one or more venues to which the profile must
be applied.
Note: The configuration is applied to all switches of the selected models, including are added to the venue later.
Add CLI Configuration Profile 
-
On the
Summary page, review the configuration details and then
click Add to apply the new profile to the
venue.
Note: The Switch Models field can display up to 25 models, and the Venues field can display up to 10 venues.
Add CLI Configuration Profile  The CLI Configuration Profile is added and displayed under the Configuration Profiles tab.
 -
(Optional) Click Edit if you want to
modify the CLI profile.
Note: While editing the CLI Configuration Profile, the Summary page displays the Added, Changed, and Removed configuration details only if there are differences between the existing configuration and the updated one. If no changes are detected, the change summary is automatically hidden. A numeric count appears next to each category, and clicking the count opens the Change Log sidebar with three tabs: Added, Changed, and Removed. Each tab displays the relevant sections and lists the corresponding changes. The CLI Configuration preview highlights modifications using a visual difference format:
- Newly added values appear with a green background.
- Changed values appear with a orange background, with only the modified part highlighted.
- Removed values appear in red text with a strikethrough, indicating deletion.
Edit CLI Configuration Profile - Summary 
To search for a specific configuration profile, enter the partial or full configuration profile name in the Search field. All matching configuration profiles are displayed. You can filter the list of configuration profiles by Type.
You can sort the list of configuration profiles by profile name, type, or venues by clicking the associated column header.