Managing Device Inventory
You can use the Device Inventory page to view only the devices that you are authorized to access, export device data, and move a device (either to a different venue for the same customer or to a venue under a different customer).
-
From the navigation bar, select
Devices.
The Devices page is displayed, defaulting to the Device Inventory tab.
Devices - Device Inventory Tab 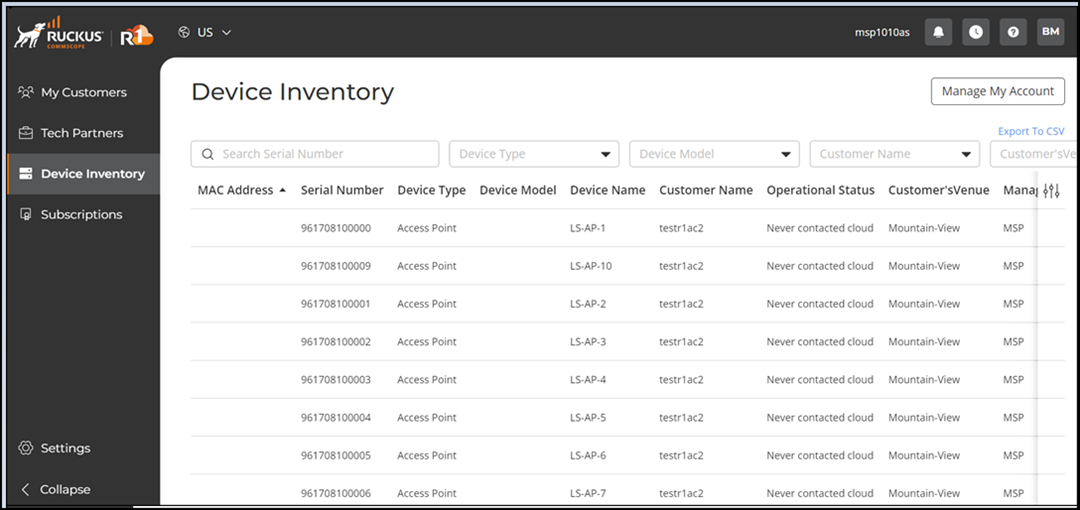
-
Review the following information
displayed on the Device Inventory page:
- MAC Address: Displays the device’s MAC address.
- Serial Number: Displays the device’s serial number.
- Device Type: Displays the type of device, such as Access Point, Switch, or Device.
- Device Model: Displays the device model.
- Device Name: Displays the name assigned to the device.
- Customer Tags: Displays the tags associated with the device.
- Current Firmware: Displays the currently installed firmware version.
- Customer Name: Displays the name of the customer (end customer) associated with the device.
- Operational Status: Displays the current connection status.
- Customer’s Venue: Displays the venue within the customer account where the device is assigned.
- Managed as: Displays whether the device is managed as MSP or in other supported modes.
- Tenant Id: Displays the tenant identifier associated with the device.
You can use the Search option to display only the table entries matching the specified Serial Number and Customer Tags; enter a minimum of two characters. Additionally, you can filter the list of devices by selecting options from the drop‑down menus of the Device Type, Device Model, Current Firmware, Customer Name, and Customer’s Venue fields. Use the Clear Filters option to remove the applied filters.Note: Selecting a Customer Name automatically updates the Customer’s Venue filter to show only the venues for that customer. If you change or clear the Customer Name, the Customer’s Venue filter resets. This ensures the device list remains aligned with the correct customer locations.You can customize which fields appear in the Device Inventory table by clicking the
 icon and selecting or deselecting the desired
column names. Optionally, you can click Reset to
default to restore the default subset of columns.
icon and selecting or deselecting the desired
column names. Optionally, you can click Reset to
default to restore the default subset of columns.You can also use the
 icon to update the Device Inventory table with the most recent device
information. When the Auto Refresh
toggle is enabled (accessible by clicking the adjacent drop-down arrow), the
table refreshes automatically at regular intervals, ensuring that the
displayed device data remains current without requiring manual updates.
icon to update the Device Inventory table with the most recent device
information. When the Auto Refresh
toggle is enabled (accessible by clicking the adjacent drop-down arrow), the
table refreshes automatically at regular intervals, ensuring that the
displayed device data remains current without requiring manual updates. -
(Optional) Click the checkbox
for one or more devices and click Move Device to
relocate the selected devices.
The Move Device sidebar is displayed, listing only the customers that the logged‑in user is allowed to access.
Device Inventory - Move Device 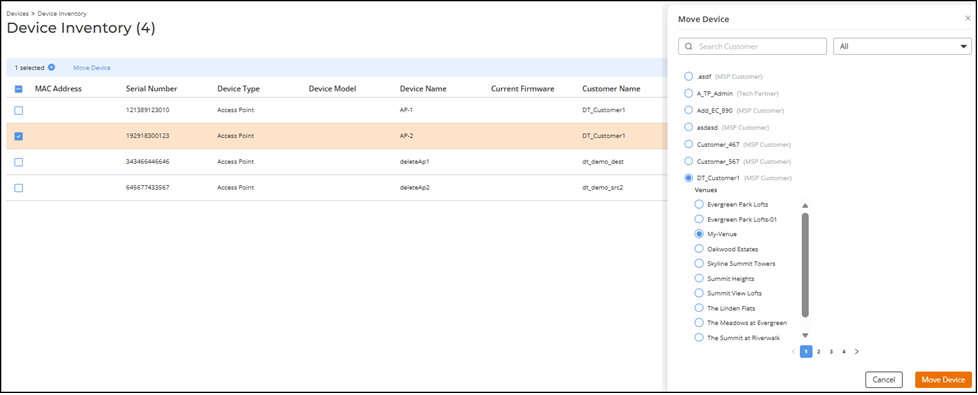
 icon to
view the status of a device move operation. The status indicates whether the move
succeeded or failed and includes the failure reason when available.
icon to
view the status of a device move operation. The status indicates whether the move
succeeded or failed and includes the failure reason when available.