Service Validation
The Service Validation page allows you to perform network connectivity for LAN, WAN, and connectivity to application servers and displays its report.
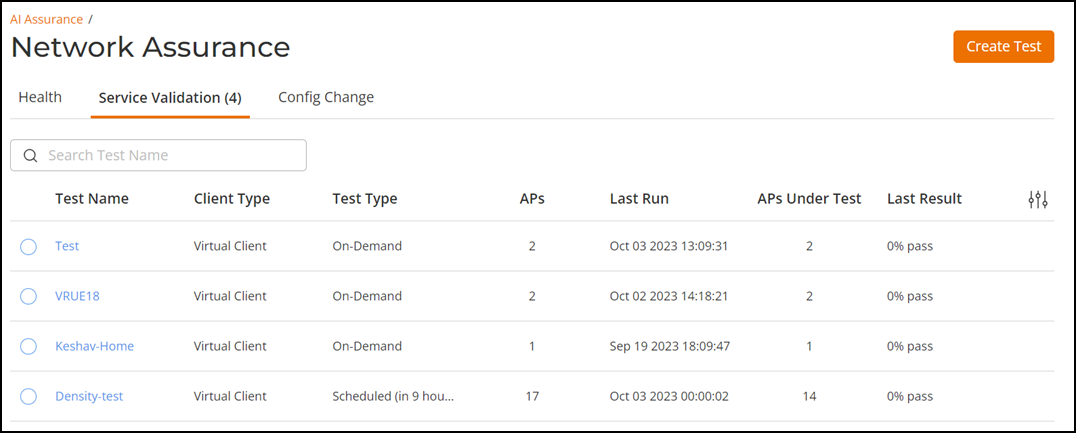
The Service Validation page displays all the test reports in a table for the selected time period in the Date and Time filter.
- Test Name: Displays the name of the test.
- Client Type: Displays the type of client.
- Test Type: Displays the type of the test options such as On-Demand, Daily, Weekly, Monthly. Selecting Daily presents an option to choose the time of the day to run the test. Selecting Weekly presents options to select the day of the week and time for the test while selecting Monthly presents options to select the date of the month and time to run the test.
- APs: Displays the count of APs in the venue.
- Last Run: Displays the latest date and time of the test.
- APs Under Test: Displays the count of APs that participated in the test.
- Last Result: Displays test success as a percentage. For example, if all the APs within the venue passed the test criteria, then 100% success is displayed as the result. If the test is ongoing, then the status "In progress" is displayed. For example, "In progress...(2 of 16 APs tested)"
You can use the search field to limit the APs list based on the search criteria.
You can select the number of test results displayed in the table from the drop-down at the bottom of the table.
Click Test Name attribute. The Service Validation Test Report page is displayed. This page displays detailed information about the test performed. For more information, refer to Service Validation Test Report.
Editing, Cloning, or Deleting a Service Validation Test
- In Service Validation table, select a test by clicking on the radio button beside the test name.
- To edit a service validation
test, click Edit, which is displayed at the top of the
table. The Edit Test page is displayed. This allows you
to edit the existing test settings and run the test with new settings.
- In the Edit Test page, configure the new settings and click Apply. To know more about settings, refer to Creating a Service Validation Test. After the test is created, it is displayed in the table on the Service Validation page.
- Run the created test, refer to Running a Service Validation Test.
- To clone a service validation test, click
Clone, which is displayed at the top of the table.
The Clone test dialog box is displayed.
- In the Clone test dialog box, enter the name for the test and click Save to save the test with the same settings and a new name.
- Run the created test, refer to Running a Service Validation Test.
- To delete a service validation test, click
Delete, which is displayed at the top of the table.
A delete confirmation message dialog box is displayed.
- In the delete confirmation message dialog box, click Delete test to delete the test. The deleted test name will be removed from the service validation table.
Creating a Service Validation Test
Complete the following steps to create a service validation test:
- On the Navigation bar, click . The Service Validation page is displayed.
- Click Create Test. The
Create Test Settings page is displayed.
Settings Page (Upper Portion only) 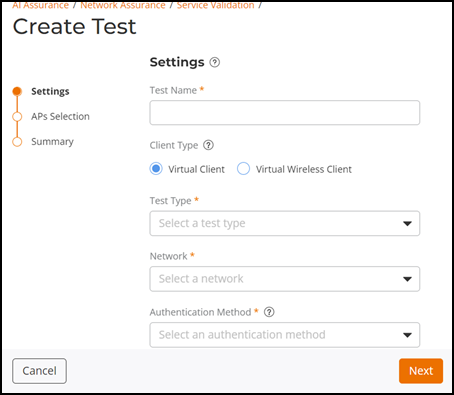
- In the Settings page,
complete the following fields:
- Name: Enter a name for the test.
- Client
Type: After you select one of the following options from
the drop down, the service validation test cannot be modified. You can
however create another test or clone this test to change the client
type.
- Virtual Client: The target AP to be tested will itself emulate as a Wi-Fi client and test the connection stages, without any actual RF transmission over the air. The benefit of this option is that Service Validation tests for the non-wireless portion of the network (e.g. DHCP, RADIUS, DNS, etc.) and can be simultaneously tested quickly over a large number of APs with no impact on existing Wi-Fi services.
- Virtual
Wireless Client: There will be actual RF
transmissions over the air. For every target AP to be tested, a
corresponding "station AP" is selected. The station AP is a
neighboring AP with the best signal strength, and during the
test, this station AP will behave as a station (i.e. a Wi-Fi
client) and wirelessly connect to the target AP, just like a
regular Wi-Fi client, for the test. The benefit of this option
is that the Service Validation test will comprehensively cover
both wireless and wired portions of the network. However, during
this test, the station AP may need to switch its operating
channel to be the same as the target AP. This change in channel
may cause some disruptions to the end user Wi-Fi experience
(e.g. during video calls). Thus, when Virtual Wireless Client is
selected, the test procedure will be done one AP at a time to
minimize disruption to the network, resulting in a longer test
duration compared to the Virtual Client option.Note: Only a neighbor on the same radio band can be used as the station AP. For example, if AP-1 has its 2.4 GHz radio turned off, it will not be used as the station AP for AP-2 even if AP-1 is the closest to AP-2 when the test is run on 2.4 GHz.
- Test Type: Select a test type from drop down on-demand, daily, weekly, or monthly.
- Network Type: Select a network from the drop down.
- Authentication
Method: Select an authentication method from the drop
down. By default, for the selected authentication method the
Pre-Shared Key is configured using the
exisiting configured password. For some authentication methods, you have
to enter username and password in the prompted field.Note: The following authentication methods are not supported:
- 802.1X with EAP-TLS and EAP-SIM
- Authentication with WEP/WPA3 encryption
- DPSK
- Hotspot 2.0 Access/Onboarding
- MAC authentication
- OWE
- Social Media Login
- WISPr with external service provider
- Radio Band: Select the
radio frequency that you want to test the APs at - options include 2.4
GHz, 5GHz, and 6 GHz. Note: 6 GHz is not supported for Virtual Client type.
Settings Page (Lower Portion) 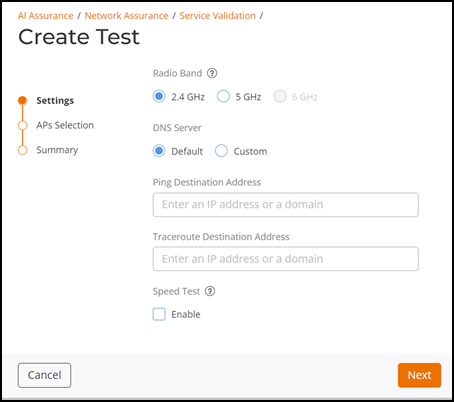
- DNS Server: Select a DNS server default or custom. If you select custom, enter an IP address in the displayed field beside custom option.
- Ping Destination Address: Enter the IP address (internal or external) or URL of the ping destination.
- Traceroute Destination Address: Enter the IP address or URL of the traceroute destination.
- Speed Test: This option checks the test speed using speedtest.net servers. Select the check box to enable this option.
- Click Next. The AP selection page is displayed.
- Select the APs you want to include to the test from the network. You can use the search option to search and select the required AP.
- Click Next. The Summary page is displayed.
- Review the settings and click Create to save the test configuration. After the test is created, it is displayed in the table of the Service Validation page.
- Run the created test, refer to Running a Service Validation Test.
Running a Service Validation Test
- On the Navigation bar, click . The Service Validation page is displayed.
- In the service validation table, select the Test you want to run and click Run Now, which is displayed at the top of the table.
- After the test is completed, the test result is displayed in Last Result column. Click Test Name attribute. The Service Validation Test Report page is displayed.