Adding or Editing VLANs
- From the
Dahsboard, click Switch
Configuration.
-
In the Switch Configuration Profiles page, Click Add Switch Configuration Profile.
- In the General Properties, enter the profile
name and description and the click Next.
- In the VLANs tab, complete the
following.
- VLAN ID: The VLAN ID.
- VLAN Name: The VLAN name.
- IPv4 DHCP Snooping: Toggle
the switch to ON. By default, the switch is turned OFF.
- ARP Inspection: Toggle the
switch to ON. By default, the switch is turned OFF.
- IGMP Snooping: Select
Active, Passive, or
None.
- Multicast Version: Select a multicast version.
- Spanning tree Protocol: Select spanning tree
protocol: RSTP, STP or
None.
Adding VLAN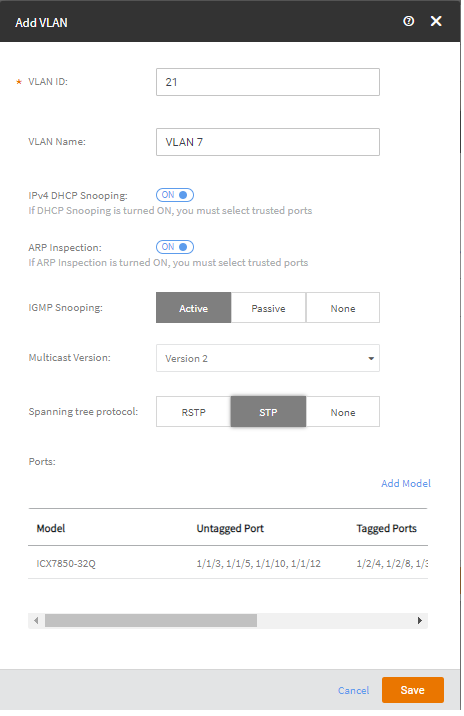
- In the VLANs tab, complete the following.
- VLAN ID: The VLAN ID.
- VLAN Name: The VLAN name.
- IPv4 DHCP Snooping: Toggle the switch to
ON. By default, its turned
OFF.
- ARP Inspection: Toggle the switch to
ON. By default, its turned
OFF.
- IGMP Snooping: Select
Active, Passive, or
None.
- Multicast Version: Select a multicast version.
- Spanning tree Protocol:
Adding VLAN - Click Save to return to
the Switch Configuration Profile dialog box.
- Click Default VLAN Settings to add configure the default
VLAN.
- Enter the default VLAN in the VLAN ID field.
- Select the spanning tree protocol as RSTP,
STP or None.
- Click Save to return to the Switch
Configuration Profile dialog box.