Managing Pending Switch Assets
The Pending Assets feature enables Managed Service Provider (MSP) accounts to view, import, and claim unassigned switches before associating them with end‑customer venues. This feature provides visibility into purchased devices and supports controlled onboarding.
- This feature applies only to switch assets in MSP accounts.
- Switches in Pending Assets do not consume licenses. Licenses are required only when devices are claimed to an end‑customer venue. If sufficient licenses are unavailable, the system blocks the claim action.
- In MSP accounts, if you delete a switch from an end‑customer venue, the system does not return the switch to the Pending Assets table.
-
Click the Switch
sub-tab.
The page displays the following information:
Devices - Pending Assets - Switch 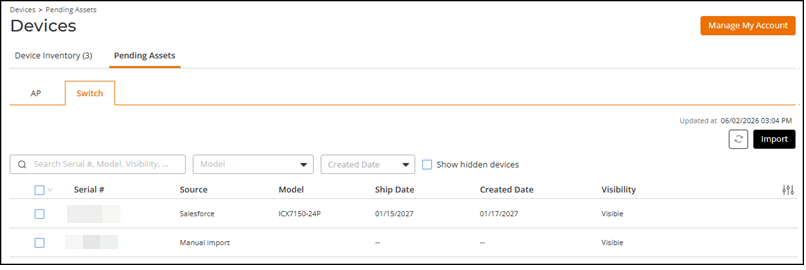
- Serial #: Displays the manufacturer‑assigned serial number that uniquely identifies the switch.
- Source: Displays the origin from which the switch record was added, such as Salesforce or Manual import (CSV).
- Model: Displays the hardware model of the switch.
- Ship
Date: Displays the shipment date of the switch as provided
by the originating system.Note: The Ship Date is populated only for devices synced from Salesforce.
- Created
Date: Displays the date on which the switch record was
first added to Pending Assets.Note: The Created Date is populated only for devices synced from Salesforce.
- Visibility: Displays whether the switch is visible or
hidden.Note: Salesforce data takes precedence over manually imported data, and fields such as Model, Ship Date, and Created Date are updated when a duplicate device exists.
You can use the Search option to display only the table entries matching the specified Serial #, Model, Visibility, or Source; enter a minimum of two characters. Additionally, you can filter the list by selecting one of the options from the Model drop‑down menu and the Created Date filter. The Model drop‑down list displays the available models, and the Created Date filter enables you to select a predefined or custom date range. Click Clear Filters to reset the filters. The Created Date filter then resets to All Time if it was changed to another date option. You can sort the list by clicking the associated column header.
You can customize which fields appear in the table by clicking the
 icon and selecting or deselecting the desired column names. Drag and drop
individual column names up or down the list to customize the left‑to‑right
column display in the table. Optionally, you can click Reset to
default to restore the default subset of
columns.
icon and selecting or deselecting the desired column names. Drag and drop
individual column names up or down the list to customize the left‑to‑right
column display in the table. Optionally, you can click Reset to
default to restore the default subset of
columns. -
(Optional) Click the
 icon to reload the latest pending asset information.
Refreshing the list syncs data with Salesforce. This operation adds newly discovered switches and updates existing records, including those previously added through manual CSV import.
icon to reload the latest pending asset information.
Refreshing the list syncs data with Salesforce. This operation adds newly discovered switches and updates existing records, including those previously added through manual CSV import. -
(Optional) Claim one or more
switches by clicking the associated checkbox(es) and then clicking Claim
Device.
The Claim Device sidebar is displayed.
Claim Device 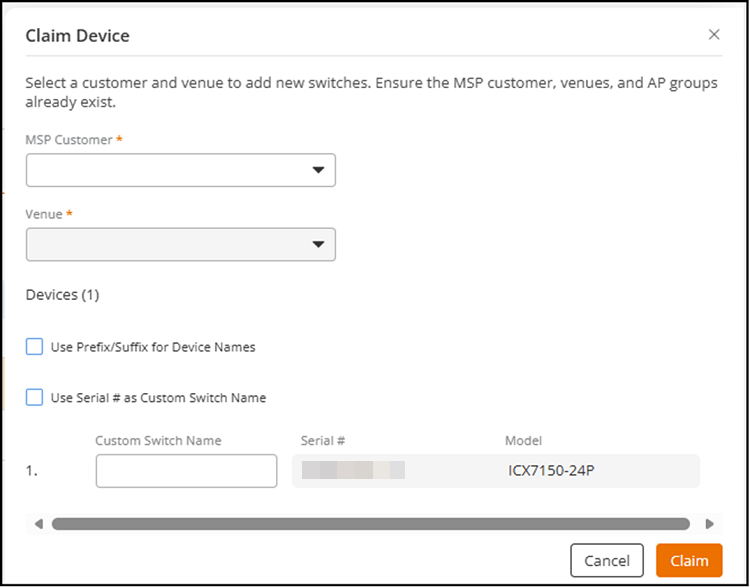
-
(Optional) Click Import.
The Import from file sidebar is displayed.
Complete the following steps to import Pending Switch Assets:
-
Click the
 icon to view the import status.
After an import operation completes, the Activities sidebar displays the import result, including the number of pending assets imported successfully and the number that failed. When failures occur, you can download a detailed error report directly from the corresponding activity notification.Note: Reports are also available for download by clicking Manage My Account and selecting .
icon to view the import status.
After an import operation completes, the Activities sidebar displays the import result, including the number of pending assets imported successfully and the number that failed. When failures occur, you can download a detailed error report directly from the corresponding activity notification.Note: Reports are also available for download by clicking Manage My Account and selecting .
-
Click the