Getting to Know the Dashboard

The Dashboard is the first page that appears after you log in to the Ruckus LTE AP Management portal. The Dashboard displays both LTE and WiFi alarms, venues, APs, and users.

Note: LTE AP support is available only on the US-based LTE AP Management version. This is different from the US-based Ruckus Cloud Wi-Fi.

The Wi-Fi clients widgets (circle marks) appears on the Dashboard only when there is a Wi-Fi configuration and/or a Wi-Fi license purchased.

Table 1. Dashboard Elements
Number Box Name Description
1 Alarms

Displays the number of uncleared alarms that are generated on your Ruckus LTE networks. When no alarms are generated, the message No Active Alarms appears when you click Alarms.

To view details of the uncleared alarms Expand. The following information pertaining to active alarms is displayed.
  • Start Time: Displays when the alarm occurred in the date (MM/DD/YYYY) and time (00:00 hours) format. When you mouse-over, it displays how many days ago the alarm occurred. The latest alarm appears on the top of the column. Click the header to sort this column.
  • Severity: Displays the severity of the alarms with the severity icons as shown in the following image.
    Alarm Icons
    Click the header of the column to sort it by the alarm type.
  • Description: Displays the alarm ID and the description of the errors or conditions. Click the header of the column to sort it by date.
  • Source: Displays the source AP if you have a valid license. Click the AP name to go to the Overview page and view all the alarms for the AP. The active alarms on the Access Point-> Overview page appear as shown the following image.
    Active Alarms
    • Green indicates that everything is operating normally.
    • Red indicates that some issues have been found. Click the double-down caret icon at the end of the status message to learn more about the issues.
    • Yellow indicates that the wireless network service is degraded. Click the double-down caret icon at the end of the status message to learn more about the issue or issues causing the degradation.
  • Identifier: Displays the MAC address of the AP.
  • To clear an alarm from the summary table, click the Clear Alarm check box.
  • Click Export to CSV to export information pertaining to all the active alarms to a .csv file.
  • Click Clear All to clear all active alarms.
For the alarms pertaining to failed tasks display action overflow menu (three vertical dots) icon.
Alarms with Actions Menu
When clicked on the action menu, the following options are displayed.
  • Reboot AP & Retry: Reboots the AP and retries the task.
  • Facory Reset AP & Retry: Resets the AP to factory defaults and retries the task.
  • Clear: Clears the alarm.
  • Contact Support: Opens the Ruckus Support page.

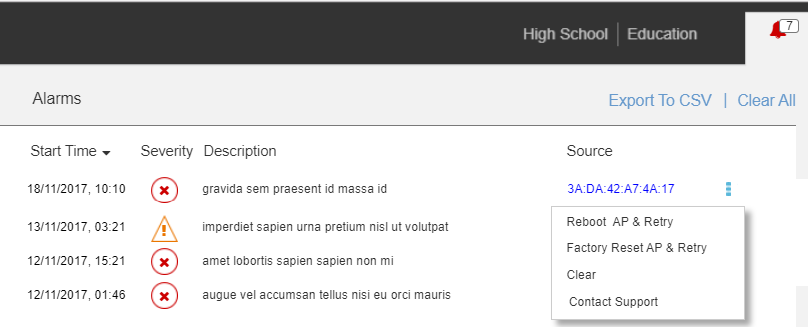
Alternatively, click the bell icon on the top-right corner to view alarm details. A resizable pop-up window appears displaying the alarm details. Click the bottom-left corner of the Alarms window to resize it.

2 Venues Displays the number of venues that have been configured in your LTE AP Management account.
  • To view a summary of the venues, including their locations, number of networks, number of APs, and number of active wireless clients, click Expand in the bottom-right corner of the Venues box.
  • To view or edit the settings of a venue, click the venue name in the summary table.
  • To view the Venues page, click Venues.
3 APs Displays the number of LTE and Wi-Fi APs in separate widgets (circle marks) that have been added to the LTE AP Management account. If there are no Wi-Fi and LTE APs, the values are displayed as "0", circled in gray. If there are APs, the respective values are circled in green.
  • To view a summary of the APs, including their names, statuses, models, IP addresses, serial numbers, MAC addresses, venues in which they are deployed, mesh roles, number of active clients, click Expand in the bottom-right corner of the APs box.
  • To view the APs page with LTE as the default tab, click APs.
  • To view the APs page with the WiFi tab as the default, click WiFi.
4 Clients Displays the number of LTE and Wi-Fi clients that are currently connected to managed APs, inside a widget (circle mark). If there are no Wi-Fi and LTE clients, the value is displayed as "0", circled in gray. If there are users, the respective values are circled in green.

Clicking the Clients link displays the Users page with LTE as the default tab and the LTE user details are displayed. If one of the previous conditions exist, the WiFi widget is displayed along side the LTE widget. To view the Users page with the WiFi tab as the default, click WiFi.

In the grid that displays the client details, primary sorting is based on the number of clients in a venue and secondary sorting is based on the number clients in an AP. The venue with the highest number of clients appears in the top most row and proceeds in descending order. Clicking the row displays the relevant venue or AP.

Note: Unlike WiFi, the LTE tab displays only the number of currently connected clients, per venue.
5 Essential shortcuts Displays shortcuts for the following basic tasks:
  • Add Venue: Click to open the screen for adding a venue, and then follow the instructions in Adding a Venue.
  • Add AP: Click to open the screen for adding an AP, and then follow the instructions in Adding an AP.
  • Add Network: Click to open the screen for adding a network, and then follow the instructions in Creating an LTE Network.
6 Map Displays venue location markers within the Google map.
Note: References to the name of an object managed by the Ruckus LTE AP Management portal (Venue, AP, Network, Client) display in blue to represent a link to the detail page of the object. For example, the MAC address under the Alarms on the Dashboard links to the AP details page.

Color-coding of Numbers for Venues, APs, and Clients

The segmented color lines around the numbers of venues, APs and clients indicate the statuses of the venues and APs.

  • Green: Operating normally
  • Red: Requires attention
  • Grey: Remains in setup mode