Using
RUCKUS LTE AP Management, you can configure a venue profile with advanced LTE settings for optimal resource management.
Follow these steps to configure a venue profile.
On the Dashboard, click
Venues.
The Venues page appears displaying the existing venues.
Select a venue to configure
advance settings.
The Venue Overview page appears.
Locate
LTE Settings under
Venue Settings and click
Edit.
The
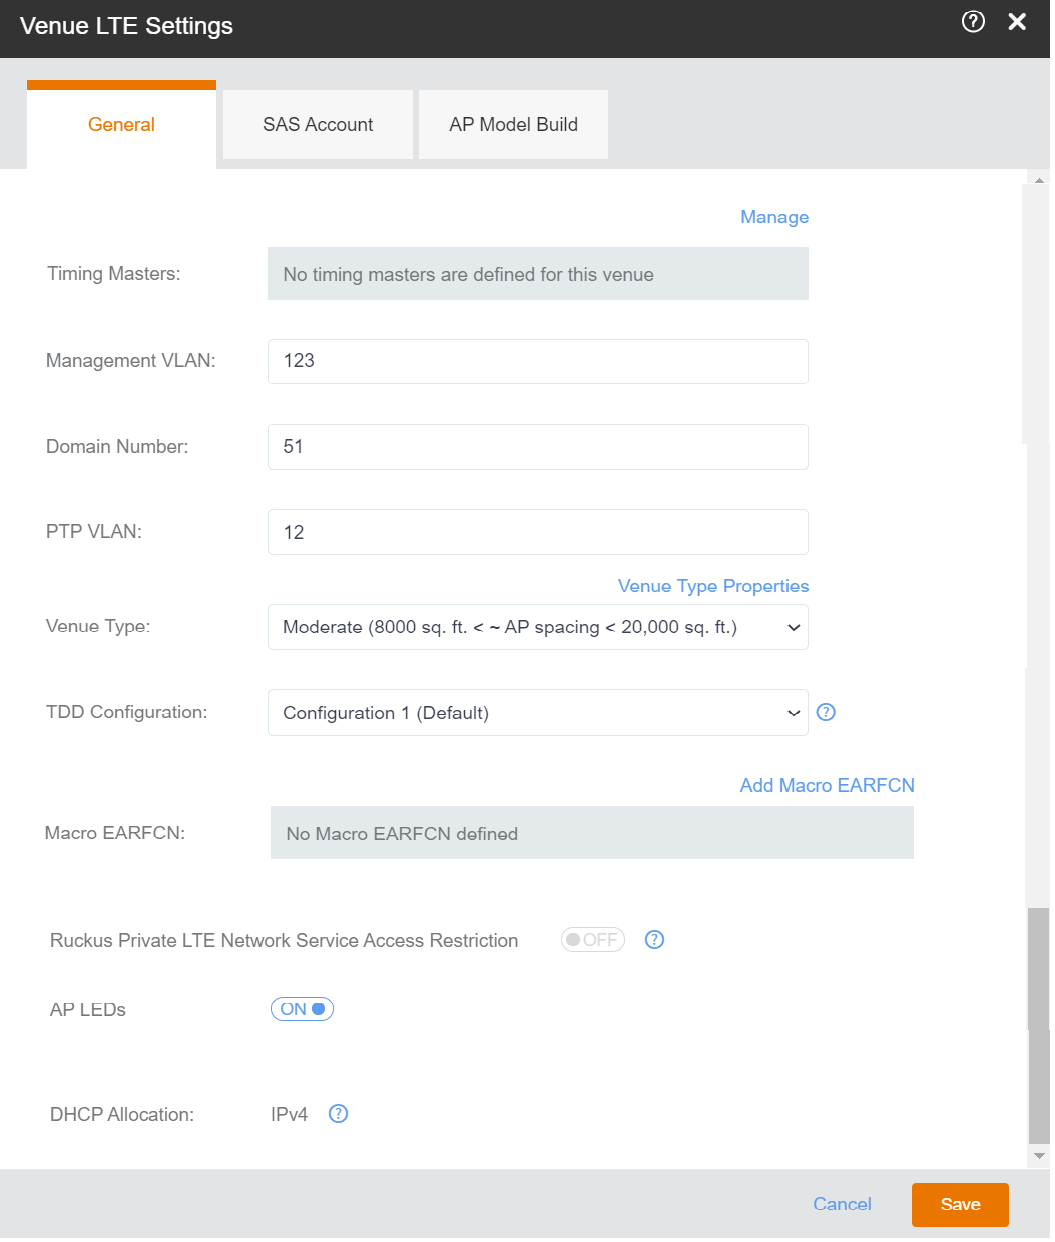
Venue LTE Settings dialog box appears.
Venue LTE Settings
To configure Timing Masters, click
Manage.
The Manage
Timing Masters dialog box appears. By default, the APs tab opens.
Note: You can configure up to
6 APs or external device as the Timing Master for a venue.
Use these instructions to
configure Timing Masters:
Select up to 6 APs to configure
them as Timing Masters.
To locate an AP, enter
the name of the AP in the Search
box and click the magnifying glass icon to run a
search.
Click Save to
configure the APs as Timing Masters.
The LTE settings are
updated.
Click the External Devices tab, select up to 6 external devices
and click Save
to configure them as Timing Masters.
To add an external
device, click Add
Device. The Add
Device dialog box appears. Enter the IPv4 address
of the external device in the Timing Master
Device IP field and click OK.
Note: The valid Timing Master format namely
IPv4 or IPv6 is derived from the DHCP allocation that was
defined for the venue.
Click Edit
to change the IP address of an external device.
Click Remove to remove an external device.
(Optional) Modify the domain number for the venue in the Domain
Number field
The valid range for domain number is from 44 through 63. By default, the
domain number is set to 44.
(Optional) Enter the VLAN ID of the
Management VLAN.
Supported VLAN ID value is from 1 through 4094.
(Optional) Enter the VLAN ID of
the PTP
VLAN.
Supported VLAN ID value is from
1 through 4094.
From the drop-down list, select a
Venue Type.
You can choose one of these venue types:
Dense (~ AP spacing <= 8,000 sq. ft.)
Moderate (8000 sq. ft. < ~ AP spacing < 20,000 sq. ft.) (Default)
Sparse (~AP spacing ≥ 20,000 sq. ft.)
Note: A reboot of certain LTE APs in the venue is required when you change the venue type.
From the drop-down list, select a
TTD Configuration.
You can choose one of these TTD configurations:
Configuration 1 (Default)
Configuration 2 (for better
downlink performance)
Configuration 6 (for better
uplink performance)
The default is TDD configuration 1. The TDD
configuration 2 and 6 configure the APs to have a better downlink and uplink
performance.
Note: Changing the
TDD Configuration may require a reboot of some LTE APs in the venue.
The
Macro EARFCN section shows information on
Carrier,
Cell Individual Offset, and
EARFCN Bandwidth. By default, Macro EARFCN disabled.
You can choose the following actions:
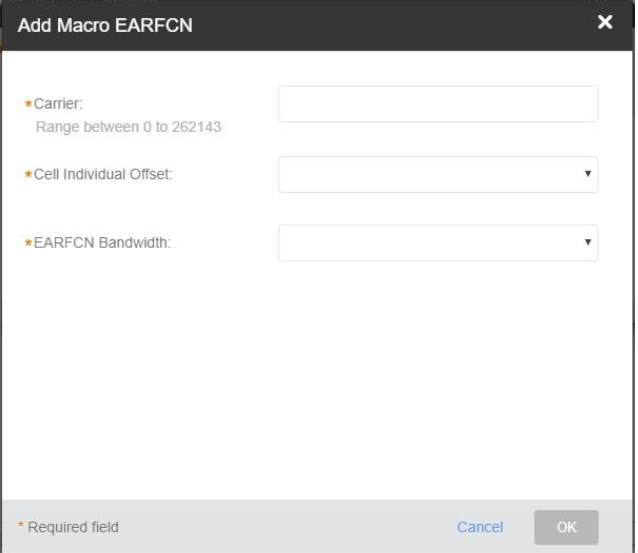
Click
Add Macro EARFCN to add enable specific Macro. Specify the following fields and then click OKAdd Macro EARFCN.
Carrier: Specify a unique and valid range from 0 through 262143.
Cell Individual Offset: Specify a valid range from -1 to -24 or from 0 through 20.
EARFCN Bandwidth: Enter one of these: BW6, BW15, BW25, BW50, BW75, or BW100
Click the pencil icon to edit the Macro EARFCN. Edit the required parameters and then click
OK.
Click the delete icon to remove the Macro EARFCN. Enter
Delete to confirm deletion of the Macro EARFCN when prompted.
Toggle the
IPv6 DHCP allocation to
ON or
OFF.
If enabled, the DHCP server can allocate a local IPv6 address to APs for a specific venue. This is necessary when an enterprise has only IPV6 for LAN and it cannot allocate an IPv4 address to the APs.
Toggle the
Ruckus Private LTE Network Service Access Restriction to
ON or
OFF.
This feature can be enabled from Administration -->Access Restriction. By default,
this feature is disabled.
If the toggle is set to
OFF, this option is greyed out and cannot be enabled
from the Venue LTE Settings dialog box.
If this feature is enabled
(ON) at the admin level, you can turn it to OFF/ON
while editing the LTE settings.
Toggle the
AP LEDs to
ON or
OFF.
Click
Save.
The system displays
Updating LTE Settings....
Configuring SAS Account for a Venue
Beginning with the Ruckus LTE Release 20.01, you can configure SAS accounts for each venue. For each tenant, the SAS account is defined in the
Administrator section. SAS accounts will appear in the drop-down in the Venue LTE Settings only if they were added by you earlier . For information on how to add a SAS account, refer to
Adding a SAS Account.
Follow these steps to configure a SAS account for a venue.
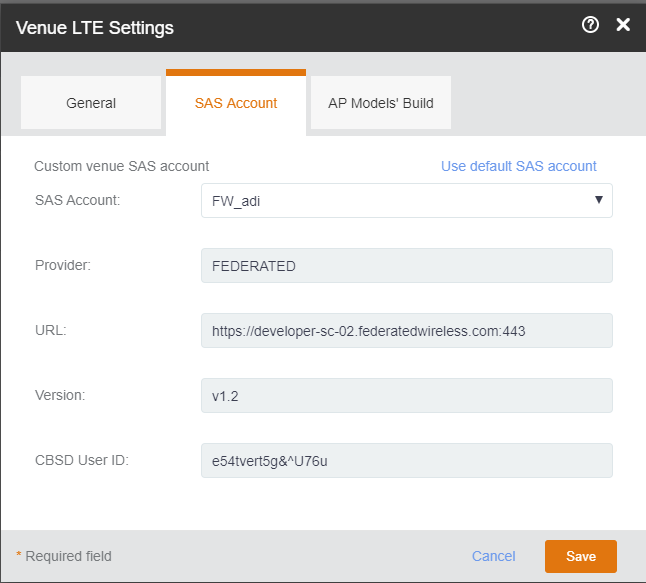
In the Venue LTE Settings dialog box, select the SAS Account tab.
You can configure a custom
venue SAS account or use the default SAS account for the selected venue. Editing a SAS Account
To configure a customer venue SAS account, select an account from the
SAS Account drop-down.
(Optional) Click the
Use Default SAS account to configure the default SAS account to the venue.
Review the selected SAS account details and click
Save.
The
Updating LTE Settings progress bar appears.
Configuring Software Build Version of the AP Model for a Venue
Follow these steps to configure the software build version of each APs for a venue.
In the Venue LTE Settings dialog box, Select the AP Models' Build
tab.
.
Select the desired software build for each AP models.