Viewing and Managing the AP List
You can view operational, identification, and configuration information for APs associated with your RUCKUS One account to evaluate AP status, deployment attributes, and available management data.
-
From the navigation bar, select
.
The Access Points page is displayed, defaulting to the AP List tab.
Access Points Page 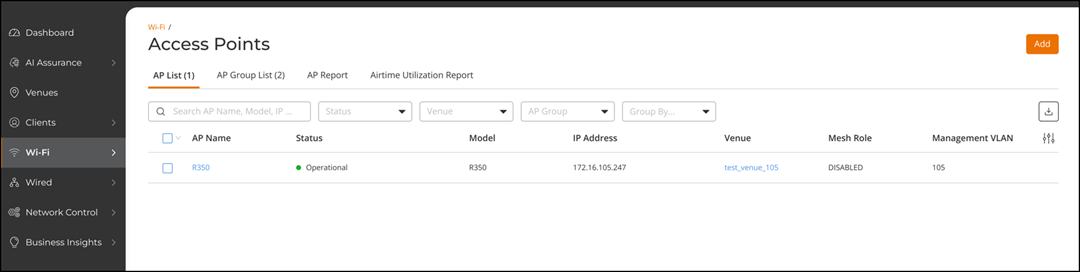
-
View the list of APs, which
contains the following information:
- AP Name: Displays the name of the AP as a hyperlink. Click the AP name to view the AP details. Refer to Viewing AP Details for more information.
- Status: Displays the current status of the AP (for example, Operational). Refer to AP Statuses for more details.
- Model: Displays the AP model.
- IPv4 Address: Displays the IPv4 address assigned to the AP.
- IPv6 Address: Displays the IPv6 address assigned to the AP.
- MAC Address: Displays the unique Media Access Control (MAC) address of the AP.
- Venue: Displays the physical site where the AP is deployed.
- Switch: Displays the name of the switch associated with the AP.
- Mesh Role: Displays the AP’s mesh role if mesh networking is enabled. The possible mesh roles are Root AP (RAP) and Mesh AP (MAP or eMAP).
- Clients: Displays the number of wireless clients that are currently associated with the AP. To view details about the wireless clients, click the client number.
- AP Group: Displays the AP group name if the AP belongs to an AP group.
- RF
Channels: Displays a subset of spectrum-specific columns
that show the specific channel on which the AP radio is broadcasting.
Columns appear only if at least one associated AP supports the
frequency.
- 2.4 GHz: Displays the 2.4 GHz overlapping Wi-Fi channel.
- 5 GHz: Displays the 5 GHz non-overlapping Wi-Fi channel.
- 6 GHz: Displays the 6 GHz non-overlapping Wi-Fi channel.
- Up Time: Displays the duration (in days and hours) since the AP started providing service.
- Tags: Displays the tags added to the AP.
- Serial Number: Displays the serial number of the AP.
- Version: Displays the firmware version of the AP software.
- PoE Port: Displays the PoE port speed.
- Secure Boot: Displays whether the AP has secure boot enabled or disabled. If enabled, a check mark is displayed; otherwise, the field appears blank.
- Management VLAN: Displays the AP management VLAN ID.
- AFC Status: Displays the status of the AP’s daily check-in with the Automated Frequency Coordination (AFC) system (Passed or Failed).
- AFC Power State: Displays the power state of the AP if supported by AFC (Standard or Low).
- AFC Max Power: Displays the maximum AFC power in dBm.
- External IP Address: Displays the AP’s public IP address (used for Internet communication through Network Address Translation (NAT)), allowing you to view the IP address from which the AP is connecting.
You can use the Search option to display only the table entries that match the specified criteria. Select General to search using AP Name, Model, IPv4 Address, IPv6 Address, MAC Address, Tags, Serial Number, and External IP Address; enter a minimum of two characters.
Select MAC to search using a MAC address. You can enter the MAC address in commonly used formats, including colon-separated (for example, 00:1A:2B:3C:4D:5E), hyphen-separated (for example, 00-1A-2B-3C-4D-5E), dot-separated (for example, 001A.2B3C.4D5E), and continuous hexadecimal (for example, 001A2B3C4D5E) formats. RUCKUS One automatically processes the entered MAC address and performs the search without requiring you to reformat the value. The search field preserves the format in which the MAC address was entered.
Additionally, you can filter the list using the Status, Venue, AP Group, and Group By drop-down menus. The status options are Requires Attention, Transient Issue, In Setup Phase, Offline, and Operational. The Venue and AP Group options list the available venues and AP groups configured in your account. The Group By options are Status, Model, and AP Group. When you group the AP list by Status, Model, or AP Group, the list organizes devices into summarized clusters, allowing you to quickly see how many APs belong to each group and view their associated incidents, connected clients, and network activity at a glance.Note: When you choose a Venue, the AP list filter instantly adjusts to display only the groups belonging to that venue. If you update or clear the Venue, the AP Group selection resets. This helps you narrow down access points and avoid unrelated filter choices.Note: After you apply a search or filter, the remaining filter options are updated based on the current results. Previously selected filter values remain applied even if they are not displayed in the updated filter list.You can customize which fields appear in the table by clicking the
 icon and selecting or deselecting the desired column names. Drag and drop
individual column names up or down the list to customize the left‑to‑right
column display in the table. Optionally, you can click Reset to
default to have the default subset of columns appear in the
table. Use the Clear
Filters option to remove all applied filters.
icon and selecting or deselecting the desired column names. Drag and drop
individual column names up or down the list to customize the left‑to‑right
column display in the table. Optionally, you can click Reset to
default to have the default subset of columns appear in the
table. Use the Clear
Filters option to remove all applied filters. -
(Optional) Click the
 icon to export and download the AP device inventory list in CSV format.
-
(Optional) Click the
 icon to update the table with the most recent information. When the Auto Refresh
toggle is enabled, the table refreshes automatically at regular intervals,
ensuring that the displayed data remains current without requiring manual
updates.
icon to update the table with the most recent information. When the Auto Refresh
toggle is enabled, the table refreshes automatically at regular intervals,
ensuring that the displayed data remains current without requiring manual
updates.