Adding a Guest Pass Network
You have a add a guest pass network for the guest users.
-
In the upper-right corner of the
Guest Pass Credentials tab, click
Add Guest Pass
Network.
The Add Guest Pass Network form is displayed.
Adding a Guest Pass Network: Network Details 
-
In the Portal Type page, Guest Pass
is selected by default. Click Next.
Adding a Guest Pass Network: Portal Type 
-
In the Host Settings page, complete the following
steps.
Adding a Guest Pass Network: Host Settings 
- (Optional) Select the Redirect users to check box to enter the redirection URL.
- (Optional) Select the Enable RUCKUS DHCP Service check box to use the DHCP service.
- (Optional) Under VLAN, select VLAN Pooling toggle.
- Select the VLAN pool from the list or click Add Pool to add a VLAN pool.
- In the Add VLAN Pool window, enter a policy name,
description (optional), and VLAN value and click
Finish to save the settings.
Adding a VLAN Pool 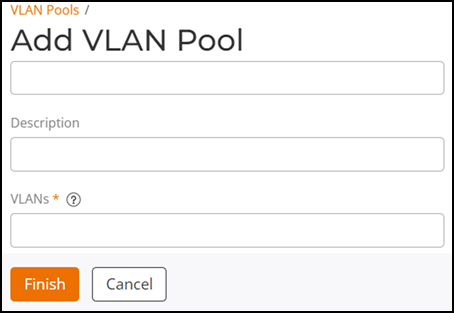
- (Optional) Select the Proxy ARP toggle to use proxy ARP.
- Click Next.
-
In the Portal Web Page page, complete the following
steps.
Adding a Guest Pass Network: Portal Web Page 
- Under Guest Portal Service, select the guest portal or click Add Guest Portal Service to add a guest portal service.
- In the Add Guest Portal Service page, enter the guest portal service.
- Under Portal Design, select the following
options.
- View as: Select the appropriate option.
- Select the desired device (desk, tablet, mobile).
- Language: Select the language.
- Components: Enable and customize the
following components that you prefer to add to design the guest
portal.
- Logo
- Welcome text
- Photo
- Secondary text
- Terms & Conditions: Enable and configure this option
- Powered by
- WiFi4EU Support: Enable and configure this option.
- Click Preview to see a preview of the guest portal.
- Click Reset to enter the information again.
- Click Finish to save the settings.
- Click Next.
Adding a Portal Service 
-
In the
Venues page, select the venues and click
Activate to activate the guest pass network. You can
either use the Activate option that is displayed above
the column headings or use the Activated toggle to
activate a venue.
Adding a Guest Pass Network: Venues 
-
In the Summary page, check all the settings. If you wish
to changes any settings, click Back to return to the
previous pages.
Add a Guest Pass Network: Summary 