Onboarding the controller to RUCKUS AI
You can onboard all the switches and APs from SmartZone to RUCKUS AI.
- Sync SmartZone controller to a valid NTP server.
- Make sure that the SmartZone controller has outbound connectivity over port 443 for network traffic and that this port is open in the network firewall settings. For more information, refer to Firewall Ports to Open for RUCKUS AI.
- Make sure that SmartZone has fully paid RTU license and AP license.
- SmartZone controllers and APs serve as the data source for RUCKUS AI. After allocating licenses to the APs, you must wait up to one hour for the data to be populated across all dashboards and reports.
- Each SmartZone controller is licensed to a specific organization; you can check the license affiliation on the RUCKUS Support website. During onboarding, the SmartZone controller is automatically linked to the specific organization in RUCKUS AI.
- If you are a partner onboarding your customer's SmartZone controller by using your own RUCKUS Support credentials, then the SmartZone controller will be onboarded to your customer's organization, and you are automatically added as an administrator in your customer's RUCKUS AI account.
-
Enable SmartZone cloud software
services and then connect SmartZone to your RUCKUS AI
account by performing the following steps.
The menu navigation has changed in SmartZone 6.0 and later releases.
- In releases prior to SmartZone 6.0, complete the following steps:
-
Select .
Enabling Cloud SZ Services 
-
In the Region
field, select the specific cluster region US,
EU, or Asia from the
dropdown to which you want to onboard the controller.
Note: If you enable the Cloud SZ Services option, the Region field is disabled.A confirmation dialog box is displayed indicating the implications of changing the region.
Region Change Confirmation Dialog Box 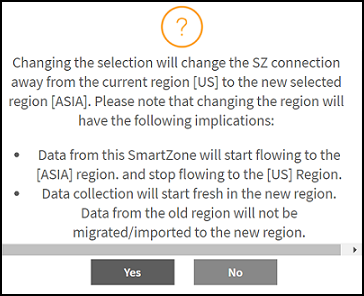
-
Toggle the button to
ON to enable RUCKUS AI. This will connect SmartZone to your RUCKUS AI account and enable data streaming to the RUCKUS AI instance.
Enabling RUCKUS AI 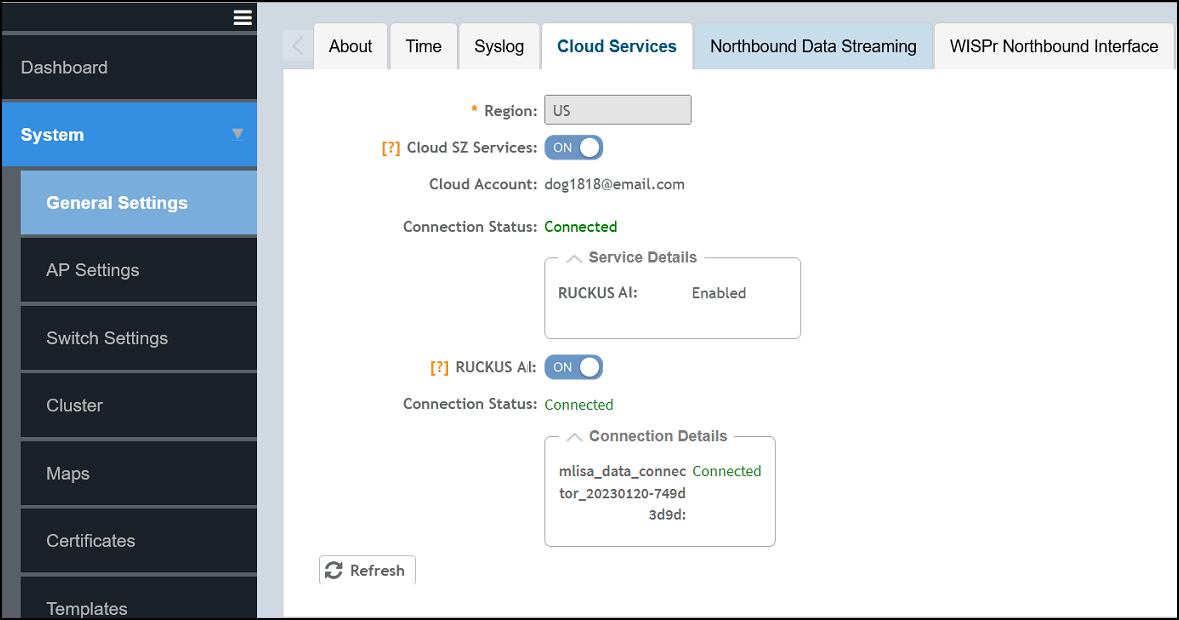 The onboarding process will take a few minutes to complete after which the connection details are displayed. You can view the status of the onboarded controllers in RUCKUS AI as described in Step 5.
- In SmartZone 6.0 and later releases, complete the following steps:
-
Select . The RUCKUS Cloud Services tab is
displayed.
Enabling Cloud Services in SmartZone 6.0 and Later Releases 
-
In the Region
field, select the specific cluster region US,
EU, or Asia from the
dropdown to which you want to onboard the controller.
Note: The option to select a region is available only when the Cloud Authentication option is disabled.A confirmation dialog box is displayed indicating the implications of changing the region.
Region Change Confirmation Dialog Box
-
Toggle the button to
ON to enable RUCKUS AI. This will connect SmartZone to your RUCKUS AI account and enable data streaming to the RUCKUS AI instance.
After the access to the service is validated, the connection status is changed to Connected.
Enabling RUCKUS AI 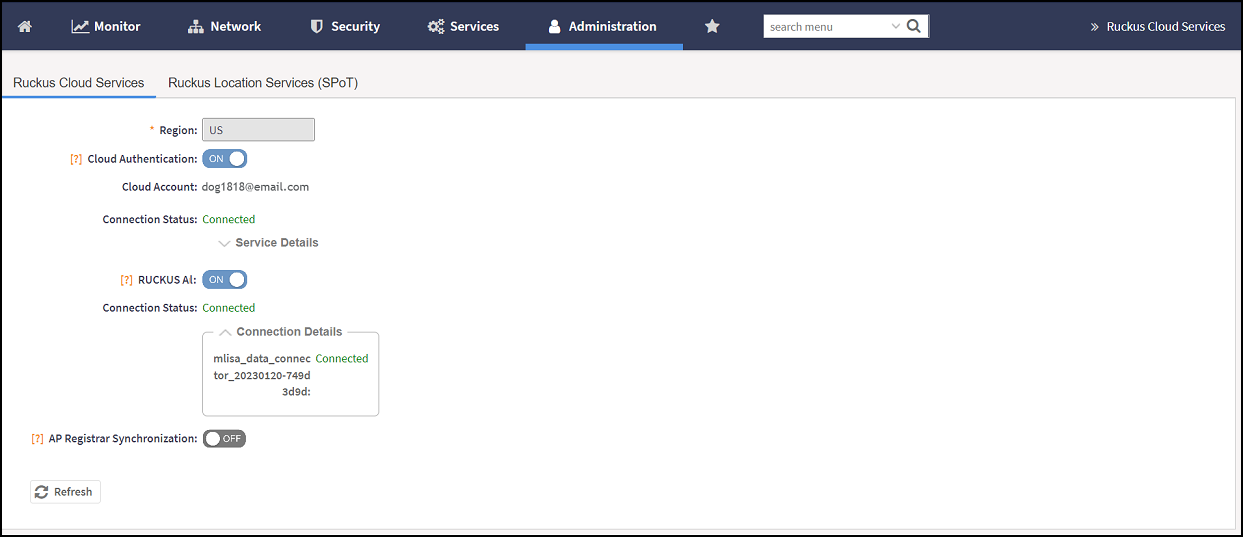 The onboarding process will take a few minutes to complete after which the connection details are displayed. You can view the status of the onboarded controllers in RUCKUS AI as described in Step 5.
-
Log in to RUCKUS AI
with the following RUCKUS AI URL for your
region using your RUCKUS Support credentials.
- For US users, https://ruckus.cloud/analytics or https://ruckus.cloud/ai
- For EU users, https://eu.ruckus.cloud/analytics or https://eu.ruckus.cloud/ai
- For Asia users, https://asia.ruckus.cloud/analytics or https://asia.ruckus.cloud/ai
Based on the support entitlement for your asset, you can connect to the RUCKUS AI cluster in United States, Europe, or Asia by selecting the corresponding region from the login window.
RUCKUS AI Login Page 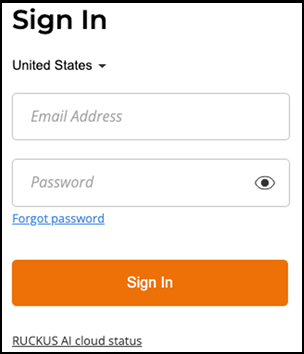
-
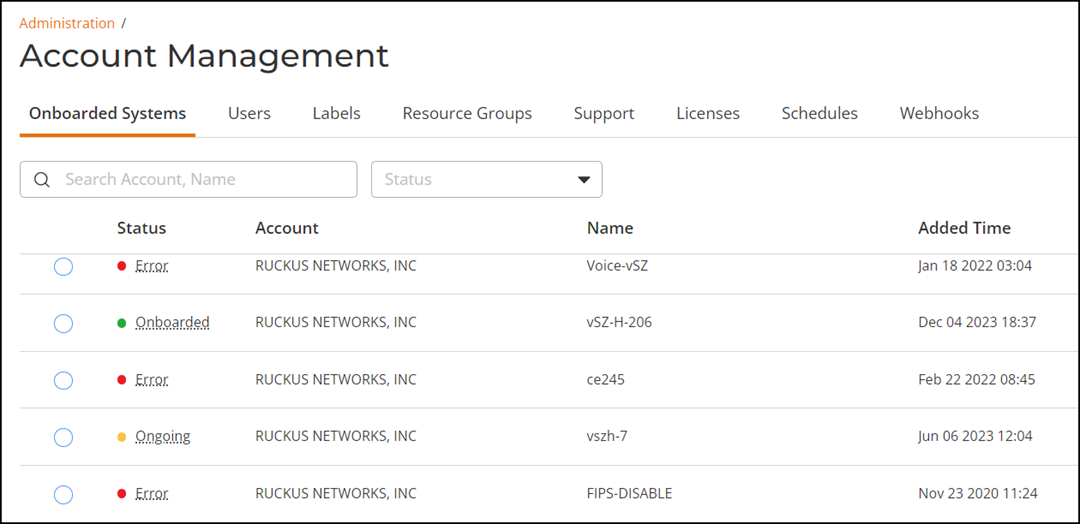
On the Navigation
bar, click and verify the status of the onboarded SmartZone controller is
green.
The SmartZone controller name is retrieved from the controller at the time of onboarding. However, if the name is changed after onboarding the controller, RUCKUS AI will not display the updated controller name.
If the controller has onboarded and connected successfully, and if data is transmitted to RUCKUS AI, the status is displayed in Green. If the controller is offboarded and not sending any data, the status is displayed in Grey. If the onboarding is in progress, the status is displayed in Yellow. If the connection to the controller is lost, or when data is not transmitted, the status is displayed in Red.
Verifying Controller Status