User Management and Roles
Information processed by RUCKUS AI is managed by the RUCKUS customers. For streamlined management, RUCKUS customer administrators can add employees from the same organization or invite a third-party RUCKUS-authorized partner to manage RUCKUS AI service. Administrators can add new users, edit existing user details, and delete users as necessary.
- Internal users: Users who belong to the same organization. That is, users registered with the RUCKUS Support account specifically associated with the tenant account to which they are being added. This means the Support account they are registered under is directly linked to the organizational tenant account.
- Third-party users: Users who belong to an external organization. That is, users registered with a different RUCKUS Support account than the tenant account to which they are being added. This means the Support account they are registered under is not directly linked to the organizational tenant account.
Regardless of the type of user, all potential users must be associated with a RUCKUS Support account. Additionally, all users must be registered as an Administrator within their respective Support account in order to be eligible for addition to any tenant account.
Understanding User Roles
User roles define the types of tasks and the scope of function that a user can perform. RUCKUS AI incorporates role-based access control (RBAC) features to assign different levels of privileges to users, enhancing security and allowing for more precise control over the tenant account.
User roles are used to control access to both the user interface (UI) and network elements. Each role comes with specific privileges and permissions that define the user's access level. Access to functional modules and GUI menu items varies based on the assigned role. For example, a user with the Business Insights User role will have access only to the Reports, Data Studio, and Clients modules in the GUI. This is particularly useful for customers who need to provide restricted and isolated access to RUCKUS AI and network elements to other users, whether they are internal or third-party. By implementing these role-based restrictions, organizations can maintain security and ensure that users only have access to the information and tools necessary for their specific tasks.
Before adding users, it is essential to carefully review the roles to ensure they align with the required job functions. Once you have identified the appropriate role for a user, you can add them by utilizing both the role and a corresponding Resource Group that matches their organizational level.
| Existing Role Name | New Role Name | Description | Create or Edit Schedule (Dashboard and Charts) |
|---|---|---|---|
| Admin | Prime Administrator | Provides access to all product functionality. This role allows administrators to
perform all configuration, monitoring, and administration tasks
in the RUCKUS AI account. Note: Access to
IntentAI is available exclusively to users with the Prime
Administrator role and designated access to the
Default Resource Group. |
Yes |
| Network Admin | Administrator | Provides access to all product functionality except IntentAI and administrative operations such as users, resource groups, licenses, support, and onboarded systems. | Yes |
| Report Only | Business Insights User | Provides view-only access to Clients, Reports, and Data Studio. | No |
| - | IT Helpdesk | Provides access to the Health and Client Troubleshooting pages only. It includes permission to modify SLAs within the Health page. | No |
| - | Read Only | Provides view-only access to all features. Administrators
assigned this role cannot perform any configuration tasks,
including creating, editing, or deleting any of the workflows.
Specifically, the following restrictions apply:
|
No |
| - | Reports User | Provides view-only access to the existing reports only. | No |
| - | Data Studio User | Provides view-only access to the existing Data Studio dashboards and charts only. | No |
Requirements
This feature has no special hardware or software requirements for feature enablement or usage.
Considerations
- Only users with the Prime Administrator role can add, edit, and delete users.
- Internal users of a tenant account cannot edit user details of an invited user.
- Invited users in a tenant account cannot edit the details of the users in the host account.
- Invited users in a tenant account cannot delete users of the host account.
Best Practices
This feature has no special recommendations for feature enablement or usage.
Prerequisites
- All potential users must have an existing RUCKUS Support account and a valid email ID that is registered with RUCKUS Support.
- Users must be registered as an Administrator within their respective Support account in order to be eligible for addition to any tenant account.
Accessing the User List
- On the navigation bar, click . The Users page is displayed.
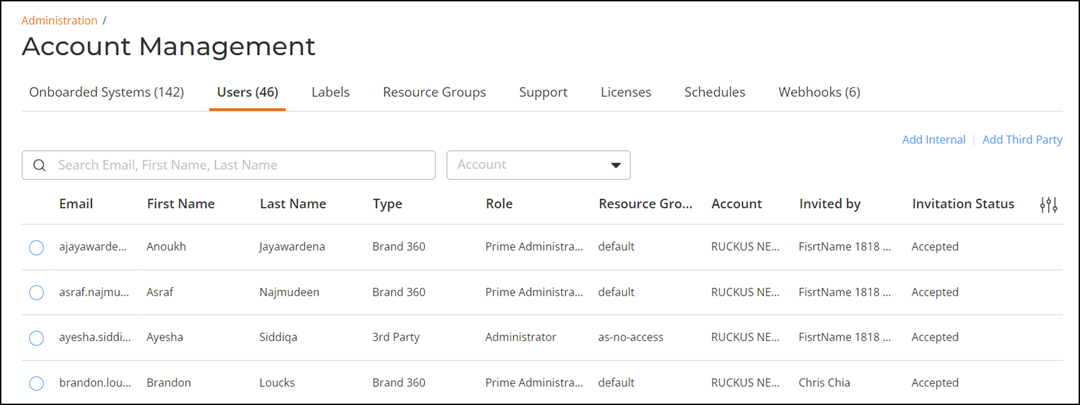
You can view the count of total registered users next to the Users tab and all the users in the account are displayed in the users table. The list can be searched based on the email address, first name, or last name, or filtered based on the tenant account name.
- Email: Displays the user email address.
- First Name: Displays the first name of the user.
- Last Name: Displays the last name of the user.
- Type: Displays if the user is internal user or 3rd party user.
- Role: Displays the role of the user.
- Resource Group: Displays the resource group name to which the user is associated.
- Account: Displays the account name.
- Invited by: Displays the name of the inviter.
- Invitation Status: Displays the invitation status as Pending, Accepted, or Rejected.
- Add internal user: For more information, refer to Adding an Internal User.
- Add third-party user: For more information, refer to Adding a Third-Party User.
- Refresh user details: For more information, refer to Refreshing the User Details.
- Edit user: For more information, refer to Editing the User Details.
- Delete user: For more information, refer to Deleting a User.
Adding an Internal User
You can add an internal user who belongs to your organization into the RUCKUS AI account. The user needs to have an existing RUCKUS Support account. Complete the following steps to add an internal user.
- On the navigation bar, click . The Users page is displayed.
- Click Add Internal. The
Add Internal dialog box is displayed.
Create Users Dialog Box 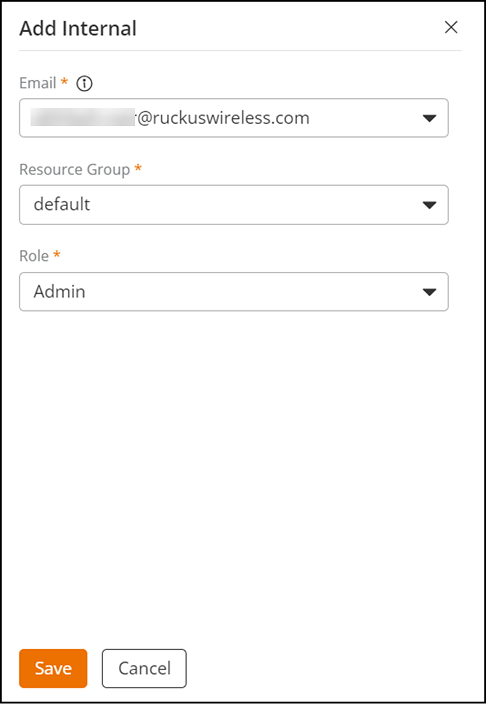
- Complete the following fields:
- Email: Enter the user email ID.
- Resource Group: Select a resource group from the drop-down list to designate access for the user to a specific resource group. For more information, refer to Resource Groups.
- Role: Select a role for the user from the drop-down list. For more information about the available roles, refer to Understanding User Roles.
- Click Save to add the user to the network. The added user name is displayed in the users table.
Adding a Third-Party User
Information relevant to the invitee is displayed in the table of the Users page. The user can accept or reject the invitation; the status of which is also displayed on this page as Accepted, Rejected, or Pending. The user must also have a registered RUCKUS AI account to accept the invitation. Additionally, only users having their own account with RUCKUS AI can accept invitations. Else, they will not be granted permission to access the application. If the user wants to use another account to accept invitations, then the new account has to be added and registered with RUCKUS AI before the user can accept invitation from that account.
Complete the following steps to add a third-party user.
- On the navigation bar, click . The Users page is displayed.
- Click Add Third Party.
The Invite 3rd Party dialog box is displayed.
Invite 3rd Party Dialog Box 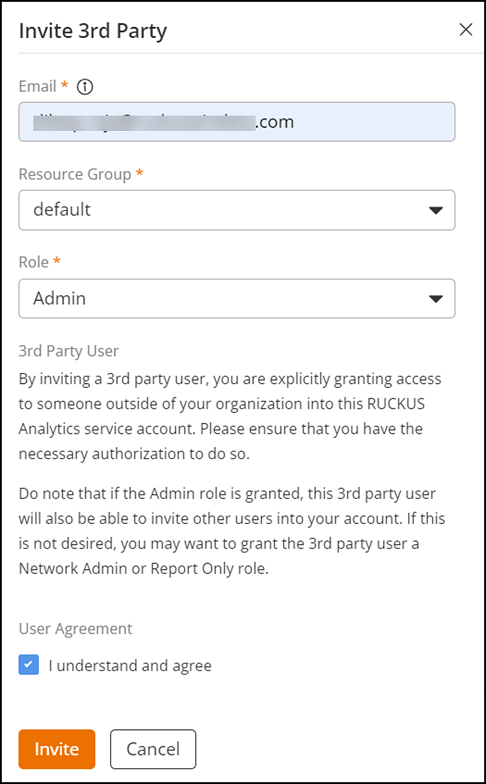
- Complete the following fields:
- Email: Enter the email
ID of the third-party user.Note: The user must have a valid email ID that is registered with RUCKUS Support. Else, the third-party account will be rendered invalid.
- Resource Group: Select a resource group from the drop-down list to designate access for the invitee to a specific resource group. For more information, refer to Resource Groups.
- Role: Select a role for the user from the drop-down list. For more information about the available roles, refer to Understanding User Roles.
- Email: Enter the email
ID of the third-party user.
- Select the User Agreement checkbox and click Invite. The invitation is sent to the third-party user.
Refreshing the User Details
You can retrieve the latest email, first name, and last name of the registered user from the RUCKUS Support portal by refreshing the user details.
- On the navigation bar, click . The Users page is displayed.
- In the Users table, click on the radio button of a user.
- Click Refresh displayed at the top of the Users table. The user details will be refreshed to show the updated details.
Editing the User Details
To edit the user details, complete the following steps:
- On the navigation bar, click . The Users page is displayed.
- In the Users table, click on the radio button of a user.
- Click Edit displayed at the top of the Users table. The Edit User window is displayed which allows you to modify the resource group and role assigned to the user.
- Click Save to save the changes.
Deleting a User
- On the navigation bar, click . The Users page is displayed.
- In the Users table, click on the radio button of a user.
- Click Delete displayed at the top of the Users table. A confirmation dialog box is displayed.
- Click Yes to delete the user.
Switching between Accounts
After accepting the invitation, all the accounts are displayed on the Accounts page. To open the Accounts page, click the account name in the upper-right corner of the Header Panel in the UI. For more information on Header Panel, refer to Header Panel.
Partners or third-party users who are invited to manage multiple customer accounts can take advantage of the single sign-on feature available in the RUCKUS AI. Using this feature, partners can conveniently switch account views without having to re-login.
Open the Accounts page and select an account in the table. The RUCKUS AI web UI is loaded with the selected account's network data.
Adding a Brand
A user can be invited to have the role of a Brand to access and monitor partner's network data. For more information, refer to Brand Invitation.