Viewing and Associating Devices for an Identity
You can associate devices with an identity to consolidate devices that are distributed across multiple identities, especially when they connect using non-username methods such as Open or PSK authentication. This feature preserves existing network attributes and improves inventory accuracy, policy consistency, and operational visibility.
- Ensure that the network is associated with an identity group before using this feature.
- Devices that connect without usernames can be distributed across multiple identities. Use device association to reorganize and unify these devices under the appropriate identity.
- You cannot change the identity associated with a client that is authenticated by DPSK, Certificate, or SAML; those authentication methods are identity-specific.
- Devices cannot be moved between different Identity Groups.
-
Select the Devices tab.
A table displaying the following details for devices associated with the identity is displayed:
- Hostname: Displays the host name of the device, if available.
- Alias: Displays the alias name assigned to the device.
- OS: Displays the operating system detected on the device.
- Health: Displays the current health status of the device.
- MAC Address: Displays the MAC address of the device.
- MLD MAC Address: Displays the Multi-Link Device (MLD) MAC address, if available.
- IPv4 Address: Displays the IPv4 address assigned to the device.
- IPv6 Address: Displays the IPv6 address assigned to the device.
- Username: Displays the user name associated with the device session.
- Venue: Displays the venue where the device is connected.
- AP: Displays the access point to which the device is associated.
- Switch: Displays the switch through which the device is connected, if applicable.
- Network: Displays the network to which the device is connected.
- Network Type: Displays the type of network access (for example, wired or wireless).
- Time Connected: Displays the duration for which the device has been connected.
- Onboarding Method: Displays the method used to onboard the device (for example, DPSK).
- VLAN: Displays the VLAN assigned to the device.
- VNI: Displays the Virtual Network Identifier associated with the device.
- Device Type: Displays the type of device.
- Model Name: Displays the device model name.
- Traffic (Session): Displays the total traffic for the current session.
- Traffic To Client: Displays the amount of data transmitted to the client.
- Traffic From Client: Displays the amount of data received from the client.
- RSSI: Displays the signal strength indicator of the device connection.
- SNR: Displays the signal-to-noise ratio of the connection.
- Radio Type: Displays the radio band used (for example, 2.4 GHz, 5 GHz).
- CPE MAC Address: Displays the MAC address of the customer premises equipment.
- Auth Method: Displays the authentication method used for the connection.
- Auth Status: Displays the authentication status of the device session.
- Encryption: Displays the encryption type used for the connection.
- Packets To Client: Displays the number of packets transmitted to the client.
- Packets From Client: Displays the number of packets received from the client.
You can use the Search option to display only the table entries matching the specified Hostname or MAC Address; enter a minimum of two characters.You can customize which fields appear in the table by clicking the icon and selecting or deselecting the desired column names. Drag and drop
individual column names up or down the list to customize the left‑to‑right
column display in the table. Optionally, you can click Reset to default
to have the default subset of columns. Click Clear Filters to
reset the filters.
icon and selecting or deselecting the desired column names. Drag and drop
individual column names up or down the list to customize the left‑to‑right
column display in the table. Optionally, you can click Reset to default
to have the default subset of columns. Click Clear Filters to
reset the filters. -
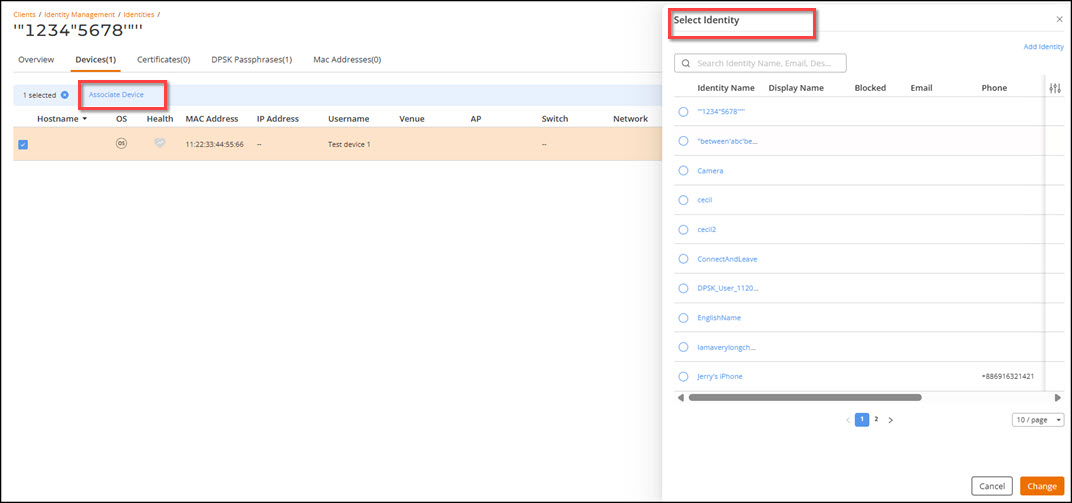
Select the device you want to
reassign, and click Associate Device. The Select Identity
sidebar is displayed, allowing you to choose the target identity.
Note: You cannot change the association for devices authenticated through DPSK, Certificate, or SAML‑based methods.Note: You can associate up to 100 devices in a single request.
Associating a Device to a Different Identity