Add Property Units, import units from a
file or Property Management System (PMS), and manage Property Unit details, status, and
identity associations as part of Property Management for a venue.
Note: The Property Management feature must
be enabled at the venue level to add or manage a property unit.
Note: You can edit the venue-level Property Management configuration
only after deleting all Property Units from the venue.
Complete the following
steps to add and manage Property Units:
In the navigation bar, select
Venues.
The
Venues page is displayed.
Click the Venue name.
The Venue Details page is displayed, defaulting to the
Overview tab.
Click the Property Units tab.
The Property Units
page is displayed. The page displays the following information: Unit
Name,
Status, VLAN, Identities,
Source, Resident Name, Resident Email,
and Resident
Phone. The Unit Name is a
hyperlink that opens the Unit Details page, which displays key information about
the selected unit, including the Resident Name,
Resident Email,
Status, VLAN, DPSK passphrase,
and Guest DPSK
passphrase. It also shows any Identities associations
linked to the unit. If no identities are associated, click Add Identity
Association. Refer to Associating Multiple Identities with a Property Unit for more details.
You can use the Search option to display
only the table entries matching the specified Unit Name,
Source, Resident Name, Resident Email,
and Resident
Phone; enter a minimum of two characters. Additionally, you can
filter the list by selecting a Status from the
drop-down list. The status options are Active and
Suspended. Use the Clear Filters
option to remove the applied filters.
You can sort the list by
clicking the associated column header except Identities
and VLAN.
You can customize which fields appear in the
Units table by clicking the icon and selecting or deselecting the desired column names. Optionally,
you can click Reset to default to restore the default subset of
columns.
Click Add Unit to
create a new property unit.
The Add
Unit sidebar is displayed. Add UnitComplete the following fields:
Unit
Name: Add a unit name for the property unit.
(Optional) DPSK
Passphrase: Enter a passphrase that you want users to
provide before they can access the network. Within a DPSK pool, the
passphrase length is set by the administrator. The passphrases must
adhere to the administrator-configured setting, which can range from 8
through 63 characters. If left empty, a passphrase will be generated by
the system. Refer to Adding a DPSK Service for more
information.
(Optional) Guest DPSK
Passphrase: Enter a passphrase that you want only guest
users to provide before they can access the network. Within a DPSK pool,
the passphrase length is set by the administrator. The passphrases must
adhere to the administrator-configured setting, which can range from 8
through 63 characters.
(Optional) VLAN:
Enter a VLAN ID (ranging from 1 through 4094). This field appears only
when the Enable Guest DPSK for Units option is
enabled in the Property Management configuration.
(Optional) Separate VLAN for
Guests: Toggle the switch on to enable the guest VLAN
and enter a VLAN ID (from 1 through 4094) for guests that does not match
the VLAN configured above.
Hide system generated
identities: Toggle Hide system generated
identities switch on to hide the automatically created
Unit DPSK and Guest DPSK identities, including their passphrases and
devices, from the Resident Portal.
Note: Any identities you add manually to the unit
will still be shown in the Resident Portal, even if system‑generated
identities are hidden.
Resident
Name: Enter a resident name.
(Optional) Resident's
Email: Enter a resident email. To receive notifications
over email, you must add an email address.
(Optional) Resident's Phone
Number: Enter a resident phone number. To receive
notifications over SMS, you must add a phone number.
(Optional) Data Usage
Metering: Select an existing Data Usage Metering profile
or click Add to create a new one. The profile allows you to
enable or disable rate limiting as well as data consumption control. The
profile will be applied to all devices that belong to this unit.
Click Add.
(Optional) Click Import from PMS.
The Property
Units table is updated and the Source column
displays PMS to indicate that the data is imported from the PMS. The
system automatically does the following:
Imports the latest room
information from the connected PMS into RUCKUS One.
Creates new Property
Units for any new rooms found in the PMS.
Removes units for rooms
that no longer exist in the PMS.
Keeps local units
unchanged if a room name already exists locally.
Ensures room data stays
aligned between the PMS and RUCKUS One each
time you click Import from PMS.
Allows you to view,
manage, and delete PMS‑imported units just like regular units.
Logs each import action
so Administrators can review when a sync occurred.
Updates associated units
automatically if you change PMS settings, switch PMS services, select a
different property, or disable Property Management.
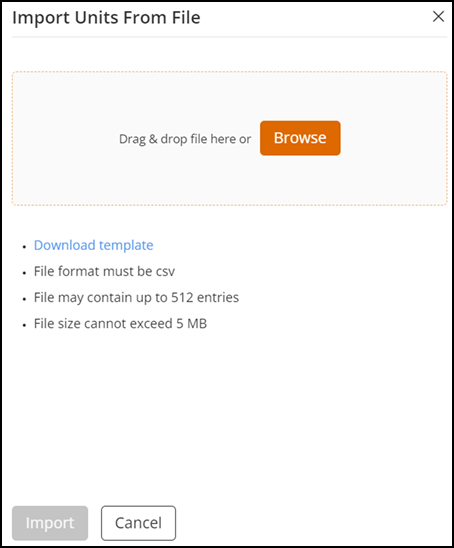
(Optional) Click Import from File.
You can import multiple units at once; bulk import is optional.
Note: The file format must be CSV, the file may contain up
to 512 entries, and the file size cannot exceed 5 MB.
Import Units From File
Sidebar
Complete the following steps to import units.
(Optional) Click
Download
template to download the CSV template to your local
machine.
Open the downloaded
template file on your local device, enter the required Unit
details:
Unit Name: Add a
unique unit name for the property unit.
(Optional) DPSK
Secret: Enter a passphrase that you want users
to provide before they can access the network. Within a DPSK
pool, the passphrase length is set by the administrator. The
passphrases must adhere to the administrator-configured setting,
which can range from 8 through 63 characters.
(Optional) Unit
VLAN: Enter a VLAN ID (ranging from 1 through
4094).
(Optional) Guest DPSK
Secret: Enter a passphrase that you want only
guest users to provide before they can access the network.
Within a DPSK pool, the passphrase length is set by the
administrator. The passphrases must adhere to the
administrator-configured setting, which can range from 8 through
63 characters.
(Optional) Guest
VLAN: Enter a VLAN ID (from 1 through 4094) for
guests that does not match the Unit VLAN ID.
Resident Name:
Enter a resident name.
(Optional) Email:
Enter a resident email.
(Optional) Phone
Number: Enter a resident phone number. The
format must be +<country code><phone number>.
(Optional) Hide system
generated identities: Enter TRUE to
hide the auto‑created Unit and Guest DPSK identities from the
Resident Portal, or FALSE to
show them.
In the Import
Units From File sidebar, drag-and-drop the CSV file into
the upload area, or click Browse to
select the file. You can replace the file by clicking the Change
File button, which allows you to browse and upload a new
file.
Click Import.
If the import is
successful, the Import Units From File sidebar
displays a message that units were imported successfully. If the import
fails, the Import Units From File sidebar displays
an error message with details for each unit that failed to
import.
If any units failed to import, open the
.csv file. Fix the issue for each unit that failed to import, remove the
units that were imported successfully and save and close the file.
Import the .csv file again.
Click the icon to download the complete list of property
units in CSV format.
Select the checkbox next to the Property Units column to
display and access the following options:
Edit
Suspend
Add Identity Association
Resend
Delete
(Optional) Click Edit to modify the property unit
details.
Note: Disabling Property Management for a venue after it
has been enabled may cause clients to lose networking services.
Note: The legacy passphrase supports a minimum length of 8
characters. DPSK Passphrase and Guest DPSK
Passphrase require a length ranging from 8 through 63
characters, as set by the administrator-configured passphrase length
policy.
The Edit Unit sidebar is displayed. Update the
required fields and click Save.
(Optional) Click Suspend to suspend an active property
unit.
A confirmation dialog box is displayed. Click
Suspend to suspend the Property Unit.
(Optional) Click Add Identity Association to associate
multiple Identities with a Property Unit.
(Optional) Click Activate to activate the Property
Unit.
Note: This option appears only for suspended Property
Units.
(Optional) Click Resend to send
the unit assignment SMS and/or email to the unit contact.
A toast notification
appears indicating that the unit assignment SMS and/or email has been sent to
the unit contact.
(Optional) Click Delete to delete a property unit.
A confirmation dialog box is displayed. Click
Delete to delete the Property Unit.
Note: You can view all activities related to the property units on
the venue details page during the last 24 hours in Administration > Timeline > Activities.
 icon and selecting or deselecting the desired column names. Optionally,
you can click Reset to default to restore the default subset of
columns.
icon and selecting or deselecting the desired column names. Optionally,
you can click Reset to default to restore the default subset of
columns.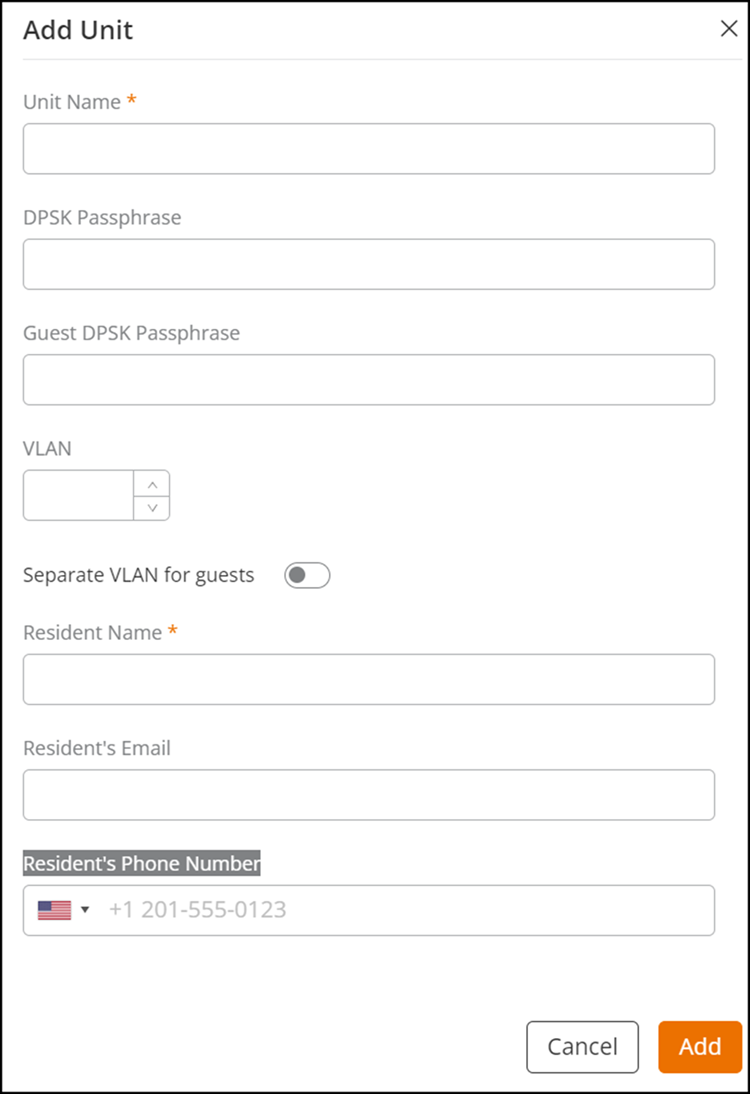
 Complete the following steps to import units.
 icon to download the complete list of property
units in CSV format.
icon to download the complete list of property
units in CSV format.