The Property Management feature
streamlines network administration for multi-dwelling units (MDUs), hospitality
environments, and other property-centric deployments, allowing you to manage network access
and services at the unit or tenant level. It integrates with identity groups, resident
portals, and communication workflows to support both resident and guest access. In
hospitality environments, Property Management can also integrate with a Property Management
System (PMS) to automate guest network access based on front-desk activity.
Before enabling and configuring the Property Management feature
and adding Property Units, you must complete the following tasks:
Complete the following steps to enable and then configure
Property Management.
On the navigation bar, select
Venues.
The Venues page is displayed.
Select the checkbox next to the
venue name in the Venue column and click Edit.
Alternatively, click the Venue
name, then click Configure.
Select the Property
Management tab.
Toggle the Enable Property
Management switch on to enable Property Management. Switching
Property Management off deletes the related configuration and may cause clients
to lose network services.
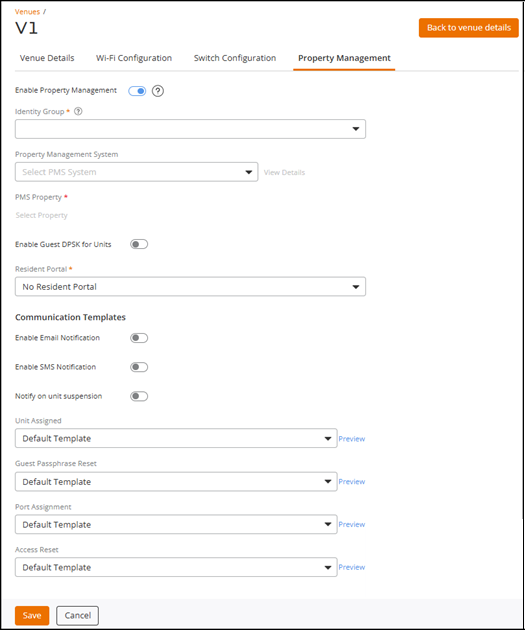
Toggling the Enable Property
Management switch on displays Property Management configuration
fields.Venue - Property
Management Tab
Select the Identity
Group from the list in the Identity Group
field.
Note: The Identity Group cannot be changed once Property
Management has been enabled.
Note: Configure DPSK Service before selecting the Identity
Group.
Select the Property Management System from the drop-down
list.
The View Details link
is enabled. Click it to view PMS details such as PMS, Description,
Client
Secret, Client ID,
Chain
Code, Authentication Scheme, Authentication
Scope, and WebSocket
URL.
Select the PMS
Property.
Click Select Property.
In the Properties sidebar, select the required
property by clicking the corresponding radio button, then click
OK.
(Optional) Click Change to change the selected
property.
Toggle the Enable Guest DPSK for
Units switch on if you want the units to have a Guest DPSK
assigned to them.
Select one of the following
options from the Resident Portal field:
No Resident
Portal: Select this option if you do not want to use the
residence portal provided by RUCKUS One.
Use RUCKUS
Portal: Select this option if you want to develop your
own custom portal using REST APIs. After you select this option, the
Resident Portal profile field is displayed. In
the Resident Portal profile field, select an
existing Resident Portal profile from the list, or
click Add Resident Portal to create a new
Resident Portal profile. Refer to Creating a Resident Portal.
(Optional) Select the
notification delivery mode in the Communication
Templates section.
Toggle the Enable Email Notification switch on to enable email
communication.
Toggle the Enable SMS Notification switch on to enable SMS
communication.
Toggle the Notify on unit suspension switch on to enable
suspension notifications.
By default, notifications are sent for
events such as unit assigned, guest passphrase reset, port assignment,
and access reset. When Notify on unit
suspension is enabled, notifications are sent for unit
suspension, unit reactivation, unit user suspension, and unit user
reactivation.
Click Preview to preview the communication
templates.
A dialog box is displayed with the communication template wording
(which cannot be changed); click Email or
SMS to preview the wording and layout for each
communication method.
The following are the available communication templates:
Unit
Assigned: Notifies users when a unit is assigned
to them. If you have configured a resident portal, select the
Default Template; if not, select the Default
Template - No Portal URL.
Guest Passphrase Reset: Notifies the unit
owners when their guest passphrase has been changed. By default,
the Default Template is selected.
Port
Assignment: Notifies the unit owner when a
network port is assigned to them. By default, the
Default Template is selected.
Access
Reset: Notifies the unit owners when the access
URL to their Resident Portal is changed. By default, the Default
Template is selected.
Unit
Suspended: Notifies the unit owner when a unit
is suspended. By default, the Default
Template is selected. This template appears when
you enable Notify on unit
suspension.
Unit
Reactivated: Notifies the unit owner when a unit
is reactivated. By default, the Default
Template is selected. This template appears when
you enable Notify on unit
suspension.
Unit
User Suspended: Notifies the unit user when the
user is suspended. By default, the Default
Template is selected. This template appears when
you enable Notify on unit
suspension.
Unit
User Reactivated: Notifies the unit user when
the user is reactivated. By default, the Default
Template is selected. This template appears when
you enable Notify on unit
suspension.
Click Save.
The Overview tab of
the Venue Details page is displayed and you will notice the Property
Units tab on the Venue Details page. The tab appears only if
Property
Management is enabled.
Note: Property units
can be added or imported from a file using the Property
Units tab. Refer to Adding and Managing Property Units for
more information.
(Optional) You can edit the
Property Management configuration by selecting Venues from the
navigation bar, selecting the venue name and clicking Edit or
Configure, selecting the Property
Management tab, editing the required fields, and clicking
Save
to apply the changes.
Note:
The Identity Group
field cannot be edited after Property Management is enabled.
You can edit other
Property Management configuration fields only until you add the
first Property Unit. To edit these settings later, delete all
Property Units from the venue.
(Optional) You can disable Property Management by selecting
Venues from the navigation bar, selecting the venue
name and clicking Edit or
Configure, selecting the Property
Management tab, and toggling off Enable Property
Management.
Note:
Disabling Property Management deletes all
Property Units in the venue and cannot be reversed.
Disabling Property Management may cause
clients to lose network services.