Enabling Multi-Factor Authentication and
Viewing Audit Events
The multi-factor authentication (MFA)
feature adds an extra layer of security to your RUCKUS One account by forcing authorized
account users to enter a verification code during their login process, using their selected
authentication method (Email, SMS, or Authentication App). By default, MFA is
disabled.
Although the MFA feature applies to all administrator
accounts, only an administrator having the Prime Admin role can control the MFA feature.
Note: When the MFA feature is enabled, all users of the account are required to set
up and use MFA. All account users can manage their personal authentication settings
from the User Profile menu.
Complete the following steps to set up and
manage MFA.
On the navigation bar, click Administration > Account Management > Settings.
In the Settings page, check the Enable Multi-Factor
Authentication (MFA) option, then click Enable MFA
in the pop-up confirmation box.
RUCKUS One generates recovery codes which
can be used as a backup method to access the account if the administrators have
trouble receiving the security code. Make sure that you copy the codes and store
them safely. Click Copy Codes next to Recovery
Codes.
Note:
Take note of the
following considerations regarding MFA and configuring
authentication methods:
The QR code is
not displayed for managing MFA Authentication App.
Only users
assigned the Prime Admin role can configure the MFA feature; the
Read Only role does not have adequate permission.
Enabling MFA
AuthenticationAfter enabling the MFA feature and configuring your authorization methods,
you must log out of RUCKUS One and log back in. When you log in to RUCKUS One,
you will be asked to authenticate with a one-time password (OTP) sent through
SMS or email or a passcode generated via the Authentication App. You must enter
the OTP or passcode and then click Verify to log in
to RUCKUS One.
Select one of the following authentication methods:
One Time Password
(OTP) switch to display the OTP
Authentication sidebar.
To receive an OTP via SMS on your
mobile device, select Text Messages (SMS), enter
your valid mobile number in the mobile number field and click Verify.
When prompted, enter the OTP received on your mobile phone, and click
Verify.
To receive an OTP via Email, select
Email, enter your email address in the
Email field, and click Verify.
When prompted, enter the OTP received in your email address and click
Verify.
Authentication App:
You will get a login code through an Authentication App. Toggle the
Authentication App switch to display instructions
for authentication using an authentication app. Follow the on-screen
instructions to obtain a verification code. Enter the verification code
generated by the Authentication App in the verification code text box and
click Confirm.
Under Backup authentication
method, click See to display the
Recovery Codes that you can use to access your account if you have trouble
receiving the security code through email, SMS, or your authentication app.
Make sure you copy these codes and store them in a safe place.
Setting Up MFA Methods in User
Profile
MFA audit events helps administrators monitor
events pertaining to the MFA feature, such as, enabling MFA, disabling MFA,
enabling One Time Password (OTP) for authentication, adding mobile numbers and
email addresses for receiving OTP, and enabling Authentication App as an MFA
authentication method.
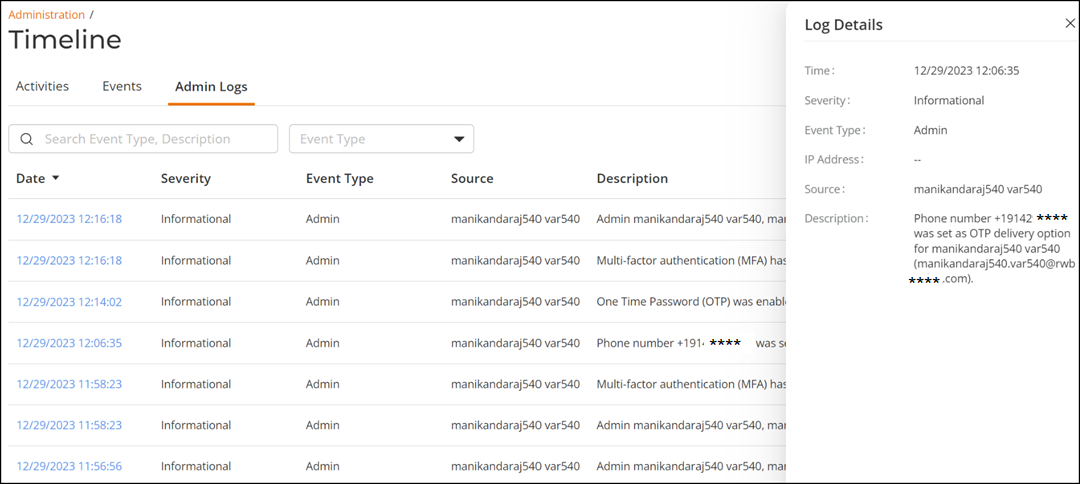
Complete the following steps to view the MFA audit events:
On the navigation bar, click
Administration > Timeline > Admin
Logs.
The Admin
Logs page is displayed.
In the Admin Logs page, click a time under the
Date column.
Note: In the search field, a
keyword (such as MFA or OTP) to filter on MFA-related events.
The
Log Details sidebar is displayed.Viewing MFA Audit
Events
The following information is displayed in the Log
Details page:
Time: Displays the time and time when the event
had occurred.
Severity: Displays the severity of the
event.
Event Type: Displays the event type.
IP Address: Displays the IP
address.
Source: Displays the source of the event.
Description: Displays the description of the
event.
Any time after the MFA feature has been enabled, you can do any of the
following:
(Optional) Modify your personal authentication method on the User Profile > Security page . Do this if your email or phone number has changed, or when you
want to select a different authentication method.
(Optional) Confirm the setting for the Multi-Factor Authentication
(MFA) option on the Administration > Account Management > Settings > Settings page.
(Optional) Copy the Recovery Codes on the Administration > Account Management > Settings > Settings page. Do this to ensure you have a backup method to access the
account.
(Optional, Prime Admin only) Disable the Multi-Factor Authentication (MFA)
option on the Administration > Account Management > Settings > Settings page. Do this if you no longer want the extra layer of secure
authentication for users accessing the account.
(Optional) Disable the MFA option. Click the checked box next to the
Multi-Factor Authentication (MFA) option, then click
Disable MFA in the pop-up confirmation box.


 The following information is displayed in the Log Details page: