Enabling SSO with a Third-Party Provider
With the Single Sign-On (SSO) feature enabled, you can configure your own authentication server for administrative log on and log in to RUCKUS One using a third-party authentication server.
Setting Up SSO with a 3rd Party Provider
- From the navigation bar, click .
Enabling SSO With Third-Party Provider 
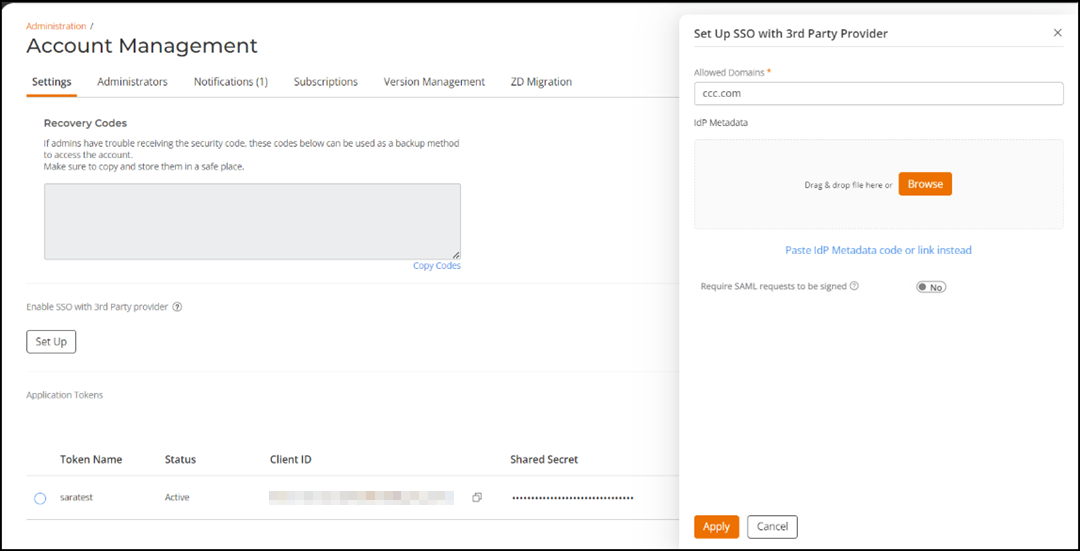
- In the Enable SSO with 3rd Party
provider section, click Set Up. Note: Currently, only Azure Active Directory is officially supported. The following protocol is supported:
- SAML
The Set Up SSO with 3rd Party Provider sidebar is displayed.Setting Up SSO 
- Complete the following fields:
- Allowed Domains: Enter the domains that are allowed for user authentication. Only the users that belong to a domain included in the Allowed Domain list can access RUCKUS One. You can add multiple domains separated by commas. The SSO domains specified must be unique globally. This means that if an administrator of another account has already configured a domain in their SSO configuration, it cannot be used again.
- ldP Metadata: Enter
the Identity Provider (IdP) Metadata that is provided by the third
party. For more information on how to get the IdP Metadata, refer to
Configuring SAML SSO with Azure AD. You have two options:
- Upload the .xml file containing the IdP Metadata.
- Click Paste IdP Metadata code or link instead and enter the IdP Metadata (XML code) or the URL in the field.
- Require SAML requests to be signed: Click the toggle switch to Yes to enable tenant administrators to sign SAML requests to an external IdP.
- (Optional) Configure a Server
Certificate: You can enable SAML response encryption in your IDP
setup for additional security.
As a prerequisite, before enabling the SAML response encryption, you must upload a public server certificate and private key combination from the page. Alternatively, you can use the public API (https://docs.ruckus.cloud/api/) to generate a public server certificate instead of uploading your own.
Use the search filter to search and select the already uploaded or generated server certificates in your tenant. In the text box, enter a partial (at least three characters) or full certificate name to select the certificate profile to be used for decryption based on the configuration done on your IDP setup.
- Click Apply to set up
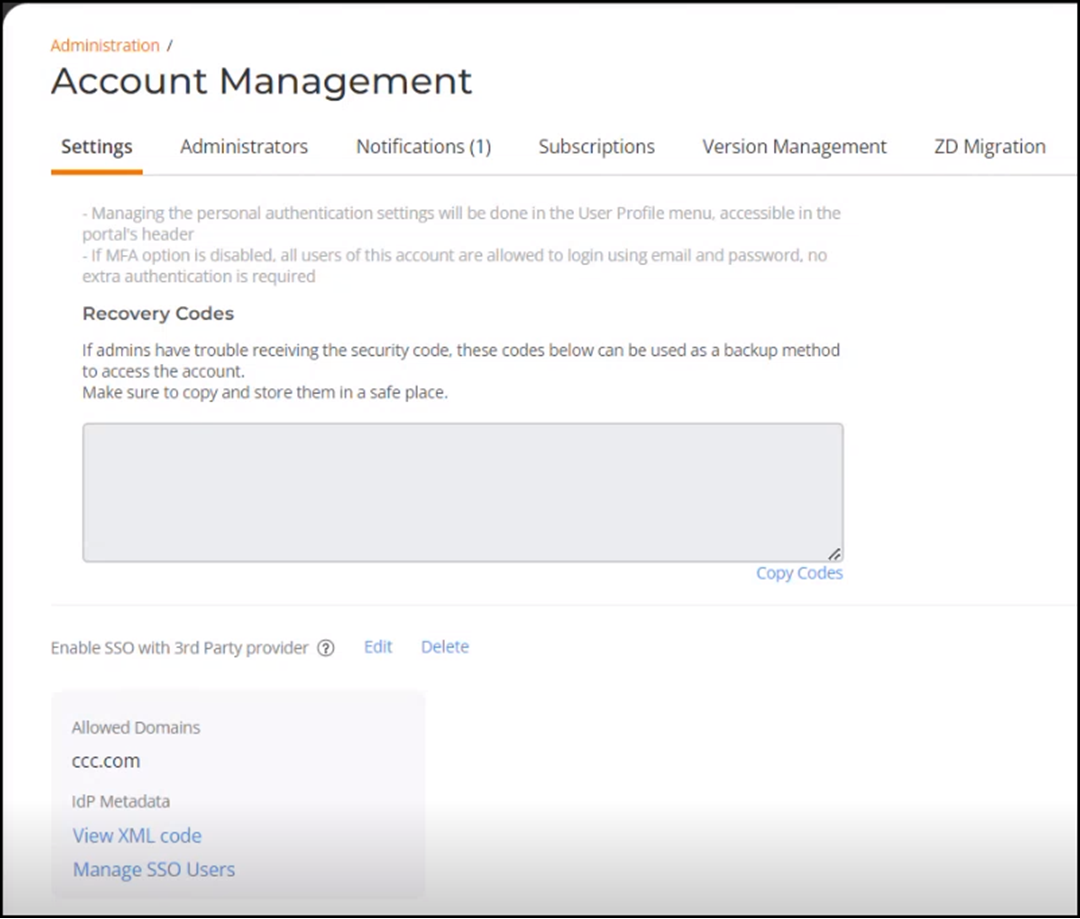
the SSO. The allowed domains are displayed along with the options to Edit or
Delete the IdP Metadata, View XML Code, Manage SSO Users, and Download IdP
Metadata.
Managing SSO Users 
- (Optional) Click Edit to edit the IdP Metadata.
- (Optional) Click Delete to
delete the IdP Metadata.Note: You cannot delete the SSO configuration if an admin account is associated with it.
- (Optional) Under the IdP
Metadata section, the following fields appear:
- View XML Code: Click View XML Code to view the IdP Metadata.
- Require SAML requests to be signed: Displays the status as YES or NO.
- SSO SAML Decryption Certificate: Displays the name of the SSO SAML decryption certificate. If you remove the uploaded custom certificate from the Configuring a Server Certificate field, then the SSO SAML Decryption Certificate field disappears from the IdP Metadata section.
- Manage SSO Users: Click on Manage SSO
Users to go to the Users &
Privileges page to add administrators.
- On the Users & Privileges page, click Add User. The Add New User sidebar is displayed.
- For Authentication Type, select SSO with 3rd Party.
- For Email, enter the email address of the administrator.
- (Optional) For First Name, enter the first name of the administrator.
- (Optional) For the Family Name, enter the family name of the administrator.
- For
Privilege Group, select the privilege
group of the administrator. Available options are:
- Prime Admin
- Administrator
- Guest User
- Read-Only
- DPSK Manager
- Click
Add User.
The newly added administrator with 3rd-party SSO authentication is displayed in the Users page.
Users Sub-tab 
- Download SAML Metadata: Click Download SAML Metadata to download the IdP Metadata. After enabling and configuring SSO, a tenant administrator can download the SAML metadata XML file.