Creating a Network That Uses a Dynamic Pre-Shared Key
You can create a network that uses dynamic pre-shared key (DPSK) authentication, which dynamically creates a unique passphrase for each user to connect to the network.
DPSK provides secure network access leveraging WPA or WPA2 security protocols. DPSK3 is the next-generation evolution of DPSK, available in both proxy and non-proxy modes, leveraging WPA3 for improved security while retaining the flexibility and individualized access of DPSK. DPSK3 is designed for environments that require both advanced security and seamless user/device management, with backward compatibility for WPA2 devices.
Consider the following requirements and limitations when configuring a DPSK network:- External RADIUS Requirement: The external RADIUS server must be RUCKUS Cloudpath to ensure seamless integration and certificate-based security.
- RadSec Support: RadSec (RADIUS over TLS) is supported only in proxy mode, providing encrypted communication between the AP and the RADIUS server.
- Security Protocol Requirement: The security protocol must be WPA2/WPA3 Mixed Mode to enable compatibility with external RADIUS (Cloudpath) in proxy mode. For WPA or WPA2, the external RADIUS server can be a regual RADIUS or Cloudpath server. For WPA2/WPA3 Mixed Mode, the external RADIUS server must be Cloudpath. This applies to both configurations—proxy and non-proxy mode.
- Access Point Requirements: APs must be Wi-Fi 6, 6E, or 7 and running firmware version 7.0.0.103.292 or later.
- DSAE Limitation: 6 GHz-only operation is not supported. To use the 6 GHz band, APs must operate in combination with other radio bands (for example, 2.4 GHz or 5 GHz).
-
On the navigation bar, click
Wi-Fi > Wi-Fi
Networks > Wi-Fi Networks
List.
The Networks page is displayed.
-
Click Add Wi-Fi
Network. Alternatively, select a DPSK network setting that you want
to copy and click Clone at the top of the table.
The Create New Network page is displayed.
-
Complete the following settings
in the Network Details page.
- Network Name: Enter a name (up to 32 characters) that you want assign to the network.
- Set different SSID: Use this option to configure the SSID different from the network name.
- Description: Enter a description (up to 64 characters) to help you identify the network using.
- Network Type: Select Dynamic Pre-Shared Key (DPSK).
When the network type is selected, a structure diagram of a DPSK type of network displays. -
Click Next.
The DPSK Settings page is displayed.
DPSK Settings Page 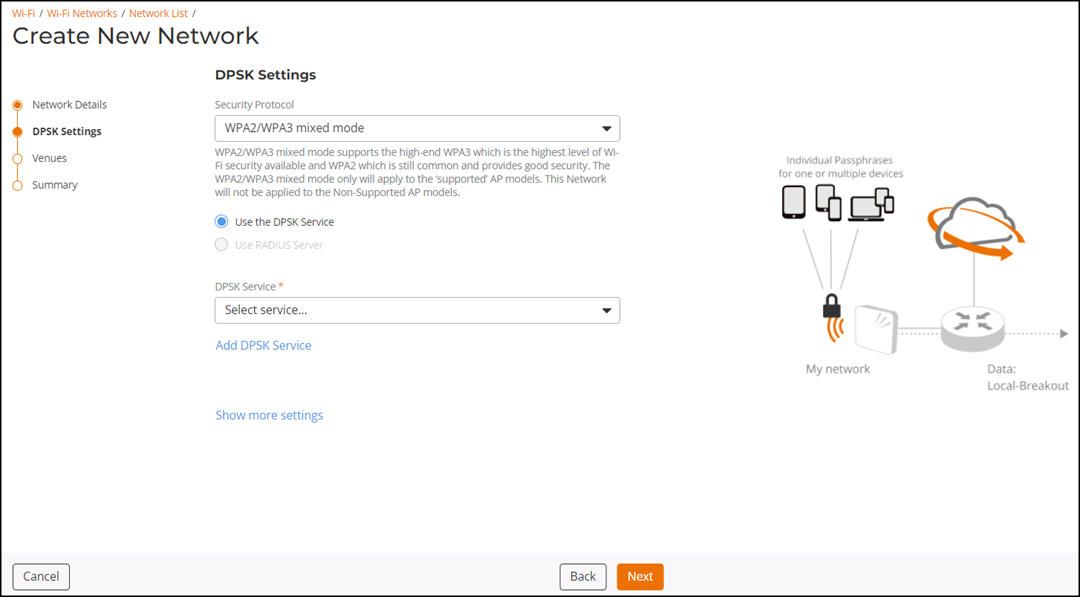
-
Complete the settings on the
DPSK Settings page.
- Security Protocol: Select WPA or WPA2/WPA3 mixed mode from the drop-down list. By default, WPA2 (recommended) is selected.
- WPA2 (Recommended) is strong Wi-Fi security that is widely available on all mobile devices manufactured after 2006. WPA2 should be selected unless you have a specific reason to choose otherwise.
- WPA security can be configured if you have older devices that do not support WPA2. These devices were likely manufactured before 2006. RUCKUS recommends that you upgrade or replace the older devices. 6 GHz radios are supported with WPA3 only.
- WPA2/WPA3 mixed
mode supports the high-end WPA3, which is the highest level
of Wi-Fi security available and WPA2 which is still common and still
provides good security. The WPA2/WPA3 mixed mode only will apply to the
‘supported’ AP models. This Network will not be applied to the Non-Supported
AP models. Note that the combination of Dynamic Pre-Shared Key (DPSK)
technology with WPA3 encryption results in a DPSK3 secured network. Note:
- You must select WPA2/WPA3 mixed mode to access the Use RADIUS Server(Cloudpath Server Only) option.
- Wi-Fi-6E clients must connect on 2.4 GHz/ 5 GHz to bind the passphrase first and then connect to service DPSK network on 6 GHz radio.
- In general, mobile devices manufactured after 2006 support WPA2 and devices manufactured after 2019 support WPA3.
- Use the DPSK
Service: Select the radio button to enable this option
and configure the DPSK Service. This option is
disabled if you enable the Use the RADIUS Server
option.
- DPSK Service: Select an existing DPSK service from the drop-down list or click Add DPSK Service to add a new DPSK service. For more information, refer to Adding a DPSK Service.
- Use the RADIUS Server:
Select the radio button to enable this option and configure the
RADIUS Server.
Note: If you select the Security Protocol as WPA2/WPA3 mixed mode, the Use RADIUS Server(Cloudpath Server Only) option is displayed. For DPSK networks using WPA2/WPA3 mixed mode, only a Cloudpath RADIUS server configured in proxy or non-proxy mode and having the Enable RadSec (over TLS) option disabled is supported.
RUCKUS One extends the DPSK functionality by integrating with Cloudpath clusters. This allows users with existing, complex Cloudpath configurations and policies for DPSK to seamlessly transition to DPSK3. This integration maintains existing security and access controls.
Using the RADIUS Server(Cloudpath Server Only) Option 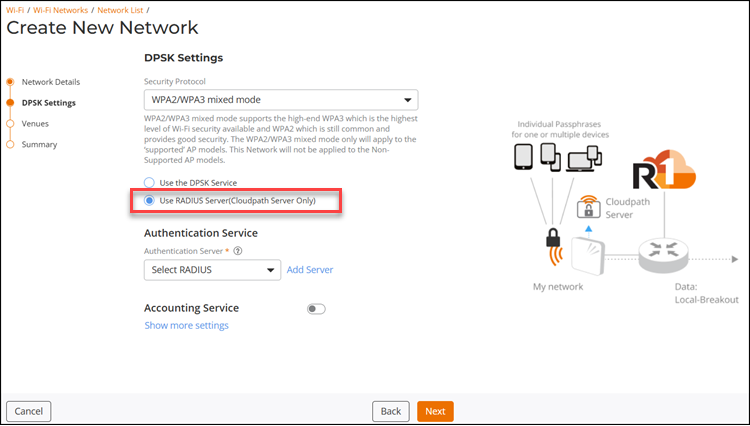
- Authentication Service: Select an
existing RADIUS Server from the drop-down list or click
Add Server to access the Add AAA
Server sidebar in which you can configure a new
RADIUS Server.
Adding an AAA Server 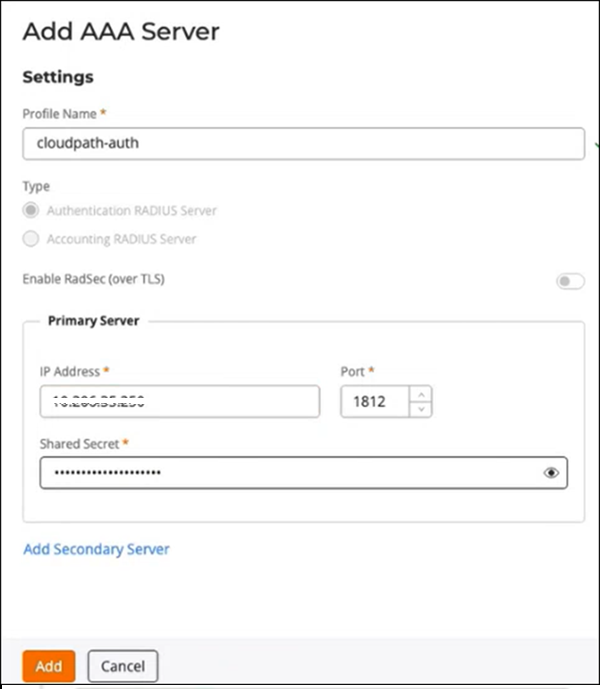
- For Profile Name, enter a name.
- For Enable RadSec (over TLS), enable this option if you are adding a regular (non-Cloudpath) or a Cloudpath RADIUS server.
- For Primary Server, enter the IP address of the Cloudpath server.
- For Port, select a port from the drop-down. By default, the port is set to 1812.
- For Shared Secret, enter the shared secret of the Cloudpath server.
- (Optional) Click Add Secondary Server to add a secondary AAA server.
- Click Add.
- Authentication Service: Select an
existing RADIUS Server from the drop-down list or click
Add Server to access the Add AAA
Server sidebar in which you can configure a new
RADIUS Server.
- Proxy Service: By default, the Proxy Service is disabled. Toggle the Proxy Service to enable this option. A proxy authentication server is used when APs send authentication messages to RUCKUS One and RUCKUS One forwards these messages to an external authentication server (Cloudpath). The Proxy Service option appears only when the Use RADIUS Server or the Use RADIUS Server(Cloudpath Server Only) option is selected.
- Accounting Service:
Toggle the Accounting Service to enable this option and select the
existing RADIUS Server from the drop-down list or click Add
Server and configure a new RADIUS Server. For DPSK
networks using WPA2/WPA3 mixed mode, only a
Cloudpath RADIUS server configured in proxy or non-proxy mode and having
the Enable RadSec (over TLS) option disabled is
supported.Note: For the accounting service on DPSK networks operating in WPA2/WPA3 Mixed Mode, support is provided for a Cloudpath RADIUS server configured in proxy mode with the RadSec option enabled.Refer to Adding and Managing a RADIUS Server for information on adding and managing a RADIUS server.
-
Click Show more
settings.
By default, the VLAN sub-tab is displayed. Each sub-tab includes additional Wi-Fi configuration options to configure the settings of your preference. Refer to Configuring Additional Settings for a Wi-Fi Network to configure each of the available settings.
-
Click Next.
The Venues page is displayed.
Venues Page 
-
Complete the following steps to
configure a venue:
-
Select the venues in
which you want to activate this network:
- To activate the network in all of your venues, select the check box beside Venue at the top of the table and click Activate.
- To activate the network in a specific venue, locate the venue from the list, and toggle the switch in the Activated column. By default, the venue is not activated.
The APs, Radio, and Scheduling of the selected venue are displayed in the table.
Select Venues 
-
By default, this network
configuration is applicable for all APs and with Radio Band of 2.4, 5,
and 6 GHz. To select specific AP groups and modify Radio Band, complete
the following steps:
- Click All
APs in the APs column. The
Select APs dialog box is displayed. To
activate this network on all current and future APs at this
venue. You can also choose a radio band of 2.4 GHz, 5 GHz, 6 GHz
or all.
Select APs Dialog Box 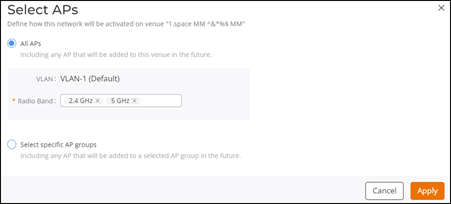
- Click Select
specific AP groups to activate this network on
specific AP groups including any AP that is added to selected AP
groups in the future. The APs not
assigned to any group option is displayed. After
APs not assigned to any group is selected,
VLAN and Radio Band
options are displayed:
Select specific AP groups 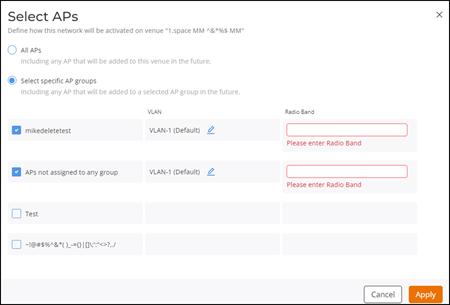
- In the VLAN option, by default VLAN-1 is selected. Click Edit (pencil icon) icon and configure the VLAN or VLAN pool for the selected AP group.
- In the Radio Band option, select 2.4 GHz, 5 GHz, or both 2.4 and 5 GHz from the drop-down list for the selected AP group.
- Click Apply.
- Click All
APs in the APs column. The
Select APs dialog box is displayed. To
activate this network on all current and future APs at this
venue. You can also choose a radio band of 2.4 GHz, 5 GHz, 6 GHz
or all.
-
By default, this network
configuration is scheduled for 24/7. To configure the
Scheduling, complete the following steps:
- Click 24/7 in the Scheduling
column. The Schedule for Network
<network-name> in Venue <venue-name>
dialog box is displayed. You can also choose a schedule of 24/7
or follow below steps to customize the schedule.
Schedule for Network Dialog Box 
- Click Custom Schedule.
- Network schedule is customized as per
your requirement. You can configure the schedule for
Monday through Sunday and from midnight to midnight
(from 00:00 hours through 23:59 hours). For more
information, click See
tips. The Network Scheduler
Tips dialog box is displayed.
Network Scheduler Tips 
- Click OK to close the Network Scheduler Tips dialog box.
- Click Apply.
- Click 24/7 in the Scheduling
column. The Schedule for Network
<network-name> in Venue <venue-name>
dialog box is displayed. You can also choose a schedule of 24/7
or follow below steps to customize the schedule.
-
Select the venues in
which you want to activate this network:
- Click
Next.
The Summary page is displayed.
- Review the settings that you configured.
-
Click Add.
The newly added DPSK network is displayed in the Wi-Fi Network List page.
DPSK Wi-Fi Networks 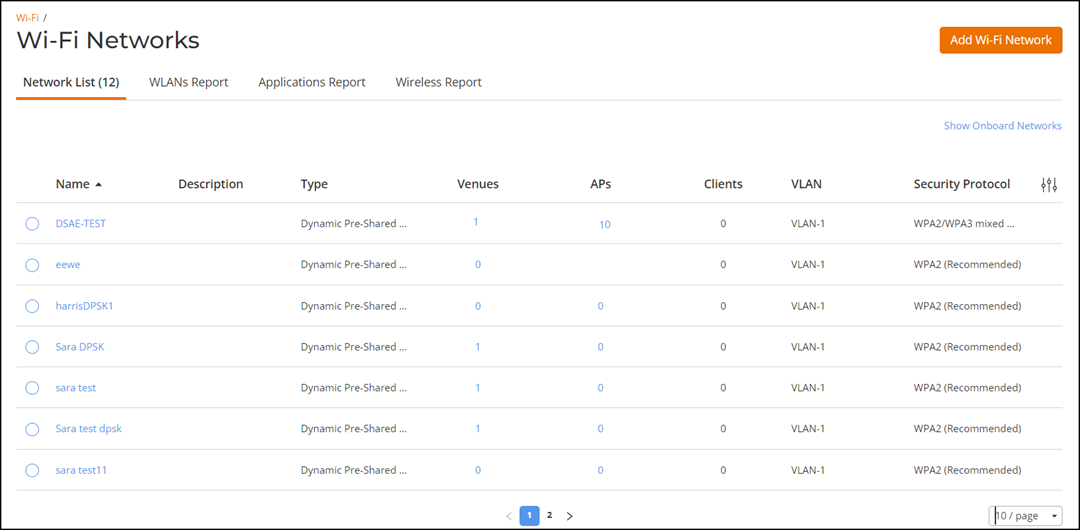
-
Click Show Onboard
Networks to view the onboarding onboarding WPA3-DPSK3
SSIDs.
The onboarding network details are displayed.
Displaying Onboarding Networks 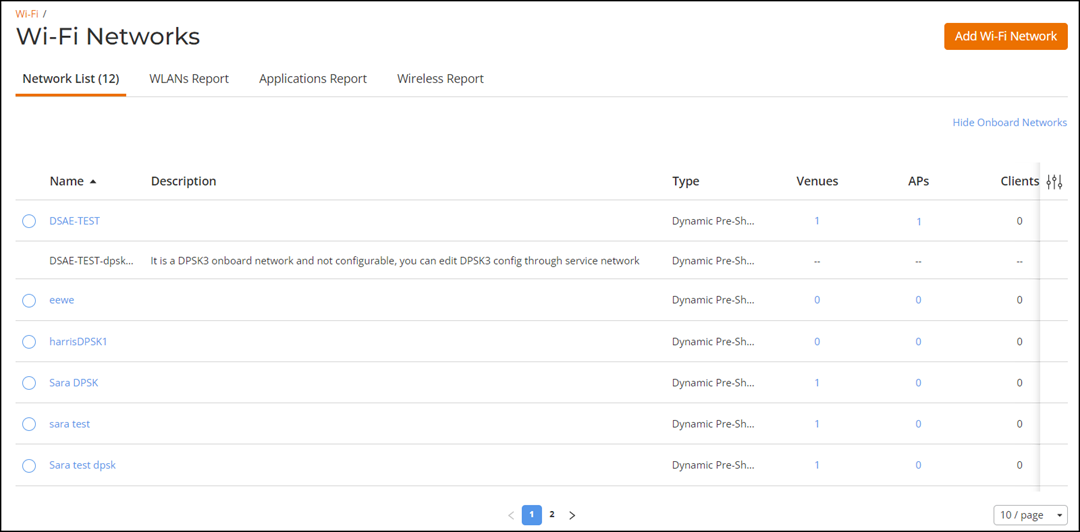 Note: The following are a few DPSK network-related requirements and known limitations:
- For a DPSK3 network, two networks having the same SSID are created, one service network and one onboarding network (also known as an Intermediate DPSK WLAN). An administrator cannot modify the Intermediate DPSK WLAN configuration; they can edit only the Service WLAN.
- The 6 GHz band uses Reduced Neighbor Reports (RNR) Information Elements (IEs) in the 2.4 GHz and 5 GHz beacons to inform Wi-Fi 6E clients about the 6 GHz SSID. The 6 GHz band also suppresses certain frames like FILS and unsolicited probe-response frames, which are necessary for initial network discovery and authentication. Meaning, Wi-Fi 6E clients must use the information in the 2.4 GHz and 5 GHz beacons RNR IEs to discover the 6 GHz AP and then move to the 6 GHz band after binding the passphrase on the lower frequency bands. Therefore, when both 2.4 and 5 GHz services are turned off, a Wi-Fi 6E client cannot bind the passphrase with the DPSK service.
- If a client does not follow the IEEE 802.11v BSS Transition Management (BTM) request from the AP (which helps manage client roaming and load balancing, improving connection quality), the client behavior might not work as expected.
- When the DPSK service network with the Security Protocol configured as WPA2/WPA3 mixed mode is removed, the associated onboarding network (Intermediate DPSK WLAN).
- Utilizing the 6 GHz band for DPSK3 requires concurrent operation of the 5 GHz band due to the WPA2/WPA3 mixed mode requirement.