Creating a Network That Uses a Passphrase (PSK/SAE)
You can create a network that requires users to enter a Passphrase (PSK/SAE).
-
On the navigation bar, click
Wi-Fi > Wi-Fi
Networks > Wi-Fi Networks List.
The Networks page is displayed.
Wireless Networks Page 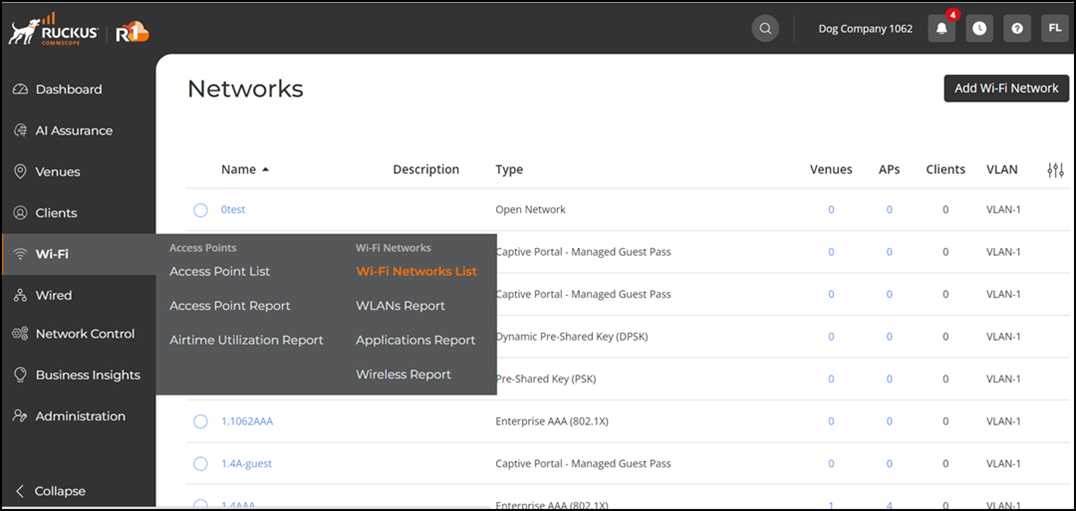
-
Click Add Wi-Fi
Network. Alternatively, select a Passphrase (PSK/SAE) network
setting that you want to copy and click Clone at the top
of the table.
The Create New Network page is displayed.
Create New Network Page 
-
Complete the following settings
in the Network Details page.
- Network Name: Enter a name (up to 32 characters) that you want assign to the network.
- Set different SSID: Use this option to configure the SSID different from the network name.
- Description: Enter a description (up to 64 characters) to help you identify the network using.
- Network Type: Select Passphrase (PSK/SAE).
When the network type is selected, a structure diagram of a Passphrase (PSK/SAE) type of network displays. - Click
Next.
The Settings page is displayed.
Settings Page 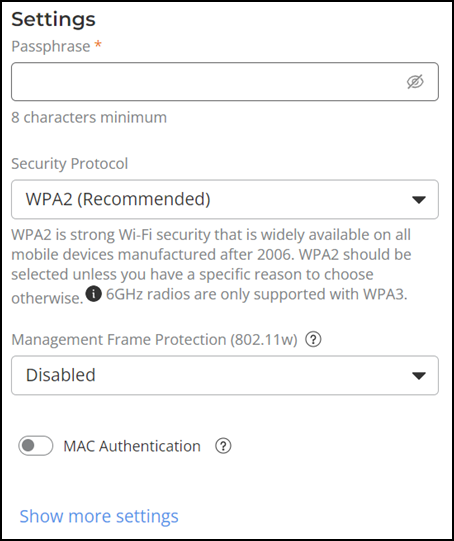
-
Complete the settings on the
Settings page.
- Passphrase: Enter a passphrase minimum eight characters that you want users to provide before they can access the network.
- WPA3 SAE Passphrase: Enter a WPA3 SAE passphrase minimum eight characters that you want users to provide before they can access the network.
- Security Protocol: Select the security protocol that you want this network to use. The default security protocol is WPA2, Other options include WPA2, WPA3, WPA2/WPA3 mixed mode, WPA, and WEP. The 6 GHz radios are supported with WPA3 only and 11ax, Wi-Fi 6E and Wi-Fi 7 only support WPA3.
- WPA2 (Recommended) is strong Wi-Fi security that is widely available on all mobile devices manufactured after 2006. WPA2 should be selected unless you have a specific reason to choose otherwise.
- WPA3 is the highest level of Wi-Fi security available but is supported only by devices manufactured after 2019.
- WPA2/WPA3 mixed mode supports the high-end WPA3, which is the highest level of Wi-Fi security available and WPA2 which is still common and still provides good security. In general, mobile devices manufactured after 2006 support WPA2 and devices manufactured after 2019 support WPA3.
- WPA security can be configured if you have older devices that do not support WPA2. These devices were manufactured before 2006. RUCKUS recommends that you upgrade or replace the older devices. 6 GHz radios are supported with WPA3 only.
- WEP: RUCKUS does not recommend using WEP to secure your wireless network because it might be insecure and could be exploited easily. RUCKUS One offers WEP to enable customers with old devices (that are difficult or expensive to replace) to continue using those devices to connect to the wireless network. If you must use WEP, do not use the devices using WEP to transmit sensitive information over the wireless network. 6 GHz radios are supported with WPA3 only.
- Management Frame Protection (802.11w): Select Disabled, Optional, or Required.
- MAC Authentication:
Toggle the switch to ON to
enable this feature and select one from the following options:
MAC
Authentication List or External MAC
Auth.Note: MAC Authentication provides an additional level of security for corporate networks. Client MAC addresses are passed to the configured RADIUS servers for authentication and accounting. You cannot modify previously configured MAC authentication settings. To accommodate any modifications, you must create new MAC authentication settings.Note: Regardless of whether MAC authentication is configured using MAC Registration List or External MAC Auth, the Dynamic VLAN setting will be automatically enabled. You will find the Dynamic VLAN option under the VLAN sub-tab when you click Show more settings.Note: If you configured MAC Registration List, you will also have to configure a new Identity profile (refer to Adding an Identity) and associate it with a client device (refer to Adding a Device to an Identity).
- MAC
Registration List: Select the MAC registration
from the drop-down list or add a new MAC registration.
- Click
Add to add a new MAC registration. The
Add MAC Registration List
dialog box is displayed. Complete the following
fields.
Add MAC Registration List Dialog Box 
- Name: Enter a name for the MAC registration list.
- List
Expiration: Select one option from the
following:
- Never expires: This license do not have an expiry date.
- Date: Select date, month, and year. This license expire after the selected date.
- After: Select a number from the drop-down list and select a duration of license expiration in Hours, Days, Weeks, Months, and Years. This license expire after the selected duration.
- Automatically clean expired entries: Toggle switch to ON to enable this feature.
- Adaptive Policy Set: Select an access
policy set from the drop-down list or add a new access
policy set.
- Click Add Access Policy Set to add a new access policy set. Refer to Creating an Adaptive Policy.
- Default Access: Select ACCEPT or REJECT.
- Click Apply.
- Click
Add to add a new MAC registration. The
Add MAC Registration List
dialog box is displayed. Complete the following
fields.
- MAC
Registration List: Select the MAC registration
from the drop-down list or add a new MAC registration.
- External MAC Auth: Select the external MAC authentication.
- MAC Address Format: Select a MAC address format from the drop-down list.
- Authentication
Service: Select a RADIUS authentication server from the
drop-down list or add a new RADIUS authentication server.
- Click Add Server to add a new RADIUS authentication server. Refer to Adding and Managing a RADIUS Server.
- Accounting
Service: Toggle switch to ON to
enable the accounting service. Select a RADIUS accounting server from
the drop-down list or add a new RADIUS accounting server.
- Click Add Server to add a new RADIUS authentication server. Refer to Adding and Managing a RADIUS Server.
- Identity Group
Note:- When an identity group is selected, all devices joining the network will automatically become an identity within that group, as displayed on the Identity Group page.
- Users have the option to either select an existing identity group from the list or create a new one.
- Upon selecting an identity group, users can enable the Use single identity association to all onboarded devices option and subsequently choose a specific identity for association.
- If a single identity is associated, all devices joining the network will be linked to that designated identity within the selected identity group.
- During network editing, the initially selected identity group cannot be removed; however, it can be changed to a different identity group.
- The identity configuration section is not applicable to the MAC Registration List when MAC Authentication is enabled.
-
- Select an identity group from the drop-down or click Add to add an identity group. Refer to Adding an Identity Group for instructions on how to add an identity group.
- To view details about the identity group, click View Details. The Identity Group sidebar is displayed.
- (Optional) Click
the toggle to enable the Use single
identity association to all onboarded devices
option. The Identity section is displayed.
If this option is selected, all devices that connect to this
network are associated with this identity. If this option is not
enabled, an identity for each connected device is created under
the identity group.
Configuring an Identity Group for PSK/SAE Network 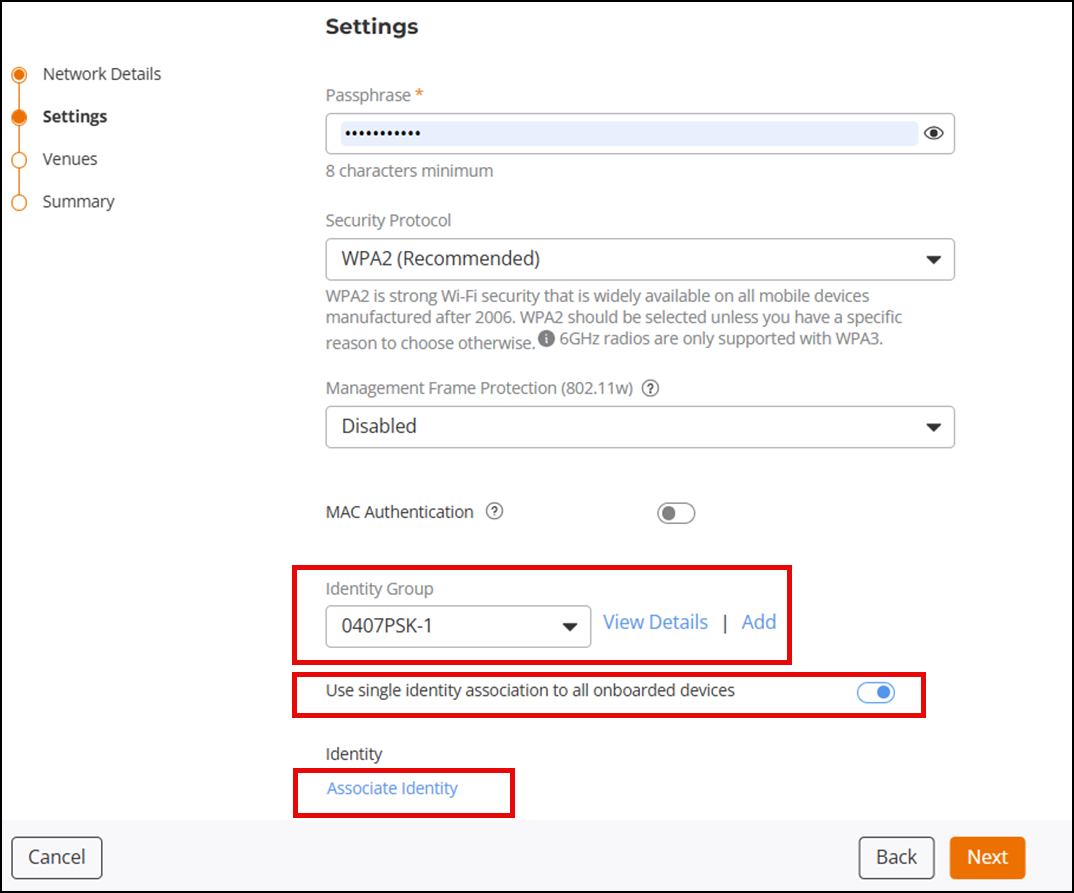
- Click Associate Identity to access the Associate Identity sidebar and select an identity to associate with the identity group, and then click Add.
- (Optional) Click Add Identity to access the Create Identity sidebar to add an identity. Refer to Adding an Identity for instructions on how to add an identity.
-
Click Show more settings.
By default, the VLAN sub-tab is displayed. Each sub-tab includes additional Wi-Fi configuration options to configure the settings of your preference. Refer to Configuring Additional Settings for a Wi-Fi Network to configure each of the available settings.
Note:Demonstration of Advanced Settings for a Wi-Fi Network. This video explains advanced settings for a Wi-Fi network and walks you through the process of configuring them.
- Click
Next.
The Venues page is displayed.
Venues Page 
-
Complete the following steps to configure a venue:
-
Select the venues in which you want to activate this network:
- To activate the network in all of your venues, select the check box beside Venue at the top of the table and click Activate.
- To activate the network in a specific venue, locate the venue from the list, and set the switch to ON in the Activated column.
The APs, Radio, and Scheduling of the selected venue is displayed in the table.
Selecting Venues 
-
By default, this network
configuration is applicable for all APs and all radio bands supported by
the APs. To select specific AP groups or modify the radio bands that
will broadcast this network, complete one of the following steps:
- Click All
APs in the APs column. The
Select APs dialog box is displayed.
Select All APs to activate this network on all current
and future APs at this venue. You can also choose to remove or
add any AP-supported radio bands in the Radio
Band drop-down list giving you the flexibility
of broadcasting this network only on the selected radio
bands.
Selecting the APs 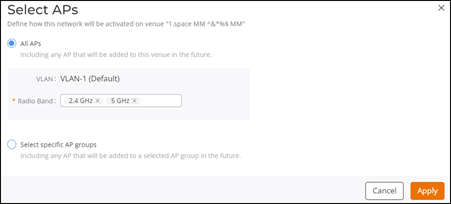
- Click Select
specific AP groups to activate this network on
specific AP groups including any AP that is added to selected AP
groups in the future. The APs not
assigned to any group option is displayed. After
APs not assigned to any group is selected,
VLAN and Radio Band
options are displayed:
Selecting Specific AP Groups 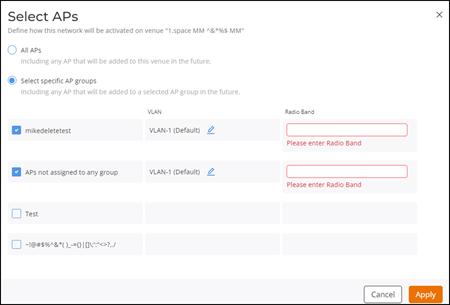
- In the VLAN option, by default VLAN-1 is selected.
Click the
 icon and configure the VLAN or VLAN
pool for the selected AP group.
 - In the Radio Band option, remove or add any AP-supported radio bands in the drop-down list for the selected AP group.
- Click Apply.
- Click All
APs in the APs column. The
Select APs dialog box is displayed.
Select All APs to activate this network on all current
and future APs at this venue. You can also choose to remove or
add any AP-supported radio bands in the Radio
Band drop-down list giving you the flexibility
of broadcasting this network only on the selected radio
bands.
-
By default, this network configuration is scheduled for 24/7. To
configure the Scheduling, complete the following
steps:
- Click 24/7 in the Scheduling
column. The Schedule for Network
<network-name> in Venue <venue-name>
dialog box is displayed. Alternatively, you may follow the
remaining sub-steps to customize the schedule.
Schedule for Network Dialog Box 
- Click Custom Schedule.
- Network schedule is customized as per your requirement. You can configure the schedule for Monday through Sunday and from midnight to midnight (from 00:00 hours through 23.59 hours). For more information, click See tips. The Network Scheduler Tips dialog box opens, displaying different configuration tips in the form of animated GIFs.
- Click OK to close the Network Scheduler Tips dialog box.
- Click Apply.
- Click 24/7 in the Scheduling
column. The Schedule for Network
<network-name> in Venue <venue-name>
dialog box is displayed. Alternatively, you may follow the
remaining sub-steps to customize the schedule.
-
The Network
Tunneling column shows the tunneling service associated
with each active network. Click the toggle to enable tunneling and
select a Network Topology tunnel type from the drop-down list.
Selecting SoftGRE allows you to select a SoftGRE
profile and optionally enable and configure IPsec (refer to Creating a SoftGRE Profile and Creating a IPsec Profile). Click Add to
save and apply your changes. The SD-LAN
option is available only in networks containing RUCKUS Edge
devices.
Selecting a Tunneling Service 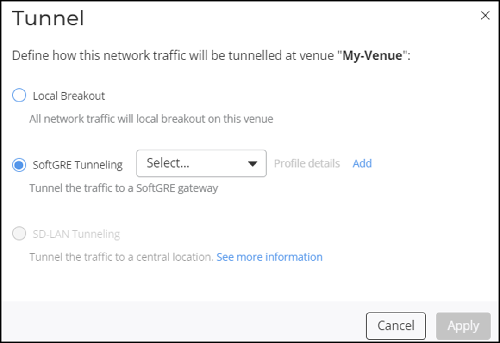
-
Select the venues in which you want to activate this network:
-
Click Next.
The Summary page is displayed.
-
Review the settings that you
configured. To display the passphrase in plain text, click the
 icon.
icon.
- Click Finish.