Creating a Network That Uses Hotspot 2.0 Access
You can create a Wi-Fi hotspot network that automatically and securely authenticates users while roaming.
You can configure the Wi-Fi Operator and
Identity Provider profiles before or during Hotspot 2.0 Access network creation.
Complete the following steps to create a Hotspot 2.0 Access network:
-
From the navigation bar, select
Wi-Fi > Wi-Fi Networks
List and then click Add Wi-Fi
Network. Alternatively, from the Dashboard, click
Add
and then select Wi-Fi
Network.
The Create New Network page is displayed.
-
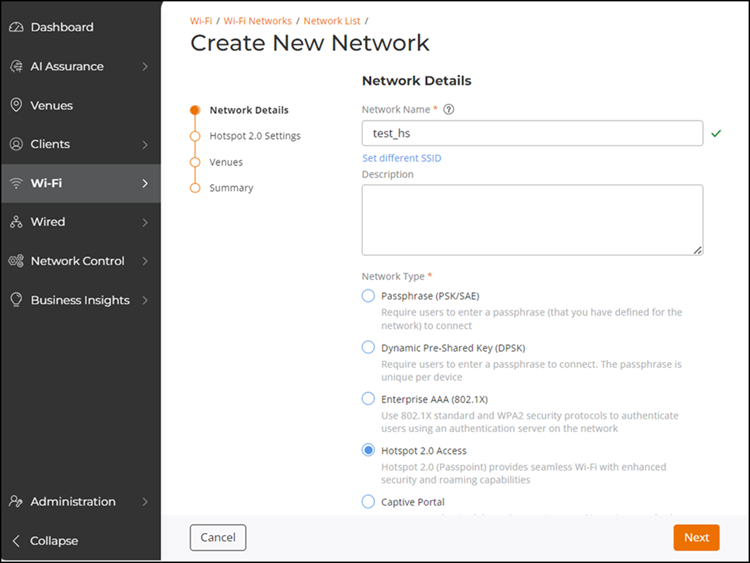
In the Network Details
section, enter a network name, (optionally) enter a description, select the
Network Type as Hotspot 2.0 Access. Optionally, you can configure a separate
SSID different from the network name by clicking Set different
SSID. Click Next to proceed
to the next screen.
Creating a Hotspot 2.0 Access Network 
-
In the Hotspot 2.0
Settings section, select the Security Protocol
from the list.
WPA2 is the default setting and is recommended for secure authentication and ensuring availability on mobile devices.
- Select a Wi-Fi Operator profile from the list or click Add to create a new one (refer to Creating a Wi-Fi Operator Profile.)
- Select one or more Identity Provider profiles from the list or click Add to create a new one (refer to Adding and Managing a Hotspot 2.0 Identity Provider Profile).
-
Select an identity group from
the Identity Group drop-down or click Add to add an
identity Group. Refer to Adding an Identity Group for instructions on how to add an identity group. To view
details about the identity group, click View Details. The
Identity
Group sidebar is displayed.
Note:
- When an identity group is selected, all devices joining the network will automatically become an identity within that group, as displayed on the Identity Group page.
- Users have the option to either select an existing identity group from the list or create a new one.
- During network editing, the initially selected identity group cannot be removed; however, it can be changed to a different identity group.
- The identity configuration section is not applicable to the MAC Registration List when MAC Authentication is enabled.
-
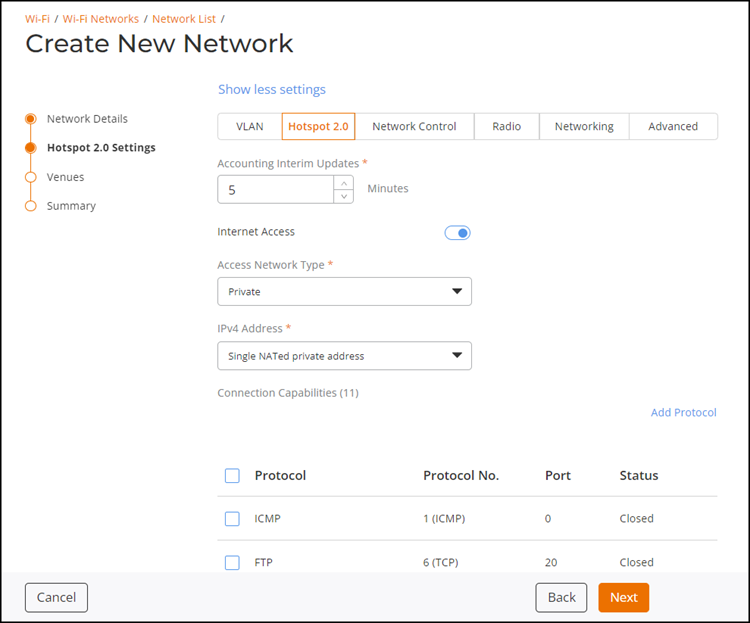
Click Show more
settings and select the Hotspot 2.0 tab,
then configure the following settings and click Next.
- Accounting Interim Updates: Set the accounting update interval, ranging from 0 through 1440. Default value is 5 minutes.
- Internet Access: By default, this option is enabled, which allows devices to connect to the internet through the hotspot. If this option is disabled, any device attempting to connect to the Hotspot Wi-Fi network will be able to connect to the network but will not be able to access the internet.
- Access Network Type: Select the access network type from the list.
- IPV4 Address: Select the IPV4 address type for the network.
- Protocol: Select a preconfigured protocol from the Connection Capabilities table or click Add. In the Add Protocol sidebar, add a Protocol Name, Protocol Number, Port Number, Status, and click Save.
Advanced Hotspot 2.0 Settings 
- Under Venues, toggle the Activated switch to ON for the venues where the Hotspot 2.0 network will be available. The APs, Radios, and Scheduling columns get auto-populated. Click on each entry to select the desired options such as specific AP group, radio options, and network schedule, and click Next.
-
Under Summary, review
the Hotspot 2.0 Access network settings and click Add.
You can see the newly added Hotspot 2.0 Access network in the Network List table.
To view diagnostics data for the Hotspot 2.0 Access network, including ANQP Request/Response, refer to Performing Client Connectivity Diagnostics.