From the RUCKUS One web interface, you
can configure routed interfaces.
Complete the following steps to configure the routed
interfaces.
-
In the
Dashboard, click Venues.
Alternatively, on the navigation bar, click Venues.
The
Venues page is displayed.
-
Select the Venue
Name and click Edit.
Alternatively, select the Venue Name and click Configure.
The Venue
Details page is displayed.
-
Select the tab.
The
Routed
Interfaces sub tab is displayed.
Routed Interfaces Sub
Tab

The
Routed
Interfaces sub tab diplays the following information:
- VE: Name of the VE.
- VLAN
ID: VLAN ID number.
- Name: Name of the VLAN.
- Port
Type: Type of port.
- Switch: Name of the switch.
- IP
Address: IP address of the device.
- IP Subnet
Mask: IP subnet mask of the device.
- Ingress
ACL: Number of Ingress ACL.
- Egress
ACL: Number of Egress ACL.
-
Click Add VLAN
Interface (VE) to add a VE.
The
Add VE Port dialog box is displayed.
Add VE Port Dialog Box
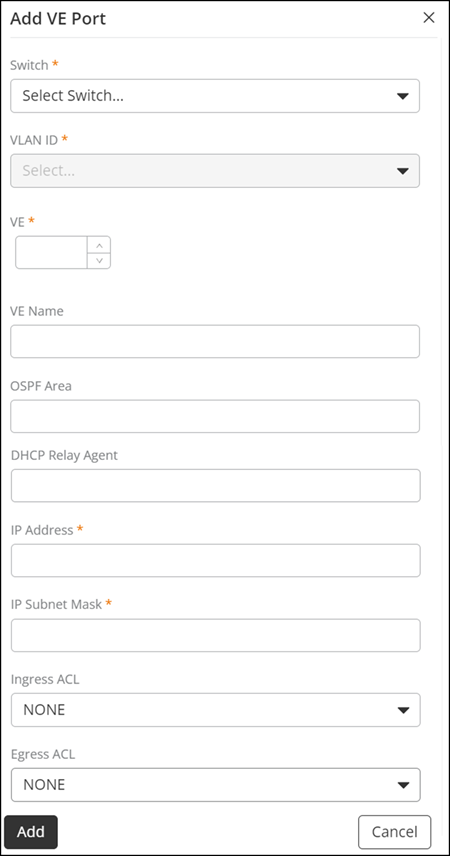
-
Complete the following fields to add a VE:
- Switch: Select a switch from the drop down
list.
- VLAN ID: Select a VLAN ID name from the drop down
list.
- VE: By default, the selected VLAN ID number is
automatically updated in this field.
- VE Name: Enter a name for the VLAN
interface.
- OSPF Area: Enter a OSPF area number.
- DHCP Relay Agent: Enter a IP address for DHCP
relay.
- IP Address: Enter an IP address.
- IP Subnet Mask: Enter an IP subnet mask.
- Ingress ACL: Select Ingress ACL number from the
drop down list.
- Egress ACL: Select Egress ACL number from the
drop down list.
-
Click Save to add the VE. The added VE is dispalyed in
the table.
-
Complete the following steps to edit a VE:
-
Select a VE from the table.
-
Click Edit.
-
Update the required fields.
-
Click Save.
-
Complete the following steps to delete a VE:
-
Select a VE from the table.
-
Click Delete.
A delete confirmation message dialog box is
displayed.
-
Click Delete Routed Interface.