You can customize the security settings of the Wi-Fi network in a venue.
Complete the following steps to customize
the security settings of a venue.
On the navigation bar, click
Venues.
The Venues page is displayed.
Select the checkbox next to the
venue name and click Edit. Alternatively, click on the venue name then click
Configure.
Select the Wi-Fi
Configuration > Security sub-tab.
The Security sub-tab
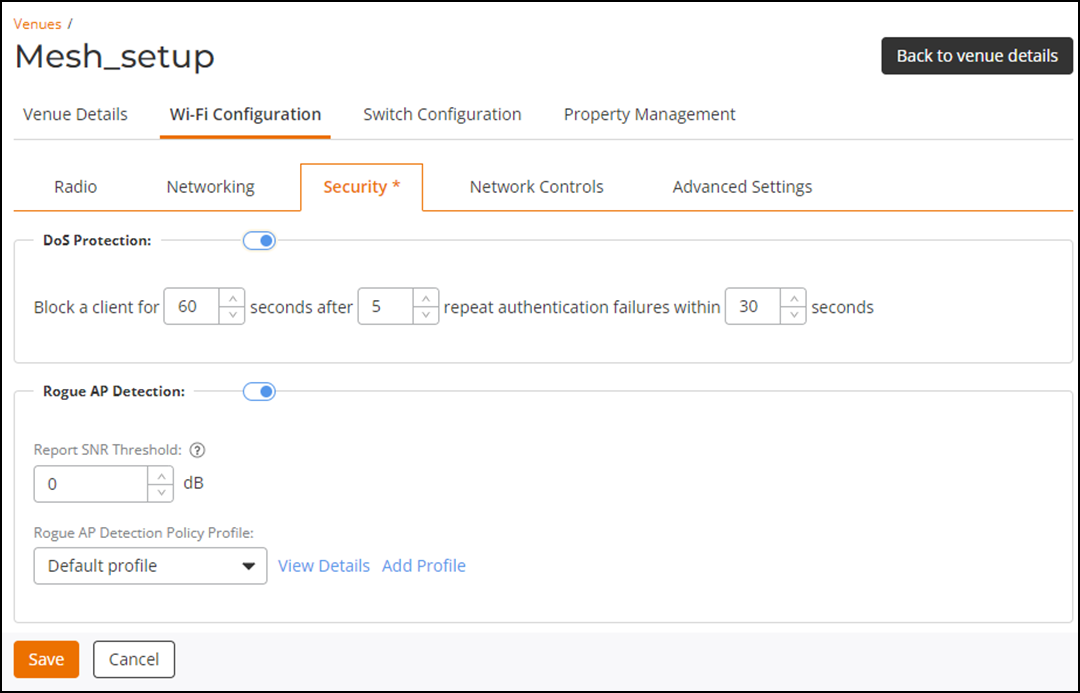
page is displayed.Venue-Level Wi-Fi
Security Tab
(Optional) Toggle the
DoS Protection switch on to enable this feature. By
default, it is disabled.
In the Block a
client for field, enter the number of seconds to block
the client.
In the seconds
after field, enter the number of failed authentication
attempts allowed.
In the repeat
authentication failures within field, enter the time (in
seconds) within which the failures are counted.
(Optional) Toggle the
Rogue AP Detection switch on to enable the WIPS
feature. By default, it is disabled.
RUCKUS One supports Wireless Intrusion Prevention
System (WIPS) functionality for access points. This feature helps detect and
mitigate rogue access points and other wireless threats, improving overall
network security.
Enter the
Report SNR Threshold value. The range is 0 to
100.
Select a Rogue
AP Detection Policy Profile from the drop-down list or
add a new profile.
Click View
Details to review the selected Rogue
AP Detection Policy Profile.
The
Rogue AP Detection Policy Details
sidebar is displayed with the following information:
Classification rules,
Priority, Rule
Name, Rule Type, and
Category.
Toggle the
Malicious Rogue AP Containment switch on to
enable this feature. By default, it is disabled. This feature
deauthenticates an AP suspected of being a malicious rogue. Choose one
of the following containment methodologies:
Aggressive: Sends a deauthentication frame
every two seconds.
Note: Aggressive mode
may disrupt clients and affect client
performance.
Automatic: Sends a deauthentication frame based
on current wireless traffic load.
Conservative (default): Sends a
deauthentication frame once per background scan cycle.
Toggle the
Radio Jamming Detection switch on to enable
this feature. By default, it is disabled. This feature monitors the
wireless spectrum for abnormal RF interference or high noise levels that
may indicate intentional or unintentional jamming. If the AP cannot
access the channel for most of the time and the busy percentage remains
above the set threshold for three consecutive 30-second checks, the AP
reports jamming activity to RUCKUS One. The
system does not change the channel automatically; it only generates a
jamming attack event for administrators to review in RUCKUS One interface. The threshold default is 50 (meaning the
venue's AP radios are busy trying to access a channel for more than 50%
of their airtime) and can be adjusted by sliding the control to specify
a different percentage.
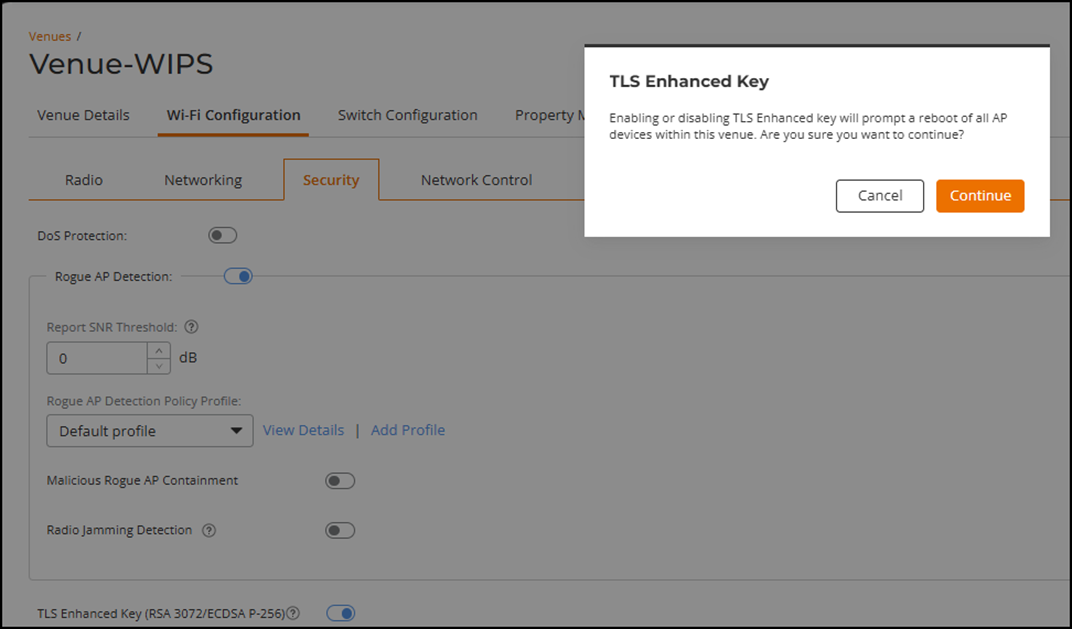
(Optional) Toggle the
TLS Enhanced Key (RSA 3072/ECDSA P-256) switch on to
enable this feature. This feature strengthens the Transport Layer Security (TLS)
connection strength between APs and RUCKUS One by utilizing
the RSA 3072 cryptographic key size for Wi-Fi 7 devices and the NIST Elliptic
Curve Digital Signature Algorithm using the P-256 elliptic curve (ECDSA P-256)
for non-Wi-Fi 7 devices. By default, it is disabled.
A confirmation message appears
indicating that enabling or disabling TLS Enhanced Key
will prompt a reboot of all APs in this venue. Review the message and click
Continue to save the setting. Venue-level Wi-Fi
Security - TLS Enhanced Key Message
Note: If an AP is moved into a venue where the
TLS Enhanced Key setting differs from its
original value (on/off), a confirmation dialog will appear to alert
the user that this action can trigger a reboot of the AP. Refer to
Editing an
AP for more information.
 Note: If an AP is moved into a venue where the TLS Enhanced Key setting differs from its original value (on/off), a confirmation dialog will appear to alert the user that this action can trigger a reboot of the AP. Refer to Editing an AP for more information.