Adding and Managing an Administrator
The RUCKUS One account allows you to add users to facilitate the delegation of specific types of management tasks.
Note:
- Trial accounts are limited to one administrator account. If you have a trial account with a TEMP license, you cannot create an additional administrator account.
- An administrator cannot edit or delete their own account.
- If a Privilege Group contains at least one user, its Name cannot be changed.
- Only Administrator and Read‑Only system groups support the Clone operation.
- System‑defined groups cannot be deleted.
- On the navigation bar, select Administration > Account Management > Users & Privileges.
-
Select the
Users sub-tab.
The following information is displayed:
- Name: Displays the name of the user.
- Email: Displays the email address of the user.
- Authentication Type: Displays the authentication type (SSO with 3rd Party or RUCKUS) configured for the user to log in to RUCKUS One. This must be enabled or activated in RUCKUS One.
- Privilege Group: Displays the privilege group with which the user is associated. Privilege groups can be system-defined or custom-defined.
You can use the Search option to display only the table entries matching the specified user Name or Email; enter a minimum of two characters. You can also use the Authentication Type and Privilege Group filters to display only entries matching your selections. You can sort the list of users by attribute; simply click on the desired column header to reorder the list. -
Click Add User to add a
new user.
The Add New User sidebar is displayed.
Add New User 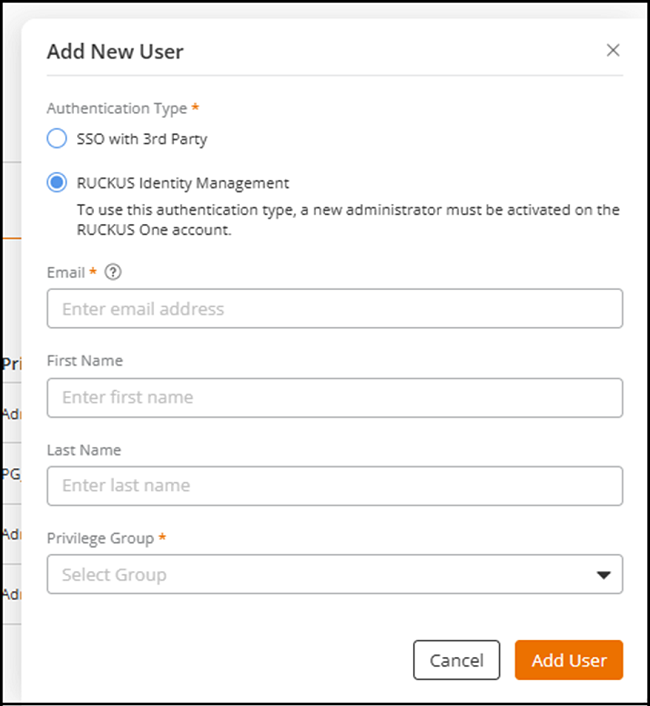 Complete the following steps to add a user:
-
Select the Authentication
Type. The options are SSO with 3rd
Party or RUCKUS Identity
Management.
Note:
- To use the RUCKUS Identity Management authentication type, a new administrator must be activated on the RUCKUS One account.
- To use the SSO with 3rd Party option, you must first enable the Enable SSO with 3rd Party provider option on the Administration > Account Management > Settings tab. Refer to Configuring SAML SSO with Azure AD for complete instructions.
-
Enter a valid Email address.
Make sure the email address is already registered with RUCKUS One.Note:
- You can associate a single email address with multiple tenants across different brands or MSPs. This allows you, as an MSP administrator, to manage them all.
- You can use the "+" (plus) notation in email addresses (for example, user+admin1@domain.com) to create unique variations for organizational purposes, allowing you to better manage and filter RUCKUS One administrative accounts while still delivering emails to the primary email system (for example, user@domain.com).
- (Optional) Enter the user's First Name.
-
(Optional) Enter the
user's Last
Name.
Note: The system uses the first and last name saved in your RUCKUS One admin profile. If those fields are empty, it will use the name stored in Identity Management.
-
Select the Privilege Group from the drop-down
list.
Note: Assigning a privilege group. Refer to Understanding Administrator Roles and Privileges and Adding and Managing a Custom Privilege Group for information to help you select an existing privilege group or configure a new one (if necessary).Note: You must map each user to a system-defined or custom privilege group. Prime Admin is available only for MSP customers.When the Privilege Group is Administrator, Prime Admin, or Read Only, the Managed Customers field is displayed.
- Select the radio button alongside None, All Customers, or Specific Customers in the Managed Customers field.
-
Click Add
User.
The newly added user appears in the Users list, and the Members count in the Privilege Groups sub-tab updates for the assigned group.
-
Select the Authentication
Type. The options are SSO with 3rd
Party or RUCKUS Identity
Management.
-
(Optional) Select the checkbox
alongside the user name to display and access the following options:
- Edit
- Delete
-
(Optional) Click Edit.
The Edit User sidebar is displayed. Modify the following fields, as necessary, and click Apply.
- First Name
- Last Name
- Privilege
GroupNote: Changing the Privilege Group immediately alters the user’s access scope based on the Privilege Group configuration. Scope cannot be modified in the Edit User sidebar; it is defined in the Privilege Group.Note: Editing administrator profile fields (First Name, Last Name, Privilege Group) generates system updates that are recorded on the Administration > Timeline page in the Activities, Events, and Admin Logs tabs. Privilege Group and name changes are logged with before and after values, the acting administrator, and the timestamp. Hover over the entry to view these details.Note: If webhooks are configured for administrator events, any update, such as a name change or Privilege Group change, triggers a notification. Select a payload format from the Payload list. For example, if you choose Microsoft Teams, the system sends the administrator‑update notification to your Teams destination using the selected payload format.
-
(Optional) Click Delete.
A confirmation dialog is displayed. Review and click Delete User. A message confirming successful deletion is displayed.Note: You cannot edit nor delete yourself.Note: If the deleted administrator is currently signed in to RUCKUS One, the system immediately terminates the active session and logs the user out to prevent further access.