Creating an IPsec Profile
An IPsec profile is a configuration that outlines how Internet Protocol Security (IPsec) is used to secure network communications by authenticating and encrypting each IP packet in a data stream.
-
Access the Add IPsec
page using one of the following methods:
- On the My Services page: Click the IPsec tile, then click the Add IPsec Profile button.
- On the Service Catalog page: Click the Add button in the IPsec tile.
This displays the Add IPsec page.
Adding an IPsec Profile - VXLAN-GPE 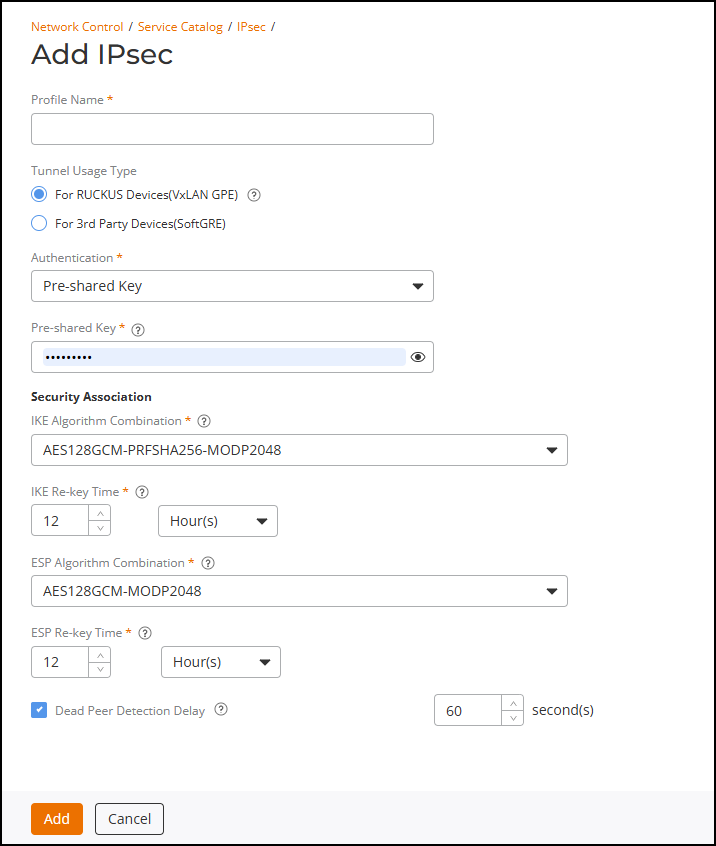
-
For Tunnel Usage Type, select one of the options:
- For RUCKUS Devices (VXLAN GPE): Select this option to configure IPsec encryption for VXLAN-GPE tunnels between APs and RUCKUS Edge devices.
- For 3rd Party Devices (SoftGRE): Select this option to configure IPsec tunnels for third-party devices using SoftGRE encapsulation.
Based on the selected Tunnel Usage Type, different sets of configuration fields are displayed.
When the For RUCKUS Devices (VXLAN GPE) option is selected, complete the following fields:- Authentication:
Select Pre-shared key from the drop-down list and
Enter a secure key (8–128 characters) using standard printable characters. Do not include quotes ("), backticks (`), $ (.
- Security Association:
Define the encryption and integrity algorithms (proposal sets) used
during IKE and IPsec Security Association (SA) establishment.
- IKE Algorithm
Combination: Specify the proposal sets for
IKEv2 negotiation between peers. Select one of the
predefined combinations from the drop-down list.
- AES128GCM-PRFSHA256-MODP2048 (default)
- AES128-SHA384-USE_INTEGRITY_ALG-ECP384
- AES128-SHA256-USE_INTEGRITY_ALG-MODP2048
Note:USE_INTEGRITY_ALGindicates that the Integrity Algorithm is also used as the Pseudo-Random Function (PRF). For example, if SHA-256 is selected as the Integrity Algorithm, the same algorithm will be configured as the PRF in IKE or ESP proposals. - IKE
Re-key Time: Specify the interval at which
IKE Security Associations (SAs) are re-established to
refresh session keys. You can define the interval in
minutes, hours, or days. Default value is 12 hours. Valid
ranges are:
- Minute(s): 10 through 60 minutes
- Hour(s): 1 through 24 hours
- Day(s): 1 through 7 days
- ESP Algorithm
Combination: Specify the encryption and
integrity algorithms used for the Encapsulating Security
Payload (ESP) phase of the IPsec tunnel. Select one of the
predefined combinations from the drop-down list.
- AES128GCM-MODP2048 (default)
- AES128-SHA384-ECP384
- AES128-SHA256-MODP2048
- ESP
Re-key Time: Specify the interval at which
ESP Security Associations (SAs) are rekeyed. You can define
the interval in minutes, hours, or days. Default value is 12
hours. Valid ranges are:
- Minutes(s): 10 through 60 minutes
- Hour(s): 1 through 24 hours
- Day(s): 1 through 7 days
- Dead Peer Detection Delay: If selected, monitors peer availability by periodically sending DPD probes to verify that the remote peer is reachable. This option is enabled by default. Valid value range for DPD timeout is 30 through 600 seconds. The default timeout value is 60 seconds. It is recommended to keep this option enabled.
- IKE Algorithm
Combination: Specify the proposal sets for
IKEv2 negotiation between peers. Select one of the
predefined combinations from the drop-down list.
When For 3rd Party Devices (SoftGRE) is selected, complete the following fields:Adding an IPsec Profile - SoftGRE 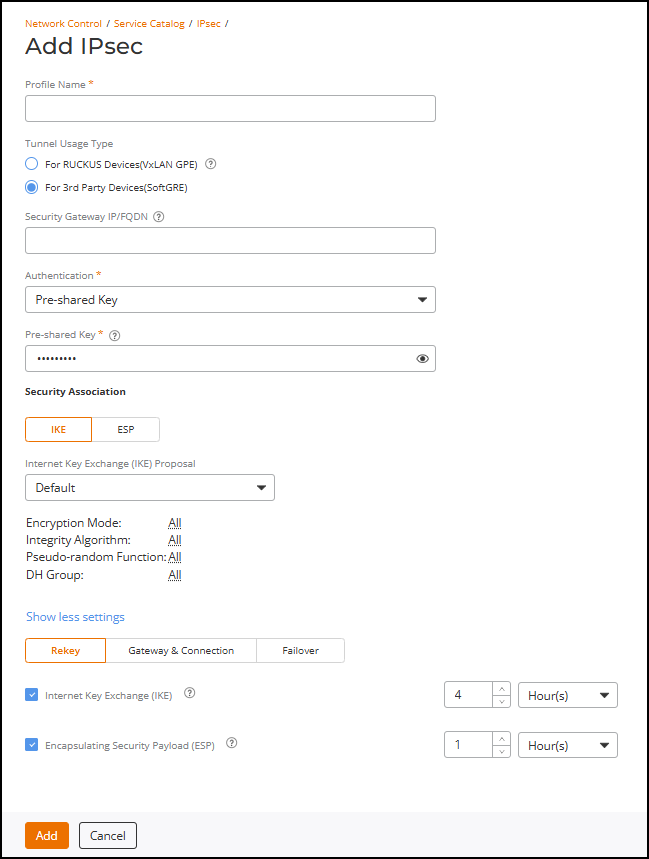
- Security Gateway: Enter the IP address or fully qualified domain name (FQDN) of the IPsec server. The IP address format depends on the IP mode configured on RUCKUS One. Only IPv4 is supported.
- Authentication: Select Pre-shared key from the drop-down list and enter the pre-shared key ranging from 44 through 128 hexadecimal characters or 8 through 64 ASCII characters (including ASCII characters from space (char 32) to ~ (char 126) except for ASCII characters " (char 34), ` (char 96), $( (chars 36 and 40 in succession)). Base64 characters are not allowed.
- For Security
Association, select IKE or
ESP.
In each, you can select Default to use the default settings or select Custom to configure the following Internet Key Exchange (IKE) or Encapsulating Security Payload (ESP) proposal settings manually.
- Encryption Algorithm: Options include 3DES, AES128, AES192, and AES256.
- Integrity Algorithm: Options include MD5, SHA1, AEX_XBC, SHA256, SHA384, and SHA512.
- Pseudo-Random Function: This additional option is available only when you select IKE. Options include USE_INTEGRITY_ALG, PRF_MD5, PRF_SHA1, PRF_AES_CBC, PRF_AES_MAC, PRF_SHA256, PRF_SHA384, and PRF_SHA512.
- DH Group: Options for Diffie-Hellman (DH) groups for IKE include MODP768, MODP1024, MODP1536, MODP2048, MODP3072, MODP4096, MODP6144, MODP8192 and ESP384.
- (Optional) Click Add Another Proposal to add another IKE or ESP proposal. This additional option is available only when you select Custom.
- (Optional) Click Show more settings to configure
the following additional settings:
By default, the Rekey tab is displayed.
- For Rekey, you can enable or disable Internet Key Exchange (IKE) or Encapsulating Security Payload (ESP) or both by selecting the corresponding checkboxes. When enabled, select a time unit (day, hour, or minute) from the drop-down list, and enter a number to set the time interval at which the IKE or ESP key renews. Both options are enabled by default.
- Select the Gateway & Connection tab
and configure the following Gateway and Connection settings:
- DHCP Option 43 Sub Code for Security Gateway: Set the DHCP Option 43 subcode that will be used to discover the address of the security gateway on the network. The default subcode is 7. Available range is from 3 through 243, excluding 6.
- Retry Limit: Set the number of times that RUCKUS One will attempt to discover the address of the security gateway. By default, this option is enabled and the default retry count is set to 5. Accepted values are from 1 through 16.
- ESP Replay Window: Set the ESP replay window (in packets). By default, this option is enabled and the default size is set to 32 packets. Accepted values are from 1 through 32 packets.
- IP Compression: Toggle the switch to enable the IP Payload Compression Protocol (IPComp) compression before encryption. By default, IP Compression is disabled. The benefits of compression before encryption include reducing transmission bandwidth, enhancing network efficiency, and maintaining integrity and confidentiality without interfering with the encryption process.
- Dead Peer Detection Delay: Select the checkbox to enable this option and select the delay period (available range is 1 through 65536 seconds). By default, this option is enabled, allowing the IKE or ESP protocol to run a health check with the remote peer to ensure that it is alive; the default delay is set to 30 seconds.
- Force NAT-T: Toggle the switch to enforce UDP encapsulation of ESP packets, thereby allowing IPsec traffic to successfully traverse a NAT device that may otherwise block IPsec traffic. By default, this option is disabled.
- NAT-T Keep Alive Interval: Enter a value (in seconds) to set the keepalive interval for NAT traversal. By default, this option is enabled and the default keepalive interval is set to 20 seconds. Accepted values are 1 through 65536.
- Select the Failover tab and configure the
failover settings when APs are unable to connect to RUCKUS
One:
- Retry Duration: Select the retry duration from the drop-down list as Specific Period and set the number of days during which APs will keep attempting to reconnect (accepted values are 3 through 65536 days) or select Forever (default setting) to keep trying indefinitely.
- Retry Interval: Set the interval (in minutes) between each retry attempt. The default retry interval is 1 minute. Accepted values are from 1 through 30 minutes.
- Retry
Mode: Select one of the following
options:
- Revertive: APs will fall back to the specified primary security gateway.
- Non-revertive: APs will maintain connectivity with the security gateway to which they are currently connected. This is the default setting.