You can view, edit, delete, and
monitor certificate templates and their associated certificates.
Complete the following steps to
manage certificate templates:
From the navigation bar, select
Network
Control > My
Services.
The My
Services page is displayed.
Select the Certificate
Management tile.
The Certificate
Management page is displayed, defaulting to the Templates sub-tab
on the Device
Certificates tab.
The page displays the
following information:
Name:
Displays the name of the certificate template. Click the name to
open the certificate template details page.
CA
Type: Displays the type of certificate
authority.
Certificates: Displays the number of certificates
using the template.
Networks: Displays the number of networks using the
template.
Identity
Group: Displays the identity group.
Common
Name: Displays the configured common name.
Certificate
Authority: Displays the name of the associated
certificate authority.
Adaptive Policy
Set: Displays the adaptive policy set.
You can customize
which fields appear in the table by clicking the icon and selecting or deselecting the desired column names. Drag and drop
individual column names up or down the list to customize the left‑to‑right
column display in the table. Optionally, you can click Reset to
default to have the default subset of columns appear in the
table. Use the Clear
Filters option to remove all applied filters.
You can use the Search option
to display only the table entries matching the specified Name and
Common
Name; enter a minimum of two characters. Additionally, you
can filter the list by selecting one or more of the options from the
Certificate
Authority drop-down list.
(Optional) Select the radio
button alongside the template name to access the management options:
Edit:
Modifies the certificate template.
Delete:
Deletes the certificate template.
Attention: Deleting a certificate template deletes all data
associated with the template, including issued certificates.
Certificates issued from the template begin to fail RADIUS
authentication. This action cannot be undone.
(Optional) Click the template
name to access the template details page.
The certificate template
details page displays CA Type,
Certificate
Authority, Identity
Group, and Adaptive Policy
Set. The page has three tabs:
The page displays Common Name,
Status, Expiration Date, Revocation Date,
Identity, Issued By, and
Timestamp.
To generate a certificate using
the selected template, click Generate
Certificate.
(Optional) Select the
SCEP Keys tab and click Add SCEP
Key.
The Add SCEP
Key sidebar is displayed. Complete the following settings:
Name:
Enter a name.
Challenge Password
Type: Select one of the following:
None: Does not configure a challenge password.
This option is selected by default.
Static: Enter a password in the Challenge
Password field.
Microsoft
Intune: Enter the Microsoft
Intune Tenant ID, Azure
Application ID, and Azure
Application Key.
Validity
Information
Note: When possible, restrict access to the SCEP
server. Disable the SCEP key when the key is not in use.
Expiration
Date: Select a date from the calendar.
Allowed
Subnets: Specify the allowed subnets.
Blocked
Subnets: Specify the blocked subnets.
Configuration
Information
Note: When certificates are issued using the SCEP
key, the following settings control the characteristics of the
issued certificates.
Days of
Access: Configure the access period. The valid
range is 0 through 365. By default, access is granted for 10
days.
Common Name
#1 Mapping: Select one of the following options
from the drop-down list:
Ignore
MAC
address, usable as ${MAC_ADDRESS} in the certificate
template
Username, usable as ${USERNAME} in the certificate
template
Device identifier, usable as ${ROLLUP_DEVICE_NAME}
in the certificate template
Email, usable as ${EMAIL} in the certificate
template
Location, usable as ${LOCATION} in the certificate
template
Click Add.
The SCEP key is
added to the SCEP Keys page. The page displays the
following information:
Name: Displays the SCEP key name.
Status: Displays the SCEP key status.
Access: Displays the configured access
duration.
SCEP Enroll
URL: Displays the SCEP enrollment URL.
Challenge
Password: Displays the configured challenge
password type.
(Optional) Select the
Chromebook Enrollment tab to view the status of the
Chromebook Enrollment option for the certificate
template configuration. If disabled, then there is nothing more to view.
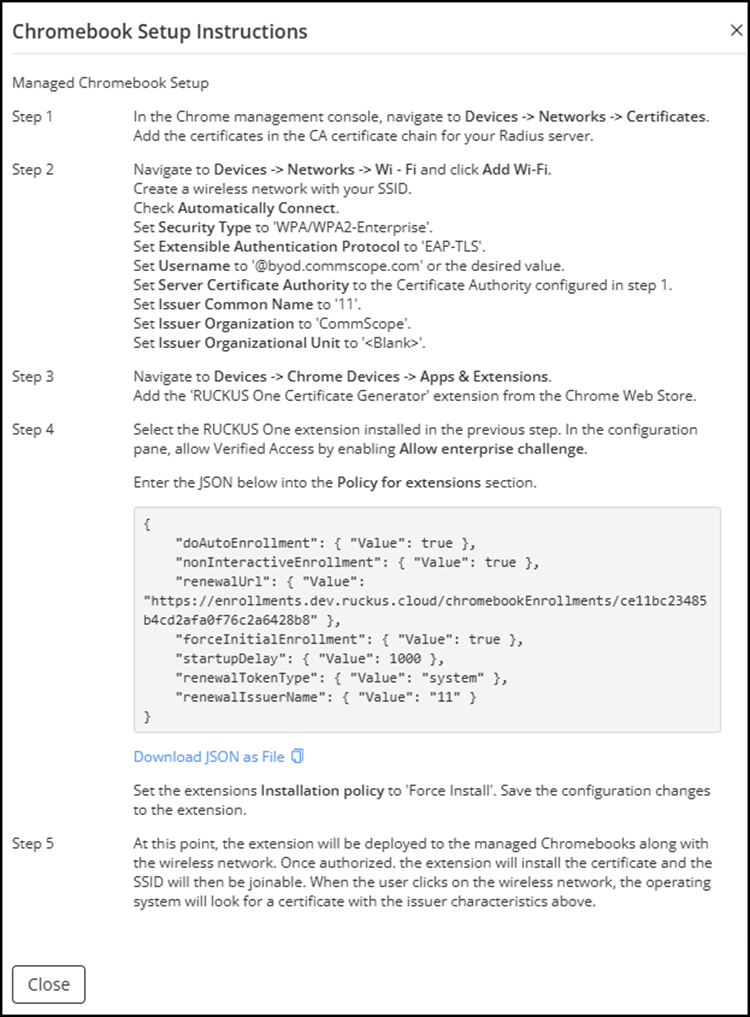
If enabled, then basic
configuration information is displayed and you can click Show setup
instructions. The Chromebook Setup
Instructions sidebar is displayed.Viewing Chromebook
Setup Instructions
 icon and selecting or deselecting the desired column names. Drag and drop
individual column names up or down the list to customize the left‑to‑right
column display in the table. Optionally, you can click Reset to
default to have the default subset of columns appear in the
table. Use the Clear
Filters option to remove all applied filters.
icon and selecting or deselecting the desired column names. Drag and drop
individual column names up or down the list to customize the left‑to‑right
column display in the table. Optionally, you can click Reset to
default to have the default subset of columns appear in the
table. Use the Clear
Filters option to remove all applied filters.