You can generate, upload, download, and
view server and client certificates used for certificate-based authentication in your
organization. Server and client certificates are identified by their Extended Key Usage
(EKU) values.
Complete the following steps to generate or
manage server and client certificates:
Add the Certificate Management
service to your tenant account. From the navigation bar, select Network
Control > Service
Catalog.
Find the Certificate
Management tile and click Add.
The Add Certificate Instance page is
displayed.
Select Server &
Client Certificate from the Template Instance
Type drop-down list and then click Next.
The Generate
Certificate page is displayed, containing the following
options:
Generate
Certificate: Creates a new server or client certificate
signed by a Certificate Authority (CA).
Generate Certificate
with CSR: Uses an existing Certificate Signing Request
(CSR) and a CA to generate a server or client certificate.
Upload
Certificate: Uploads an existing server or client
certificate.
(Optional) Select
Generate Certificate and complete the following
fields:
Select a certificate authority from the Certificate
Authority drop-down list.
Enter values in the following certificate attribute fields:
Name, Organization,
Organization Unit,
Country, State /
Province, and Locality.
Validity
Period: Specify the certificate validity period. Select
the Start
Date and Expiration
Date.
Note: Certificate authorities
are typically valid for 20 years. The default start date is one
month earlier to help avoid potential system clock
issues.
Certificate Strength: Configure the certificate
strength settings:
Key
Length: Select a key length from 2048 to 4096.
This setting does not apply to certificates generated through
Chromebook enrollment or manually supplied CSRs.
Algorithm: Select an algorithm. Available
options include SHA-1, SHA-256, SHA-384,
and SHA-512.
Select one or more Key Usage options:
Digital Signature
Key Encipherment
Select one or more Extended Key Usage options:
Note: Both options can be selected when the
certificate is intended for both client and server
authentication.
Client Authentication
Server Authentication
(Optional) Select Generate Certificate with CSR and
complete the following fields:
Select a certificate authority from the Certificate
Authority drop-down list.
Enter a value in the Name field.
Paste the CSR in the
Paste
Certificate Sign Request (CSR) field.
Validity Period: Specify the certificate validity
period. Select the Start Date and
Expiration Date.
Note: Certificate authorities are normally valid for 20 years. The
default start date is one month earlier to avoid potential system
clock issues.
Select one or more Key Usage options:
Digital Signature
Key Encipherment
Select one or more Extended Key Usage options:
Note: Both options can be selected when the
certificate is intended for both client and server
authentication.
Client Authentication
Server Authentication
(Optional) Select Upload Certificate and complete the
following fields:
Enter a value in the Name field.
Upload a public key
certificate file. Drag and drop the file into the upload area, or click
Browse to select the file. You can replace the file by
clicking the Change File button, which allows you to browse and
upload a new file.
Note: A PKCS #12 (.p12) file
contains both public and private keys. If the private key is
password-protected, enter the password in the Private Key
Password field. Supported public key file types are
.p12, .der, .cert, and .pem.
Upload a private key
file, if required. Drag and drop the file into the upload area, or click
Browse to select the file. You can replace the file by
clicking the Change File button, which allows you to browse and
upload a new file.
Note: Supported private key file
types are .pem, .key, and .cert.
Enter a password in the
Private
Key Password field if the private key is
password-protected.
Click Add.
The certificate is added and displayed in the Server & Client
Certificates tab.
Certificate Management
- Server & Client Certificates
The page displays the following information:
Name: Displays the certificate name.
Status: Displays the certificate status.
Description: Displays the certificate
description.
Issued By: Displays the certificate authority
that issued the certificate.
Valid To: Displays the certificate expiration
date.
Extended Key
Usage: Displays the intended certificate usage, such
as Server
Authentication or Client
Authentication.
You can customize which fields
appear in the table by clicking the icon and selecting or deselecting the desired column names. Drag and drop
individual column names up or down the list to customize the left‑to‑right
column display in the table. Optionally, you can click Reset to
default to have the default subset of columns appear in the
table. Use the Clear
Filters option to remove all applied filters.
You can use the Search option
to display only the table entries matching the specified Name and
Description; enter a minimum of two characters.
Additionally, you can filter the list using the Status and
Extended Key
Usage drop-down menus. The status includes Valid,
Invalid, Revoked, and
Expired. The extended key usage includes Server
Authentication and Client
Authentication.
(Optional) Select the checkbox alongside the name to display the management
options:
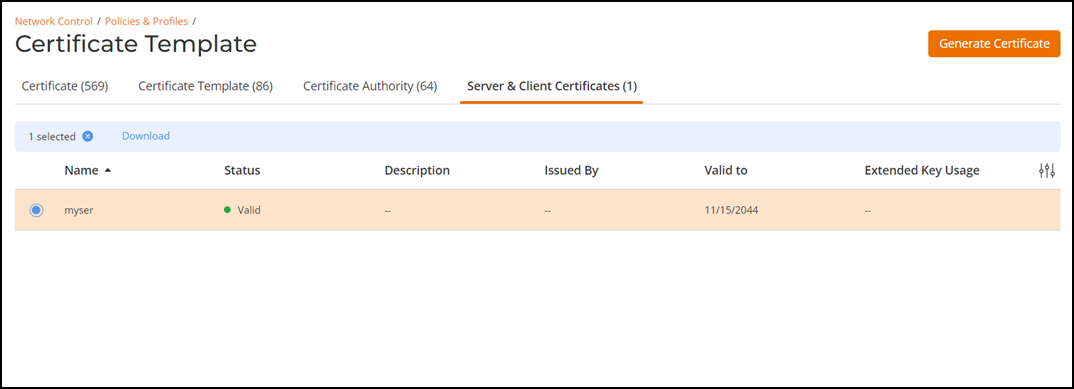 The page displays the following information:
 icon and selecting or deselecting the desired column names. Drag and drop
individual column names up or down the list to customize the left‑to‑right
column display in the table. Optionally, you can click Reset to
default to have the default subset of columns appear in the
table. Use the Clear
Filters option to remove all applied filters.
icon and selecting or deselecting the desired column names. Drag and drop
individual column names up or down the list to customize the left‑to‑right
column display in the table. Optionally, you can click Reset to
default to have the default subset of columns appear in the
table. Use the Clear
Filters option to remove all applied filters.