Identity Provider Overview
An Identity Provider provides network services and operates the AAA infrastructure required to authenticate subscribers.
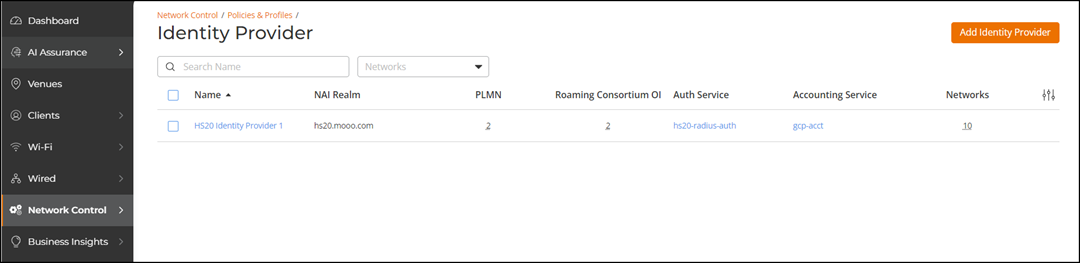
Navigating to the Identity Provider tile (via ), you can see the SAML, Hotspot 2.0, and OAuth (Entra ID) tabs, which allow you to view the following information about all the identity providers associated with your RUCKUS One account. The information is displayed in table format, reflecting a default subset of columns.
The following information about the SAML Identity Providers is displayed.
| Name | Name of the SAML Identity Provider. This is a sortable field. |
| IdP Metadata | IdP metadata that is provided by the identity provider. Click on the
 icon to view the IdP metadata. icon to view the IdP metadata. |
| SAML Request Signature | Specifies whether the SAML request signature option is on or off. If it is on, then you may click the blue SAML Request Signature link to view more details. |
| SAML Response Encryption | Specifies whether the SAML response encryption is on or off. If it is on, then you may click the blue SAML Response Encryption link to view more details. |
| Networks | The number of networks associated with a SAML IdP profile. Hover your cursor over the network number to view more details. |
The following information about the Hotspot 2.0 Identity Providers is displayed.
| Name | Name of the HS 2.0 Identity Provider. This is a sortable field. |
| NAI Realm | List of network access identifier (NAI) realms corresponding to the Service Providers (SPs) or other entities whose networks or services are accessible through an associated Wi-Fi network. Up to 16 NAI realm entries can be created. Each NAI realm entry can contain up to four Extensible Authentication Protocol (EAP) methods. Each EAP method can contain up to four authentication types. |
| PLMN | The total number of Public Land Mobile Networks (PLMNs) defined for the identity provider. Hover your cursor over the number to display a list of the PLMNs. Up to 16 PLMN entries can be created. Each PLMN contains a Mobile Country Code (MCC) and a service-provider-specific Mobile Network Code (MNC); this is used when the controller sends MAP authentication information. |
| Roaming Consortium OI |
The total number of Roaming Consortium Organization Identifiers (OIs) defined for the identity provider. Hover your cursor over the number to display a list of the Roaming Consortium OIs. A Roaming Consortium OI, as defined in IEEE 802.11u, is a unique value assigned to one (or a group of) subscription service providers that support Hotspot 2.0 roaming. During network discovery and selection, the client device receives the list of OIs and determines if any of them meet the device’s connection and roaming policies. Up to 12 Roaming Consortium entries can be created and you can adjust the order since the AP takes up to 3 OIs in the beacon. |
| Auth Service | Authentication Service to map a realm to an external RADIUS server that is preconfigured. Click the Authentication Service entry to view detailed information. |
| Accounting Service | Accounting Service to map a realm to an external RADIUS server that is preconfigured. Click the Accounting Service entry to view detailed information. |
| Networks | The total number of Hotspot 2.0 Access networks associated with the Wi-Fi operator. Hover your cursor over the number to display a list of Hotspot 2.0 networks. |
| Profile Name | Name of the OAuth (Entra ID) Identity Provider profile. |
| Tenant ID | Microsoft Entra ID tenant identifier associated with the Identity Provider profile. |
| Client ID | Client identifier of the registered Microsoft Entra ID application. |
| Networks | The total number of Wi-Fi networks associated with the Identity Provider profile. Hover your cursor over the network number to view more details. |
You can use the Search option to display only the table entries matching the specified profile name; enter a minimum of two characters.
You can filter Identity Provider profiles by selecting a Wi-Fi network from the Networks drop-down list. Click Clear Filters to reset the filters.
You can customize which fields appear in
the Hotspot 2.0 table by clicking the  icon and
selecting or deselecting the desired column names. Optionally, you can click Reset to default to have
the default subset of columns appear in the Hotspot 2.0 table.
icon and
selecting or deselecting the desired column names. Optionally, you can click Reset to default to have
the default subset of columns appear in the Hotspot 2.0 table.