Creating a Tunnel Profile
A tunnel profile is essential for managing and optimizing the behavior of tunnels between Access Points (APs) and the RUCKUS Edge device. Each Tunnel Profile is linked to a single cluster, and each cluster is confined to a specific venue.
APs use tunnel keepalive request messages to verify the reachability of the RUCKUS Edge device before establishing AP data tunnel and broadcasting WLANs enabled with an SD-LAN service. Once the tunnel is established, APs continue to send periodic keepalive request messages to monitor the reachability of the Edge device. If the AP does not receive responses for the maximum number of consecutive keepalive requests, it assumes the Edge is unreachable, brings down the tunnel, and stops broadcasting the WLANs. The AP continues to send periodic keepalive requests and will reestablish the tunnel and resume broadcasting WLANs upon receiving responses.
Complete the following steps to create a Tunnel Profile:
-
From the navigation bar, select
Network
Control > My Services or Service Catalog.
The My Services or Service Catalog menu is displayed respectively.
-
Click Add in the
Tunnel
Profile tile.
The Add Tunnel Profile page is displayed.
Add Tunnel Profile - VxLAN GPE 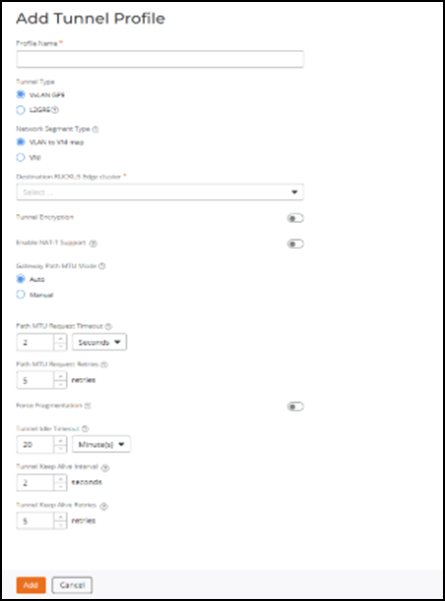
Add Tunnel Profile - L2GRE 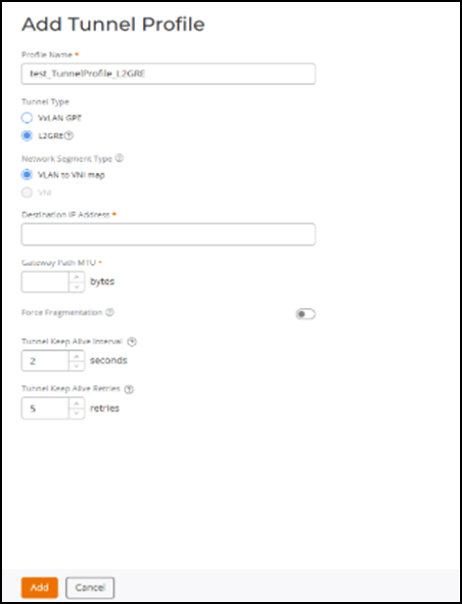
-
Complete the following
fields:
- Profile Name: Enter the name for the tunnel profile.
- Tunnel Type: Select one of the following options:
- VxLAN
GPE: Establishes tunnels between RUCKUS Access Points and
RUCKUS Edge devices. It supports multiple encapsulated protocols for
SD-LAN deployments needing flexibility and scalability.Note: IPv6 data packets will be tunneled through existing IPv4 VxLAN-GPE tunnels between APs and RUCKUS Edge. This support is applicable only for the SD-LAN service.When VxLAN GPE is selected, complete the following fields:
- Network Segmentation Type: The VLAN to VNI map option is selected by default. The SD-LAN service maps the VLAN ID to the VNI for tunneling. Select the VNI option if the tunnel will be used by a Personal Identity Network (PIN). Selecting the VNI option disables the Enable NAT-T Support option.
- Destination RUCKUS Edge cluster: Destination Edge cluster name, which is used for AP to cluster or DMZ tunnels. A Tunnel Profile which is intended to be used for an AP to cluster configuration must have an Edge cluster already configured. Select the destination cluster from the drop-down.
- Tunnel
Encryption: Enable IPSec/IKE-based encryption
for VxLAN-GPE tunnels between APs and Edge devices. If enabled,
the tunnel traffic between the AP and Edge device is secured
using IKEv2 and IPSec protocols, ensuring data confidentiality
and integrity across public or untrusted networks. Once enabled,
additional configuration fields appear for selecting or adding
an IPSec profile.Note: Tunnel encryption is supported only for VxLAN-GPE tunnels. Enabling or disabling tunnel encryption is a disruptive operation as the existing tunnels are deleted and re-established during the change. It is recommended to perform this action during maintenance windows to avoid service interruptions.
- IPSec Profile: Specifies the
IPSec profile that defines the encryption and
authentication parameters used for the tunnel.
Select a preconfigured IPSec profile from the drop-down list. The selected profile’s details such as Pre-Shared Key, IKE proposal, and ESP proposal are automatically displayed for reference.
If an IPsec profile is not available, click Add to open the Add IPSec Profile sidebar, where you can create and add a new IPSec profile. For more information, refer to Creating an IPsec Profile.
Note: Only one IPSec profile can be associated per tunnel profile. Multiple IPSec profiles per tunnel are not supported.When tunnel encryption is enabled, NAT Traversal (NAT-T) is automatically activated for the VxLAN-GPE tunnel. In addition, Dead Peer Detection (DPD) is enabled by default to monitor peer availability and automatically recover from link failures. If encryption is disabled on a tunnel profile, NAT-T remains enabled. Disabling encryption does not deactivate NAT-T.
- IPSec Profile: Specifies the
IPSec profile that defines the encryption and
authentication parameters used for the tunnel.
- Enable NAT-T Support: Establish and maintain device connections. Even if the AP and Data Center (DC) are separated by a NAT server, which masks the private IP of the AP, VxLAN still facilitates support between the AP and the Edge device. This option is disabled by default. Toggle the switch to enable. When the VNI option in Network Segmentation Type is selected, this option will not be available for selection.
- Gateway
Path MTU Mode: Controls how the gateway handles
the Path Maximum Transmission Unit Discovery (PMTUD). When
configuring a VxLAN-GPE tunnel profile between an Access Point
and a Data Center Edge device, the Gateway Path MTU mode can be
configured as Auto or Manual. When configuring a VxLAN-GPE tunnel
profile between a Data Center Edge device and a DMZ Edge device,
the Gateway Path MTU mode should be configured as Manual because automatic PMTUD is not supported
between two Edge devices. Select one of following options:
- Auto: The system will attempt to automatically discover the optimal Maximum Transmission Unit (MTU) for the tunnel path.
- Manual: Enter the value in bytes
(allowed values are 576 through 1450). The value must be
less than the Ethernet MTU on the AP.Note: Check the Ethernet MTU on the AP; Tunnel MTU gets applied only if it is less than the Ethernet MTU.
- Path MTU Request Timeout: The maximum wait time for a response to a path MTU request. Range: 10 milliseconds through 10 seconds; default is 2 seconds.
- Path MTU Request Retries: The maximum number of Path MTU requests sent to test one MTU value. Range: 3 through 64; default is 5 retries.
- Force Fragmentation: When enabled, the AP or Edge device will automatically fragment packets, ignoring the Don't Fragment (DF) bit in the IP header of the packets. Forced packet fragmentation can reduce congestion and improve network throughout, but it may lead to fragment loss, packet reassembly issues, and memory exhaustion. This option is disabled by default. Toggle the switch to enable.
- Tunnel Idle Timeout: The amount of time a tunnel is allowed to remain active without any traffic. Select Minutes, Days, or Week from the drop-down list and then enter the duration or use the up/down arrows to set the value. Range: 5 through 10080 minutes, 1 through 7 days, or 1 week; default is 20 minutes.
- Tunnel Keep Alive Interval: Defines the interval between two consecutive keepalive request messages. Range: 1 through 5 seconds, with a default value of 2 seconds.
- Tunnel Keep Alive Retries: Defines the maximum number of consecutive keepalive requests that can fail before the AP determines the Edge device is unreachable. Range: 3 through 10 retries, with a default value of 5.
L2GRE: Forwards AP traffic to a third-party device via an L2GRE tunnel for SD-LAN service encapsulation. It encapsulates Layer 2 Ethernet frames within GRE packets to transport them over an IP network, making it suitable for extending Layer 2 networks across Layer 3 boundaries.
When L2GRE is selected, complete the following fields:- Network Segmentation Type: The VLAN to VNI map option is selected by default.
- Destination
IP Address: Enter the IPv4 address of the
third-party, external, upstream device to which the DC cluster
will establish a tunnel.Note: These profiles are not backward compatible and cannot be used as a default profile.
- Gateway Path MTU: Enter the value in bytes (allowed values are 576 through 1450).
- Force Fragmentation: When enabled, the Edge device will automatically fragment packets, ignoring the Don't Fragment (DF) bit in the IP header of the packets. Forced packet fragmentation can reduce congestion and improve network throughout, but it may lead to fragment loss, packet reassembly issues, and memory exhaustion. This option is disabled by default. Toggle the switch to enable.
- Tunnel Keep Alive Interval: Defines the interval between two consecutive keepalive request messages. Range: 1 through 5 seconds, with a default value of 2 seconds.
- Tunnel Keep
Alive Retries: Defines the maximum number of
consecutive keepalive requests that can fail before the Edge
determines the L2GRE server is unreachable. Range: 3 through 5
retries, with a default value of 5.
When Edge reaches the maximum number of retry attempts and determines that the connection to the L2GRE server is down, it generates a down event/alarm and sends it to R1. When the connection between Edge and the L2GRE server is restored, Edge triggers an up event.
-
Click Add.
The Tunnel Profile is created and is displayed on the Tunnel Profile page.