Viewing and Managing Clients Associated with a Switch
You can view information about the clients connected to an ICX switch.
-
Select the Clients
tab.
Switch Details Page - Clients Tab 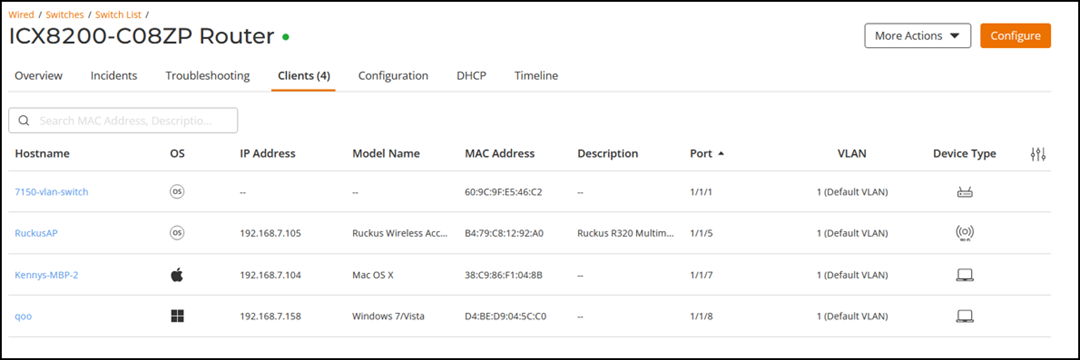
-
Review the following information:
- Hostname: Displays the hostname of the client. Click the hostname hyperlink to open the Client Details page. From the Client Details page, you can view detailed client information.
- OS: Displays the operating system of the client.
- MAC Address: Displays the MAC address of the client.
- IP Address: Displays the IPv4 address of the client.
- IPv6 Address: Displays the IPv6 address of the client.
- Description: Displays the client description.
- Port: Displays the switch port through which the client is connected. Click the port hyperlink to open the Edit Port sidebar.
- VLAN: Displays the VLAN associated with the client.
- VNI: Displays the Virtual Network Identifier (VNI).
- Authentication Type: Displays the authentication type used by the client.
- Device Type: Displays the device category associated with the client.
- Model Name: Displays the device model name.
- Alias: Displays the configured alias of the client.
Note: The DHCP client visibility feature, that displays OS, IP address, and model name, is supported only on ICX switch firmware version 10.0.10c or higher.You can customize which fields appear in the table by clicking the
 icon and selecting or deselecting the desired column names. Drag and drop
individual column names up or down the list to customize the left‑to‑right
column display in the table. Optionally, you can click Reset to
default to restore the default subset of columns. Click
Clear
Filters to remove all applied filters and restore the
complete list of clients. You can sort the list by clicking the associated
column header.
icon and selecting or deselecting the desired column names. Drag and drop
individual column names up or down the list to customize the left‑to‑right
column display in the table. Optionally, you can click Reset to
default to restore the default subset of columns. Click
Clear
Filters to remove all applied filters and restore the
complete list of clients. You can sort the list by clicking the associated
column header. You can use the Search option to display only the entries that match the specified criteria. Select General to search general client information. Select MAC to search using a MAC address. You can enter the MAC address in commonly used formats, including colon-separated (for example, 00:1A:2B:3C:4D:5E), hyphen-separated (for example, 00-1A-2B-3C-4D-5E), dot-separated (for example, 001A.2B3C.4D5E), and continuous hexadecimal (for example, 001A2B3C4D5E) formats. RUCKUS One automatically processes the entered MAC address and performs the search without requiring you to reformat the value. The search field preserves the format in which the MAC address was entered.Additionally, you can filter the list by selecting one of the option from the Alias drop‑down list. The Alias filter includes All, Alias, and Non-Alias.
-
(Optional) Click the
 icon to update the table with the most recent
client data. The Auto
Refresh toggle automatically refreshes the table at regular intervals
when enabled, ensuring that the displayed client information remains current
without a manual refresh.
icon to update the table with the most recent
client data. The Auto
Refresh toggle automatically refreshes the table at regular intervals
when enabled, ensuring that the displayed client information remains current
without a manual refresh.
-
(Optional) Click the
 icon to download the switch client inventory list
in CSV format.
icon to download the switch client inventory list
in CSV format.