Editing a Switch
You can configure the properties of a switch to optimize network performance, enhance security, and manage traffic more effectively.
-
On the RUCKUS One web
interface, select Wired >
Switches > Switch
List.
The Switch List page is displayed.
- From the list of switches and stacks, click the checkbox for the switch or stack that you want to edit.
- Click Edit.The Switch Details Stack Details or Stack Details tab is displayed (as applicable).
Editing a Switch
-
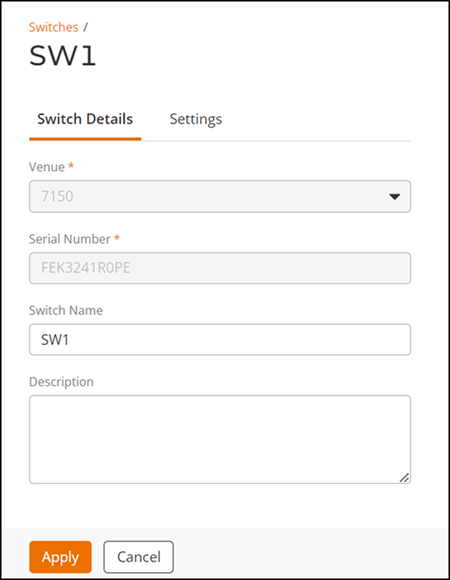
(Optional) Change or modify the
following details, as necessary. Available fields are dependent on whether you
are editing a single switch or a stack.
- Switch Name: Edit the switch name.
- Stack Name: Edit the stack name.
- Description: Edit the description of the switch or stack.
- Stack Member: Click
Add another member to add another switch to the stack. You
may also reorder the stack members by dragging-and-dropping their
icons.
- Click Apply if you are only editing the switch or stack details. Otherwise, proceed to the next step.
-
(Optional) Select the Settings tab.
On the Settings page, you can edit the following:
- IP Assignment
- DHCP: Dynamically assigns IP addresses to devices on a network.
- Static/Manual:
Manually configure the IP
Address, Subnet
Mask, and Default
Gateway IP addresses.Note: The IP address is the VE 1 IP address.
- Jumbo Mode: When enabled, this option allows transmission of jumbo frames on an Ethernet interface, improving network performance for applications that require high bandwidth data transfer, such as video streaming. Disabled by default, use the toggle to enable or subsequently disable this option.
- IGMP Snooping: Optimizes the delivery of multicast
traffic within a local area network (LAN). The following are the
available options:
- Active
- Passive
- None
- Spanning Tree
Priority: Spanning Tree Priority (STP) is a configurable
parameter on each switch. STP is used to determine the priority of the
switch in the spanning tree election process. Select the priority from
the drop-down menu.Note: Beginning with RUCKUS FastIron 10.0.20a and later, the Spanning tree protocol can be either set to RSTP or None, and the value of Spanning Tree Priority can be set to zero or increments of 4096.
- Static Routes: Static
routes are manually configured static routing entries in the routing
table of a switch. Click Add Route
to add a static route. The Add Route side bar is
displayed. Configure the Destination IP,
Next Hop, and
optionally, Admin
Distance, then click Add.
The ICX 8100 series now supports static routing across multiple virtual interfaces, enhancing Layer 3 capabilities. Support for static routing has been enhanced for the following ICX 8100 series switch models:
Table 1. Supported RUCKUS ICX 8100 Models Model Name Description ICX 8100-24 Standard 24-port switch ICX 8100-24P PoE-enabled 24-port switch ICX 8100-24P-X 10G 24‑port PoE‑enabled switch ICX 8100-24-X 10G 24‑port switch ICX 8100-48 Standard 48-port switch ICX 8100-48P PoE-enabled 48-port switch ICX 8100-48P-X 10G 48‑port PoE‑enabled switch ICX 8100-48PF PoE-enabled 48-port with additional features ICX 8100-48PF-X 10G PoE-enabled 48-port variant ICX 8100-48-X 10G variant of 48-port switch ICX 8100-C08PF Compact 8-port PoE switch ICX 8100-C08PF-X 10G compact 8-port PoE switch ICX 8100-C16P Compact 16-port PoE switch ICX 8100-C16P-X 10G compact 16-port PoE switch Before adding a static route, ensure your ICX device is running FastIron firmware version 10.0.10h or later. Refer to Firmware Update Management by Switches for instructions on upgrading your switch firmware.
- Port Authentication:
Disabled by default, you can enable or subsequently disable the Port
Authentication feature using the toggle. Once enabled, configure the
associated settings, such as Auth Default VLAN
and Guest VLAN.
The Authentication configuration settings are applied at the switch level, meaning all ports with Port Authentication enabled will inherit these settings unless custom settings are configured at the port level.
Port-specific custom settings override the switch-level settings. The Guest VLAN is exclusively a switch-level configuration.
- IP Assignment
- Click Apply to apply the configuration settings.