Adding an Existing Workflow to a New Workflow
You can add an existing workflow to the workflow you are building by using the Workflows Library. This allows you to reuse previously created workflows either as an independent copy or as a linked workflow reference. Reusing workflows helps streamline workflow creation, reduces duplication, and maintains consistency across onboarding workflows.
Note: When designing a workflow, you typically use the Actions
Library to add individual workflow steps. For details on adding actions, refer to
Designing the Workflow.
-
Click the Configure icon to open the Workflow
Designer.
Configuring a Workflow 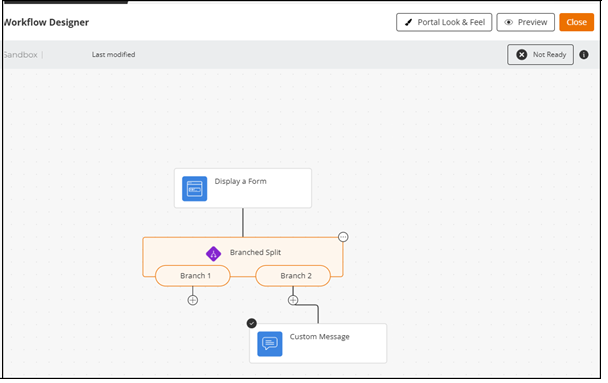
-
Click the
 icon to open the sidebar.
A sidebar is displayed, defaulting to the Actions Library tab.
icon to open the sidebar.
A sidebar is displayed, defaulting to the Actions Library tab. -
Select the workflow you want to reuse.
The system displays Preview and Add options.
Workflow Library 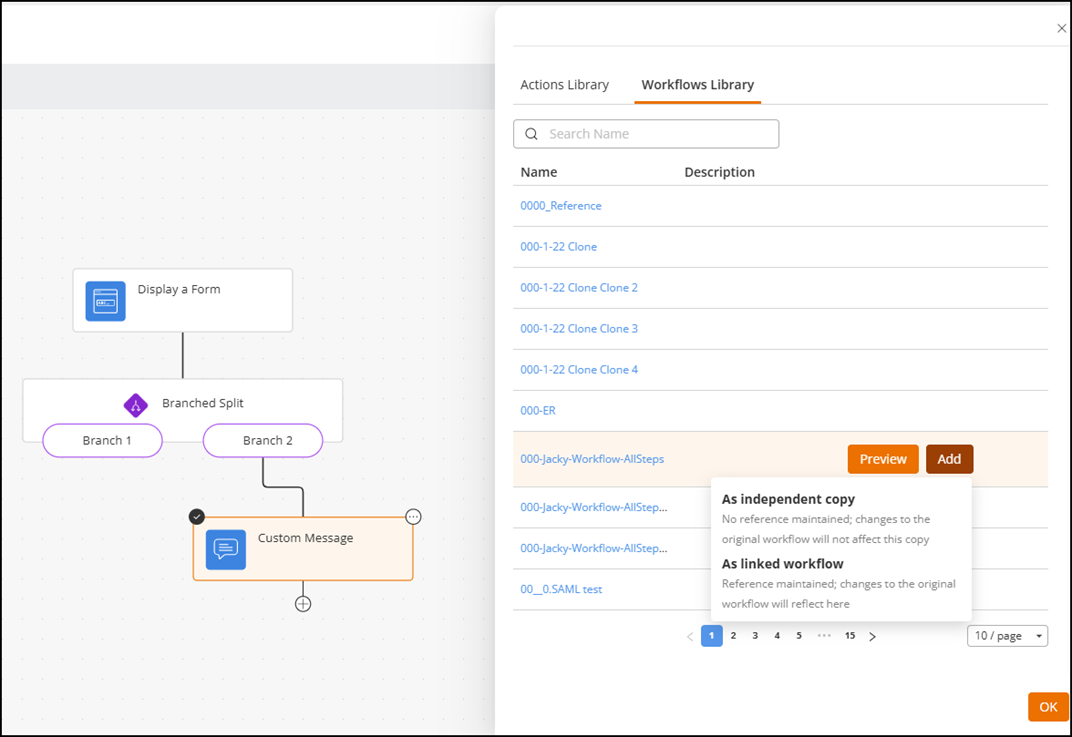
-
Click
Add, and choose one of the following:
- As independent
copy:
- Creates a standalone, editable copy of the workflow.
- Does not receive updates from the original workflow.
- Appears on the canvas without a blue border.
- Each step displays a
 icon for edit (
 ), preview (
 ), and delete (
 ) actions.
- As linked
workflow:
- Inserts the workflow as a reference to the original.
- Continues to reflect updates made to the source workflow until you publish your workflow.
- Converts into a snapshot at publish time.
- Appears inside a blue‑bordered block, indicating it is a referenced workflow.
- A
 icon appears at the exit point of
the referenced workflow.
icon appears at the exit point of
the referenced workflow. - Steps inside the referenced workflow cannot be edited
individually.Note: These rules apply whenever you add a linked workflow:
- You can only connect to end steps of a referenced workflow.
- You cannot insert steps inside a referenced workflow block.
- Circular references are not allowed; the UI prevents them automatically.
- All end steps of the referenced workflow must be connected to your workflow for validation to succeed.
Note: A appears when a step is selected. This applies to all steps, not just
referenced workflows.
appears when a step is selected. This applies to all steps, not just
referenced workflows. - As independent
copy:
-
Insert the workflow.
The workflow appears on the canvas as:
- A blue‑bordered block when added as a linked workflow.
- A set of individually
editable steps when added as an independent copy.
Workflows - Independent Copy and Linked Workflow 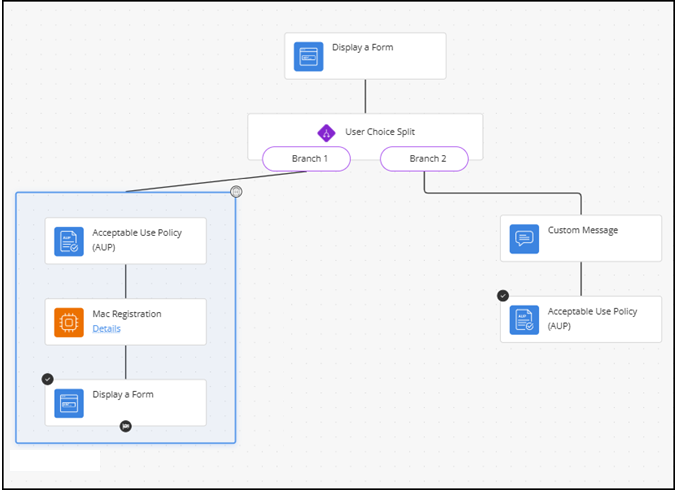
-
(Optional) Hover over the top
edge of the blue‑bordered block to display the
 icon. Click the icon and choose:
- Delete this block only: Removes the referenced workflow block and detaches downstream steps.
- Delete block and children: Removes the referenced workflow block along with all steps contained in it. The tooltip also displays Delete referenced workflow.
-
(Optional) Hover over a step to display the
icon. Click the icon and choose:
- Delete Step Only: Removes only the selected step.
- Delete Step and Children: Removes the selected step and all steps connected below it.
Note: These delete options apply to steps added manually and to steps inside an independent workflow copy. They also apply to any step that exists outside a referenced workflow block.