Viewing MSP Customers
You can view the MSP Customers associated with your RUCKUS One account.
-
On the navigation bar, select
.
The MSP Customers page is displayed.
MSP Customers 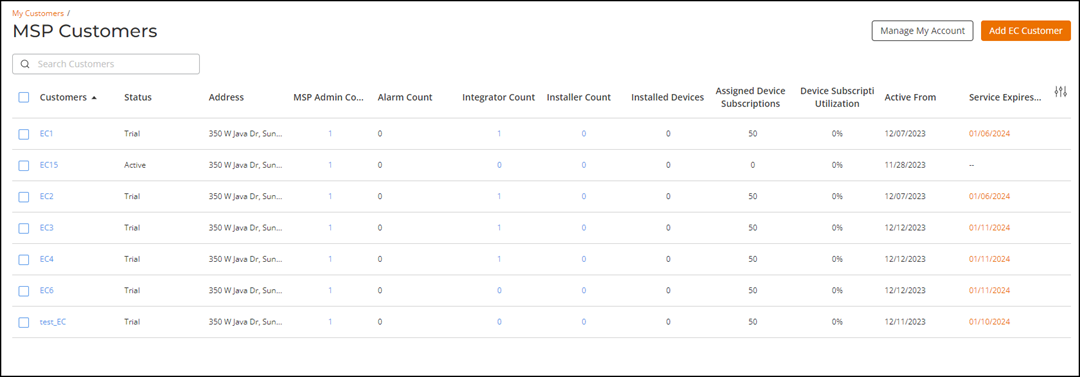
-
On the MSP
Customers page, you can review the list of existing
customers.
The page displays the following information:
- Customers: Displays the name of the customer.
For active customers, the name appears as a hyperlink that you can click to masquerade and login into the MSP Customer. For Inactive and customers, the name is shown as plain text, and the MSP cannot click to masquerade and login into the MSP Customer (the link is disabled).
- Service Mode: Displays the service mode for the MSP customer (Trial, Paid, Paid in Grace Period, or Paid Grace Expired).
- Service Status: Displays the service status of the MSP Customer (Active, Inactive, or Restricted).
- Address: Displays the address of the MSP Customer.
- MSP Admin Count: Displays the number of MSP administrators and privilege groups assigned to the customer. Click the number in the MSP Admin Count column to view information about the MSP administrator and associated privilege groups.
- Customer Admin Count: Displays the number of customer administrators.
- Alarm Count: Displays the number of active alarms.
- Integrator Count: Displays the number of Integrators assigned to the customer. Click the number in the Integrator Count column to view information about each Integrator. Refer to Assigning Multiple Integrators to MSP Customers.
- Installer Count: Displays the number of Installers assigned to the customer. Click the number in the Installer Count column to view information about each Installer. Refer to Assigning Multiple Installers to MSP Customers.
- Tags: Displays tags for each end customer as a hyperlink. Clicking the hyperlink opens the Manage Tags sidebar where you can assign or remove tags.
- Used Licenses: Displays the number of licenses currently in use.
- Assigned Licenses: Displays the number of assigned licenses.
- Device Subscriptions Utilization: Displays the percentage of device subscription utilization.
- Service Tier: Displays the customer’s RUCKUS One subscription level: Professional or Essentials.
- Service Created: Displays the date from which the account is active.
- Service Expires: Displays color-coded text to indicate whether the service is active (black), approaching expiration (orange), or expired (red).
- Tenant ID: Displays the unique identifier for the customer's RUCKUS One account.
You can customize which fields appear in the MSP Customers table by clicking the icon and selecting or deselecting the desired column names. Drag and drop
individual column names up or down the list to customize the left‑to‑right
column display in the table. Optionally, you can click Reset to default to have
the default subset of columns appear in the MSP Customers table.You can use the Search option to display only the table entries matching the specified Customers, Address, Tags, or Tenant ID; enter a minimum of two characters. Additionally, you can filter the list of MSP Customers by selecting one of the options from the drop-down menu of the Service Status, Service Mode, and Service Expiration Date fields. The service statuses include All, Active, Inactive, and Restricted. The service expiration date options are All, Expired, Non-Expired, services expiring within 30, 60, or 90 days, and services that expired in the last 30, 60, or 90 days.
icon and selecting or deselecting the desired column names. Drag and drop
individual column names up or down the list to customize the left‑to‑right
column display in the table. Optionally, you can click Reset to default to have
the default subset of columns appear in the MSP Customers table.You can use the Search option to display only the table entries matching the specified Customers, Address, Tags, or Tenant ID; enter a minimum of two characters. Additionally, you can filter the list of MSP Customers by selecting one of the options from the drop-down menu of the Service Status, Service Mode, and Service Expiration Date fields. The service statuses include All, Active, Inactive, and Restricted. The service expiration date options are All, Expired, Non-Expired, services expiring within 30, 60, or 90 days, and services that expired in the last 30, 60, or 90 days.The service mode options are All Service Modes, Trial, Paid, Paid in Grace Period, or Paid Grace Expired. The table updates automatically to display customers that match the selected option. Click Clear Filters to reset the filters. You can sort the list by clicking the associated column header.
- Customers: Displays the name of the customer.