You can edit an end customer's account
information and configuration settings.
Complete the following steps to edit an end
customer.
On the navigation bar, select
My
Customers > MSP
Customers.
The MSP
Customers page is displayed.
Select the checkbox alongside
the name of the customer and click Edit.
The Customer
Account page is displayed.
In the Account Details section,
you can modify the following information as required:
Customer
Name: Modify the customer name.
The Address and MSP
Administrators fields are read-only and cannot be
modified from this page.
Tags:
Modify the tag.
Review the
Subscription Service information.
In Subscription
Service, click Change. The
Change Subscription Service sidebar is displayed.
Modify the
following:
Service
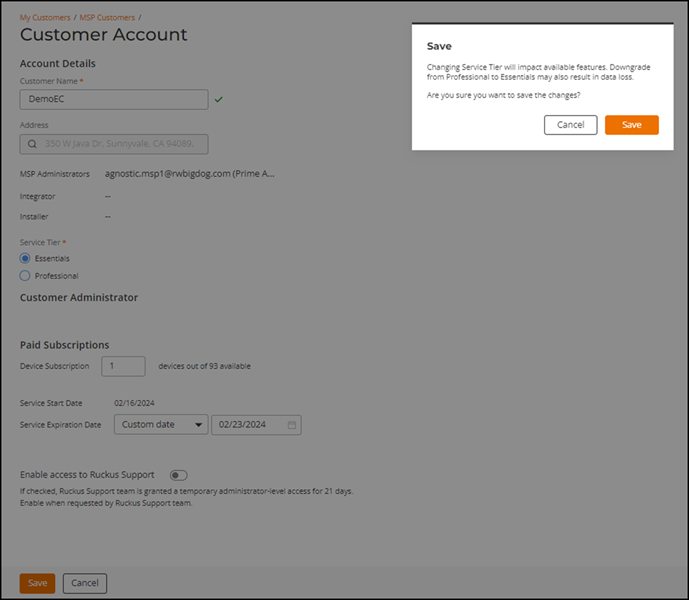
Tier: Displays the assigned service tier. When you
change the service tier, confirm the update before saving.
Note:
Changing the
Service
Tier affects the features available for that
tier. Downgrading from Professional to a lower tier results in data loss.
Customer Account - Changing the Service
Tier
Changes to
the Service
Tier are logged on the
Activities page, where the activity
status is displayed using the following color codes:
Completed (Green), Pending (Amber), Failed (Red), and In
Progress (Yellow).
Changes to
the Service
Tier setting are also captured in the
customer's RUCKUS One account by navigating
to Administration > Admin
Logs.
When you
change the Service
Tier in Edit Mode, regardless of any changes
to the number of assigned licenses or the service expiration
date, the system automatically expires the current MSP EC
service and creates a new one to maintain a clear historical
record of each MSP EC tier, including its corresponding
start and end dates.
Service
Mode: Displays the subscription mode for the customer
account. Depending on the selected mode, you can configure the
Device
Networking license count and the Service Expiration
Date. The Service Start
Date is displayed as read-only.
Note: The system displays the minimum required
licenses for the current configuration. If the number of available
licenses is less than the minimum required, change the Service
Expiration Date to determine whether additional
licenses are available.
Display Subscription
details to MSP Customer: Toggle the switch on to display
subscription details to MSP customers. This feature allows you to
configure the display of the history of services for this specific MSP
Customer to the MSP Customer users.
Note: When disabled, subscription details are not
displayed in Administration > Subscriptions > My
Subscriptions.
Display Subscription
details to Tech Partners: Toggle the switch on to
display subscription details to Tech Partners. This feature allows you
to configure the display of the history of services for this specific
MSP Customer to the Tech Partner users who have access to this MSP
Customer.
Note: When disabled, subscription details are not
displayed in Administration > Subscriptions > My
Subscriptions.
Display the message
below in the place of Subscription details: Select the
check box to display a custom message and when a custom message is
configured, it is displayed on the subscription page.
Message:
Enter the custom message. The message can contain up to 1,024
characters. This capability allows you to display a personalized message
to your MSP Customer that may include details like contact information
unique to this MSP Customer, or any other specific information for the
MSP Customer.
Note:
If
subscription details are hidden and the message option is
enabled, the configured message is displayed instead of the
subscription details.
If
subscription details are hidden for Tech Partners or MSP
Customers and the message option is disabled or the customer
message is empty, the Administration > Subscriptions menu and the My
Subscriptions tab are not displayed.
Toggle the Enable
application-recognition and control switch on to configure the
default ARC behavior for newly added MSP customers. This setting determines
whether application recognition and control (ARC) is enabled or disabled by
default for new WLAN networks.
Note: Only Prime Admins and
Administrators can override this setting. The overridden settings apply only
to newly created WLANs, and existing WLAN ARC settings remain
unchanged.
Note: In addition to editing the
customer page, you can masquerade as the customer and override the ARC
settings by navigating to the administration page (Administration > Account
Management > Privacy).
Toggle the Enable
access to RUCKUS Support switch on to grant temporary
administrator-level access to the RUCKUS Support team. This access is
automatically revoked after 21 days. Enable this only when requested by RUCKUS
Support.