Viewing and Scheduling Conference Room Events
- Conference rooms are managed as units and are separate from the Resident Portal functionality.
- Adding or importing conference rooms does not create calendar events.
- Calendar scheduling applies only to the selected conference room.
- Network access is granted only during the scheduled event time.
- Identities are automatically associated with the conference room when the event starts.
- Identities are automatically disassociated after the event ends based on system cleanup rules.
- Editing or deleting events affects scheduling only and does not modify the conference room configuration.
- Select event attendees from existing identities during scheduling; they are not associated at the conference room level.
- Ensure that the Enable Identity Auto Clean-up setting for the associated identity group is disabled to prevent inactive identities (over 30 days) from being removed before future events.
-
Schedule a new event. Click the
Scheduling sub-tab and then click Add
Event.
Alternatively, click Calendar in the upper-right corner of the details page for the selected conference room, and then click New Event.The New Event sidebar is displayed.
New Event 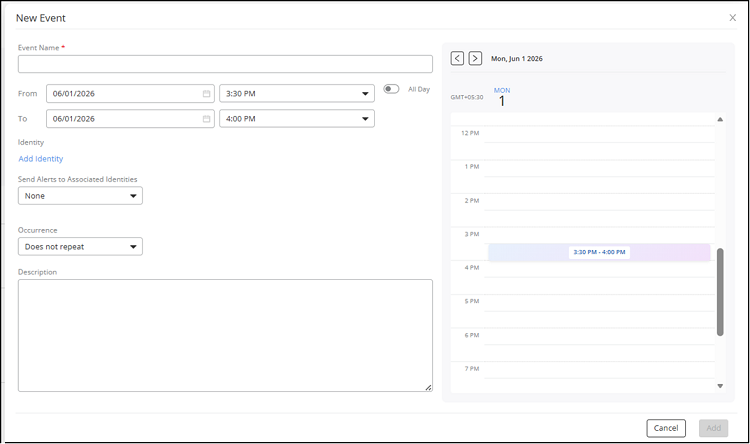 Complete the following fields to create the event, then click Add:
The event is created and appears in the Scheduling section. The Scheduling section displays Event Name, Identity, Status, Description, and When details of all future events (the system removes non-recurring events from the list when they are completed). The Event Name is a hyperlink that opens the Event Details page, and the Identity count is a hyperlink that opens the Identity sidebar, where you can associate or disassociate identities.
You can use the Search option to display only the table entries matching the specified Event Name, Description, and When; enter a minimum of two characters. Click Clear Filters to remove the applied filters.
You can customize which fields appear in the Scheduling table by clicking the
 icon and selecting or deselecting the desired column names. Drag and drop
individual column names up or down the list to customize the left‑to‑right
column display in the table. Optionally, you can click Reset to
default to restore the default subset of columns.
icon and selecting or deselecting the desired column names. Drag and drop
individual column names up or down the list to customize the left‑to‑right
column display in the table. Optionally, you can click Reset to
default to restore the default subset of columns. You can sort the list by event status or date/time by clicking the associated column header, Status or When, respectively.