Viewing and Marking Rogue APs in a Venue
You can view detailed information about rogue APs in a venue.
-
Click the venue name and then
select the sub-tab.
The Rogue APs page displays with the following information:
- BSSID: Displays the BSSID of the rogue AP.
- Category:
Displays the type of rogue AP. The options are Malicious, Ignored, Unclassified, and
Known.
-
- The
 icon indicates that the
rogue AP is malicious.Note: Each AP can handle a maximum of 500 malicious entries. Therefore, the system sends no more than 500 entries to each AP.
icon indicates that the
rogue AP is malicious.Note: Each AP can handle a maximum of 500 malicious entries. Therefore, the system sends no more than 500 entries to each AP. - The
 icon indicates that the
rogue AP is unclassified.
icon indicates that the
rogue AP is unclassified. - The
 icon indicates that the
rogue AP is known.
icon indicates that the
rogue AP is known. - The
 icon indicates that the
rogue AP is ignored.
icon indicates that the
rogue AP is ignored.
- The
-
- Classification Rule: Displays the rule applied to classify the rogue AP.
- SSID: Displays the SSID of the rogue AP.
- Channel: Displays the Wi-Fi channel used by the AP.
- Band: Displays the frequency band (2.4 GHz, 5 GHz, or 6 GHz).
- SNR: Displays the signal-to-noise ratio of the AP.
- Closest AP: Displays the name of the nearest AP as a hyperlink to open the Overview tab of the selected AP on the AP List page.
- Detecting APs: Displays the number of APs that detected the rogue AP.
- Last Seen: Displays the timestamp of the last detection.
- Locate
Rogue: Displays the location status of the rogue AP.
- The
 icon displays when the system
cannot determine the rogue AP's location because the detecting
APs are not placed on any floor plan. Hover over the icon to view the message.
icon displays when the system
cannot determine the rogue AP's location because the detecting
APs are not placed on any floor plan. Hover over the icon to view the message. - The
 icon displays when the rogue AP is
locatable. Click the icon to open a popup window that
displays the AP’s location along with the following details: Rogue MAC
Address, Category,
Classification Policy, and SSID.
icon displays when the rogue AP is
locatable. Click the icon to open a popup window that
displays the AP’s location along with the following details: Rogue MAC
Address, Category,
Classification Policy, and SSID. The floor plan displays both the detecting AP and the rogue AP.
Note:- At
least three detector APs must be deployed on the
same floor plan for full functionality. With fewer
than three APs, only the AP’s position displays, and
detection details may be limited. If any detector AP
is placed on a floor plan, the icon
appears.
- The
detecting AP and rogue AP on the Rogue AP details page appear in colors that
correspond to their assigned category. In the
following figure, the selected category is Unclassified. Therefore, the detecting AP is
displayed as a blue
 icon, and the rogue AP is
displayed as a blue
icon, and the rogue AP is
displayed as a blue  icon.
icon.
Locate Rogue - Rogue AP Details 
- At
least three detector APs must be deployed on the
same floor plan for full functionality. With fewer
than three APs, only the AP’s position displays, and
detection details may be limited. If any detector AP
is placed on a floor plan, the
- The
You can use the Search option to display only table entries that match the specified BSSID; enter a minimum of two characters. Additionally, you can filter the list by selecting one or more options from the Category drop-down menu, which includes Malicious, Ignored, Known, and Unclassified. Use the Clear Filters option to remove all applied filters.
You can also customize which table columns appear in the Rogue AP table by clicking the
 icon and selecting or deselecting the desired
columns. Optionally, click Reset to default to restore the default subset of columns in the
Rogue AP table.
icon and selecting or deselecting the desired
columns. Optionally, click Reset to default to restore the default subset of columns in the
Rogue AP table.Rogue APs Tab 
-
Unmark one or more rogue APs by
clicking the associated checkbox(es) and then clicking Unmark.
Rogue APs - Mark As and Unmark Options 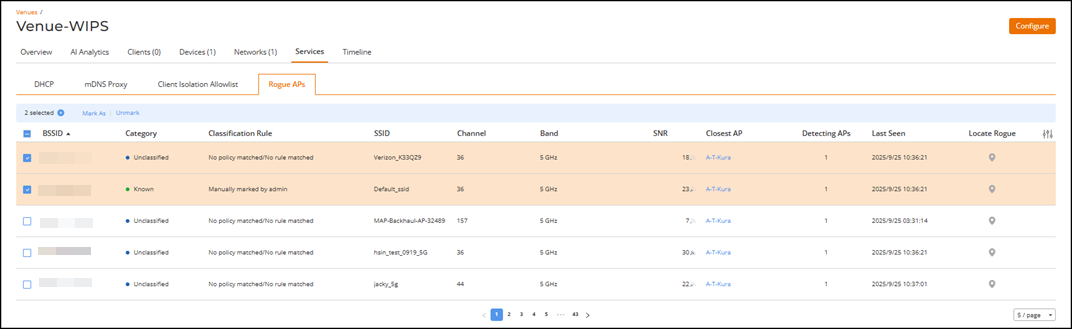 Note: Once unmarked, the Category and Classification Rule fields are updated with the latest rogue detection information.