You can enable and manage the DHCP service in a venue.
Complete the following steps to enable and manage
DHCP service.
On the navigation bar, click
Venues.
The Venues page is displayed.
Click the Venue name.
The venue details page is
displayed, defaulting to the Overview
tab.
Click the Services tab.
The DHCP tab is displayed, defaulting to the Wi-Fi
sub-tab.
Click Manage Local
Service.
The Manage Local DHCP for Wi-Fi
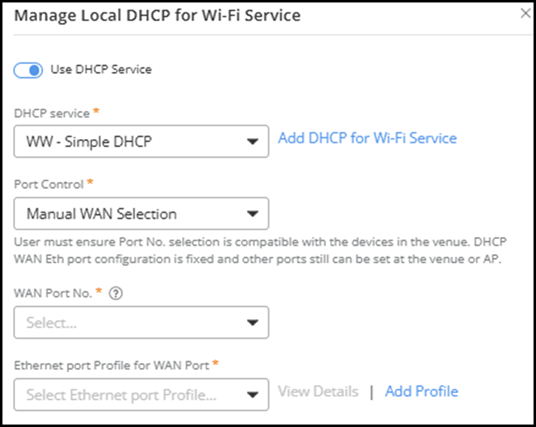
Service sidebar is displayed.Manage Local DHCP for Wi-Fi Service -
Simple DHCP Configuration
Toggle the Use DHCP Service
switch on.
Select the DHCP service from the
drop-down list.
If a DHCP for Wi-Fi service is
not yet defined, you can create a new one; click Add DHCP for Wi-Fi
Service, complete the fields in the Add DHCP for Wi-Fi page,
and click Add. You can then select the newly created DHCP service from
the DHCP
service drop-down. Refer to Adding and Managing a DHCP Service Profile for Wi-Fi for more
information.
Note: When you select a DHCP service that
uses Multiple AP DHCP
or Hierarchical AP
DHCP, the dialog displays additional server configuration
fields.
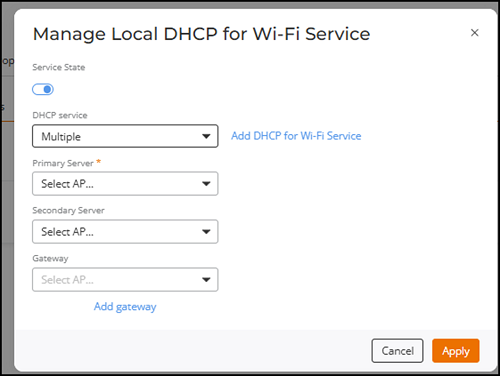
Manage Local DHCP for
Wi-Fi Service - Multiple AP DHCP ConfigurationConfigure the following:
Select the AP to use as
the primary DHCP server from the Primary
Server drop-down list.
(Optional) Select the AP
to use as the secondary DHCP server from the Secondary
Server drop-down list.
(Optional) Select the AP that provides
gateway functionality from the Gateways
drop-down list.
(Optional) Click Add
gateway to display an additional Gateways
field.
Note: The Add
gateway field appear only when you select a DHCP
service that uses Multiple AP DHCP.
(Optional) Click the
icon next to a gateway entry to remove
it.
 icon next to a gateway entry to remove
it.
icon next to a gateway entry to remove
it.