Adding and Managing Configuration Templates
MSP administrators can create configuration templates with pre-defined values and variables, which are RBAC controlled, and allow read-only access to LAN service providers (LSPs). The available types of configuration templates span all aspects of network management, including venues, networks, devices, services, policies, and identity group. An LSP can choose the appropriate configuration template and apply the same to a property or a set of properties.
-
In the navigation bar, select
Templates.
The Configuration Templatespage is displayed with the following information:
- Name: Displays the template name as a hyperlink.
Clicking the hyperlink opens the Template Details
sidebar.The Template Details sidebar displays the following information: Template Name, Type, Drift Status, Enforcement, Created By, Created On, Last Modified, Last Applied, and Configuration Details.
- Drift Status: Displays the current drift status. If a drift is detected, a Drift Detected hyperlink appears. Clicking the hyperlink opens the Drifts Report sidebar. Refer to Viewing and Syncing Config Template Drifts for more information.
- Configuration Details: The
View
Configuration hyperlink opens the
configuration details page for the selected template and
displays all defined parameters and values. When a template
is enforced, all fields appear in read-only mode. For
non-enforced templates, click Configure to modify editable fields. The
View
Configuration hyperlink appears only for
templates that contain saved configuration data; the
hyperlink is inactive when no configuration is
available.Note: The View Configuration hyperlink is not available for Switch CLI Profile and Switch Regular Profile templates. Its visibility is independent of the enforcement setting.
- Type: Displays the template category, such as Wi-Fi Network, Venue, or Service.
- Applied To: Displays the number of venues, networks, or devices where the template is applied.
- Enforcement: Displays whether the template is enforced or not enforced. If -- is displayed, the template is not enforced and the Enforcement template configuration option is not supported by the template type.
- Drift Status: Displays the current drift status. If In Sync is displayed, there is no drift between the template and its instances, indicating that all changes have been successfully synchronized. If a drift is detected, a Drift Detected hyperlink appears; clicking the hyperlink opens the Drifts Report sidebar. If -- is displayed, the template has never experienced drift. Once drift is detected, the status changes to Drift Detected. After a successful synchronization, it updates to In Sync. Thereafter, the status alternates between Drift Detected and In Sync, and does not revert to --.
- Created By: Displays the username of the administrator who created the template.
- Created On: Displays the date and time when the template was created.
- Last Modified: Displays the date and time when the template was last modified.
- Last
Applied: Displays the date and time when the template
was last applied. If -- is displayed, the template has never been applied to any
device.
You can use the Search option to display only the table entries matching the specified name; enter a minimum of two characters. Additionally, you can filter the list of configuration templates by selecting options from the drop-down menus of the Type, Enforcement, and Drift Status fields. The type menu supports multiple selections, including Access Control, AP Group, Application Policy, Device Policy, DHCP for Wi-Fi, DPSK, Guest Portal, Identity Group, IPSec, Layer 2 Policy, Layer 3 Policy, RADIUS Server, Rogue AP Detection, Switch CLI Profile, Switch Regular Profile, Syslog Server, Tunnel Profile, Venue, VLAN Pool, Wi-Fi Calling, and Wi-Fi Network. The enforcement options are Enforced and Not Enforced. The drift status options are Drift Detected and In Sync. Use the Clear Filters option to remove the applied filters.
- Name: Displays the template name as a hyperlink.
Clicking the hyperlink opens the Template Details
sidebar.
-
On the Configuration
Templates page, click Add Template.
A drop-down menu listing template options is displayed.
Configuration Templates - Add Template 
-
Select a template type and
follow the on-screen instructions to complete creating the configuration.
Note:
- This topic assumes that you are familiar with the process of configuring Wi-Fi networks, AP groups, venues, wired switch profiles, policies, services, and identity groups using the RUCKUS One portal. Refer to the RUCKUS One User Guide for more information.
- Identity Group is a required field for many network types and services, ensuring proper deployment and functionality.
- Networks and services reference the identity groups. When configuring a new network or service, you have the option to select an existing identity group or create a new one.
- Wi-Fi:
Select this option to create a Wi-Fi network or AP Group configuration
template. The following options are available:
- Wi-Fi Network: Select this option to create a Wi-Fi network configuration template. The Enforce template configuration option appears on the configuration page. Toggle it on to ensure that all direct changes on template-activated elements are blocked to enforce compliance with the template configuration.
- AP Group: Select this option to create an AP group configuration template.
- Venue: Select this option to create a venue
configuration template. The Enforce template
configuration option appears on the configuration page.
Toggle it on to ensure that all direct changes on template-activated
elements are blocked to enforce compliance with the template
configuration. Note: When the country in the Address field is set to any location within the United States, the default 2.4 GHz channels 1, 6, and 11 are automatically applied to the Venue Template upon creation.
These default channel settings are not visible during template creation. They become visible only after the template is applied and a venue is created under the user.
- Wired:
Select this option to create a configuration template for RUCKUS ICX
switches. The following options are available:
- Switch Regular Profile: Select this option to create a regular switch profile configuration template.
- Switch CLI Profile: Select this option to create a switch CLI profile configuration template.
- Services:
Select this option to create a service configuration template. The
following options are available:
- Access Control: Select this option to create an access control configuration template.
- DHCP for Wi-Fi: Select this option to create a DHCP service configuration template for Wi-Fi.
- DPSK: Select this option to create a DPSK service configuration template. The Enforce template configuration option appears on the configuration page. Toggle it on to ensure that all direct changes on template-activated elements are blocked to enforce compliance with the template configuration.
- Ethernet Port Profile: Select this option to create an Ethernet port profile configuration template.
- Guest Portal: Select this option to create a guest portal configuration.
- IPSec: Select this option to create a IPSec configuration template. The Enforce template configuration option appears on the configuration page. Toggle it on to ensure that all direct changes on template-activated elements are blocked to enforce compliance with the template configuration.
- RADIUS Server: Select this option to create a RADIUS server configuration template. The Enforce template configuration option appears on the configuration page. Toggle it on to ensure that all direct changes on template-activated elements are blocked to enforce compliance with the template configuration.
- Rogue AP Detection: Select this option to create a rogue AP detection configuration template.
- Syslog Server: Select this option to create a syslog server configuration template.
- Tunnel Profile: Select this option to create a Tunnel Profile configuration template.
- VLAN Pools: Select this option to create a VLAN pool configuration template.
- Wi-Fi Calling: Select this option to create a Wi-Fi calling configuration template. The Enforce template configuration option appears on the configuration page. Toggle it on to ensure that all direct changes on template-activated elements are blocked to enforce compliance with the template configuration.
- Identity Group: Select this option to create an identity group configuration template.
Note: Configuration templates for mDNS and Client Isolation features are not supported. -
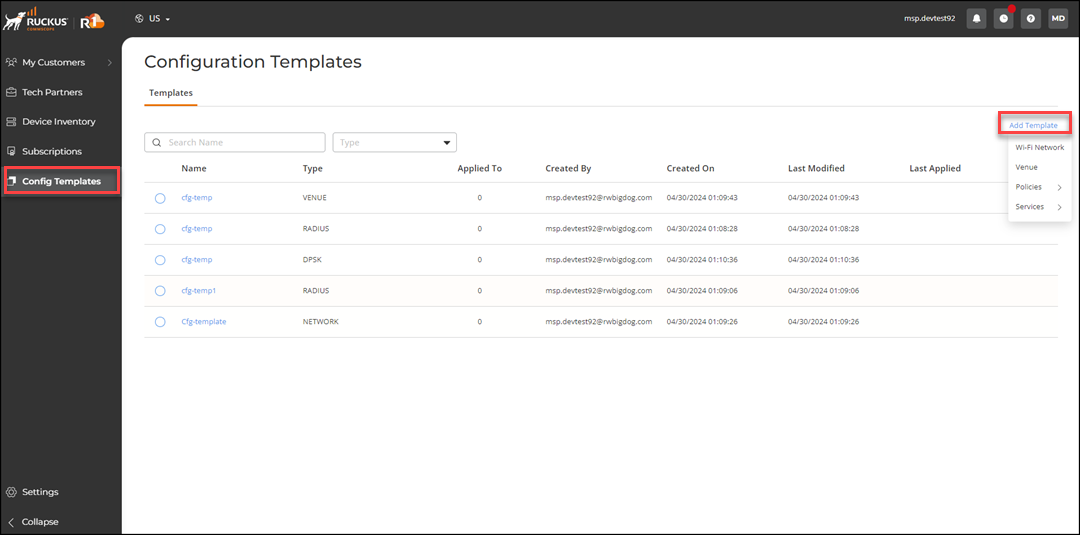
(Optional) You can manage
configuration templates from the Configuration Templates
page using the following options:
Configuration Templates - Template Management Options
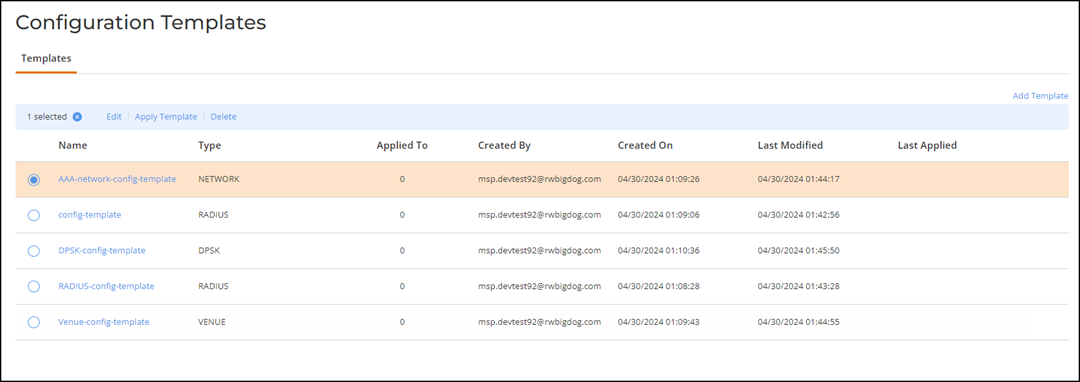
Note: Available options differ based on the type of template selected and whether drift is detected.- Edit: Select the checkbox next to the Name column
and click Edit.
The selected template page is displayed, showing fields and tabs specific to the template type. You can view or modify configuration details and click Save to apply changes.
- Clone: Select the checkbox next to the Name column
and click Clone.
-
A Clone Template dialog box appears where you can enter the new Name (up to 32 characters) and click Save.Note: The Clone operation is supported only for Wi-Fi Network, Venue, DPSK, and Wi-Fi Calling configuration templates.
-
- Apply Template: Select the checkbox next to the Name column and click Apply Template. Refer to Applying a Configuration Template to an End Customer for more information.
- Show
Drifts: Select the checkbox next to the Name column
and click Show
Drifts to view and synchronize configuration differences
between the applied configuration and the template. Refer to
Viewing and Syncing Config Template Drifts for more
information. Note: The Show Drifts and Sync options are available only for templates that have been applied to venues, networks, or devices and have a status of Drift Detected.
- Delete: Select the checkbox next to the Name column
and click Delete.
A delete configuration confirmation dialog box appears. Click Delete Config Template to confirm deletion.
- Edit: Select the checkbox next to the Name column
and click Edit.