Editing or Deleting the RADIUS Server Profile
You can edit or delete a RADIUS Server profile to update its configuration or remove it when it is no longer needed.
Note: The record cannot be deleted if it is currently in use within a
network.
Complete the following steps to edit or delete the RADIUS Server profile:
-
In the My Services
page, click RADIUS Server.
The RADIUS Server page is displayed. The page displays the list of all the RADIUS Server profiles defined in the RUCKUS One account:
- Name: Displays the name
of the RADIUS Server profile as a hyperlink. Clicking the hyperlink opens the RADIUS
Server Details page.
The Details page displays Profile Type, Primary Server, RadSec status, SAN identity, Trusted CA, Client Certificate, and Server Certificate. The page also lists the Instances that use this RADIUS Server, indicating where the server is applied. The Configure button allows you to modify the RADIUS Server settings.
- RADIUS Type: Displays the type of RADIUS Server (Authentication or Accounting)
- Primary Server: Displays the IP address of the primary RADIUS Server.
- Secondary Server: Displays the IP address of the secondary RADIUS Server.
- RadSec: Displays a checkmark if RadSec is enabled
- CA: Displays the Certificate Authority (CA) associated with the RADIUS Server profile.
- Client Certificate: Displays the client certificate associated with the RADIUS Server profile. If any warning icon appears next to the client certificate, pause the pointer to view additional details about the client certificate.
- Server Certificate:
Displays the server certificate associated with the RADIUS Server profile. If any
warning icon appears next to the server certificate, pause the pointer to view
additional details about the server certificate.Note: The certificate names displayed in the CA, Client Certificate, and Server Certificate columns are hyperlinks. Clicking a certificate name opens the Certificate Management page and automatically displays the corresponding tab with the selected certificate listed.
- Networks: Displays the number of networks that are currently associated with this RADIUS Server profile. Pause the pointer on the network count number to view the network names.
- Identity Provider: Displays how many identity sources are associated with the RADIUS Server.
You can customize which fields appear in the RADIUS Server table by clicking the icon and
selecting or deselecting the desired column names. Optionally, you can click Reset to default to restore
the default subset of columns.
icon and
selecting or deselecting the desired column names. Optionally, you can click Reset to default to restore
the default subset of columns.RADIUS Server Page 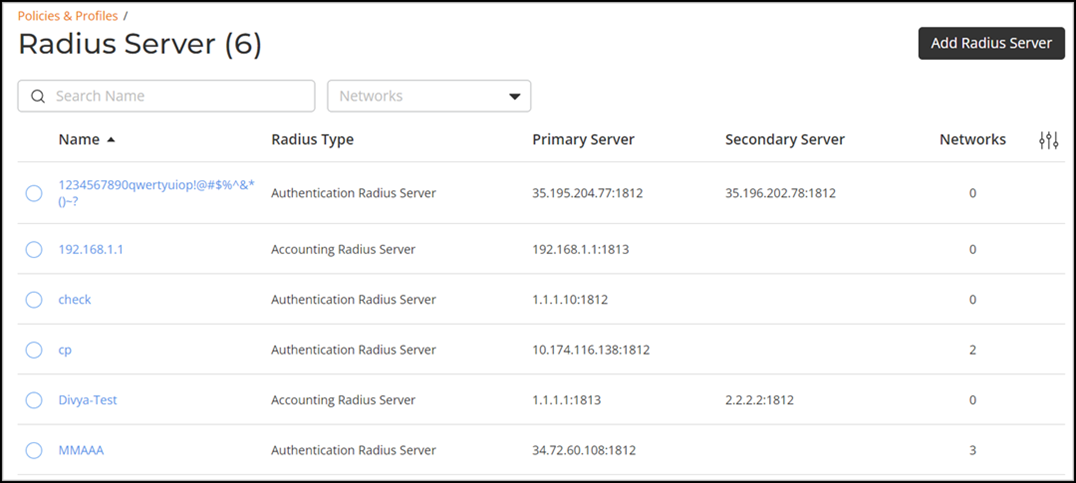
- Name: Displays the name
of the RADIUS Server profile as a hyperlink. Clicking the hyperlink opens the RADIUS
Server Details page.
-
Click Edit to modify the RADIUS
Server configuration.
The Edit RADIUS Server page is displayed.
Edit RADIUS Server 
-
Update the required fields as
needed:
- Profile Name
- TypeNote: User Role Mapping is available only for Authentication RADIUS Servers and is not supported for Accounting RADIUS Servers.
- Primary Server
- Secondary Server
- Enable RadSec (over
TLS): RadSec can be enabled only at creation time; therefore, the
Enable RadSec (over
TLS) toggle remains disabled on the Edit RADIUS
Server page:
- RadSec not enabled during creation cannot be enabled later.
- RadSec enabled during RADIUS
Server creation allows editing of the following fields: CN/SAN Identity,
Trusted
Certificate Authority, Client
Certificate, and Server
Certificate.
Enabling RadSec configures the RADIUS Server to communicate over port 2083 by default.
- User Role Mapping
- Click Add Role Mapping to create a user role mapping.
- Set the priority of user role
mappings by dragging and dropping the user role up or down using the
 icon on the far right side of the table.
 - Select a user role mapping and click Edit to modify it, or click Delete to remove it.
Refer to Adding and Managing a RADIUS Server for more information. -
Update the required fields as
needed: