Access Control Policy Details
The access control feature is a method for identifying, authenticating, and authorizing wireless devices that request access to the network server. The network security is managed by creating access control rules and policies that limit user access and deny access to devices that do not follow the access control rules and policies. This feature allows you to configure access policies from Layer 2 to Layer 7.
Complete the following steps to view the Access Control policy details:
-
In the My
Services page, click Access Control.
The Access Control page is displayed, defaulting to the Wi-Fi tab.
Access Control Page 
The Wi-Fi tab is organized into the following sub-tabs:
- Access Control Set: This tab displays the Name of each Access Control Set along with the associated Layer 2, Layer 3, Device & OS, Applications, Client Rate Limits, and the number of Networks to which each Access Control Set is applied.
- Layer 2: This tab displays the Name of each Layer 2 policy along with the configured MAC Address, Description, and the number of Networks to which each Layer 2 policy is applied.
- Layer 3: This tab displays the Name of each Layer 3 policy along with the configured Rules, Description, and the number of Networks to which each Layer 3 policy is applied.
- Device & OS: This tab displays the Name of each Device & OS policy along with the configured Rules, Description, and the number of Networks to which each Device & OS policy is applied.
- Applications: This tab displays the Name of
each Application policy along with the configured Rules,
Description, and the number of Networks
to which each Application policy is applied.
You can use the Search option to display only the table entries matching the specified Name; enter a minimum of two characters. Additionally, you can filter the list by selecting one of the options from the drop-down menu of the Network field. Click Clear Filters to reset the filters. You can sort the list by clicking the associated column header.
You can customize which fields appear in the table by clicking the
 icon and selecting or deselecting the
desired column names. Optionally, you can click Reset to
default to restore the default subset of
columns.
icon and selecting or deselecting the
desired column names. Optionally, you can click Reset to
default to restore the default subset of
columns.
-
(Optional) Click the Access Control Set sub-tab.
-
Click the name in the Name column.
The Access Control Details page is displayed.
This page displays the details of a selected Access Control Set. It shows the Access Control Set name at the top and indicates which policy types are enabled or disabled, including Layer 2, Layer 3, Device & OS, Applications, and Client Rate Limit. Below, the Instance section lists the networks to which this Access Control Set is applied, including the Network Name, Type, and associated Venues; a search field allows you to find a network by name.
You can use the Configure button to modify the Access Control Set settings.Access Control Policy Details Page 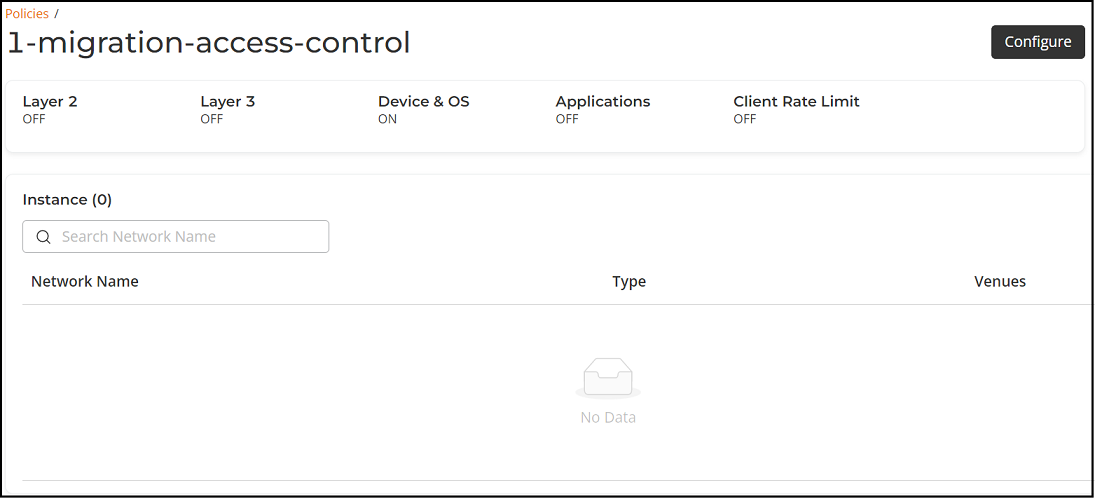
-
Click the drop-down
arrow next to the
 icon to open the options menu. Toggle the
Auto Refresh
switch to on to enable the auto refresh functionality. This
automatically refreshes the page at regular intervals.
icon to open the options menu. Toggle the
Auto Refresh
switch to on to enable the auto refresh functionality. This
automatically refreshes the page at regular intervals.
-
Click the name in the Name column.
-
(Optional) Select the Switch tab.
The Switch tab is organized into the following sub-tabs:
- Access Control
Set: This tab displays the list of Access Control Sets
created for Switches. The table shows the Name of
each Access Control Set and the associated Layer 2
policy.
The details page displays the details of a selected Access Control Set. It indicates whether the Layer 2 policy is enabled or disabled.
You can use the Search option to display only the table entries matching the specified Name; enter a minimum of two characters. Click Clear Filters to reset the filters. You can sort the list by clicking the associated column header.
You can customize which fields appear in the table by clicking the
icon and selecting or deselecting the
desired column names. Optionally, you can click Reset to
default to restore the default subset of
columns. - Layer 2: This tab displays the list of Layer 2 ACL
policies for Switches. The table shows the ACL Name,
the number of configured Rules,
the number of associated Switches,
and the number of associated Venues.
The details page displays the details of a selected Layer 2 access control policy. It shows the policy name at the top and provides Overview and Rules views. The Overview view lists the switch instances where the Layer 2 policy is applied, including Switch, Model, Ports, and Venue, with options to search and filter switches. The Rules view displays the configured Layer 2 rules, including Action, Source MAC Address, Source Mask, Destination MAC Address, and Destination Mask. The Configure button allows you to edit the Layer 2 policy settings.
You can use the Search option to display only the table entries matching the specified ACL Name; enter a minimum of two characters. Click Clear Filters to reset the filters. You can sort the list by clicking the associated column header.
You can customize which fields appear in the table by clicking the
icon and selecting or deselecting the
desired column names. Optionally, you can click Reset to
default to restore the default subset of
columns.
- Access Control
Set: This tab displays the list of Access Control Sets
created for Switches. The table shows the Name of
each Access Control Set and the associated Layer 2
policy.